
I’m not exaggerating when I say I’ve made these cookies at least 200 times in the last five years.
They’re the cookies I bring to every gathering, the ones my husband requests on repeat, and the recipe I’ve texted to friends more times than I can count.
And here’s the thing: they’re not complicated. No overnight chilling, no fancy ingredients you can’t pronounce, no stress.
Just really, really good chocolate chip cookies that turn out perfect every single time.
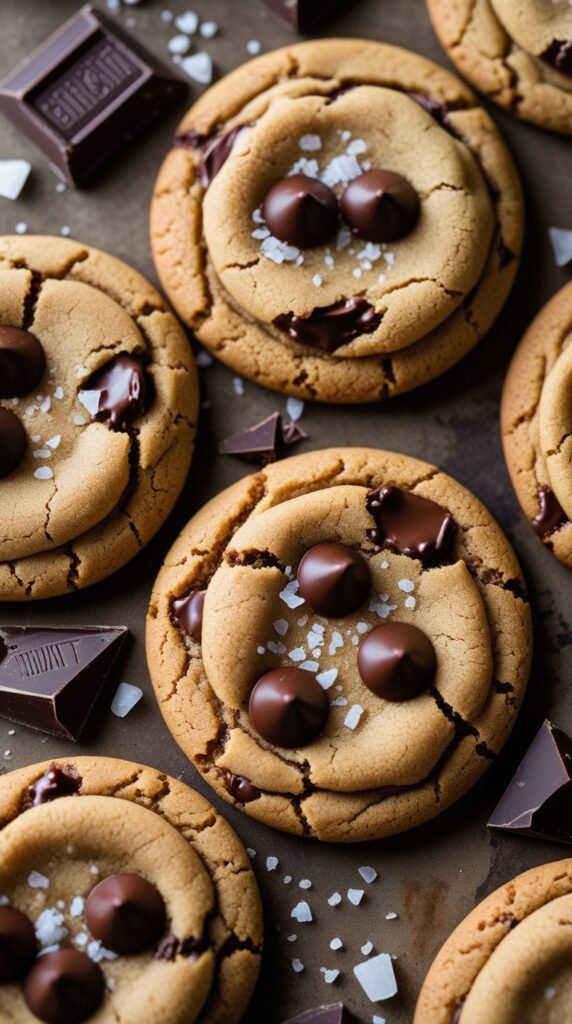
The edges get this beautiful golden crisp while the centers stay soft and chewy. The chocolate-to-cookie ratio is spot on. And that first bite when they’re still warm? I’m pretty sure that’s what heaven tastes like.
I’ve tweaked this recipe so many times over the years, and this version is it. This is the one.
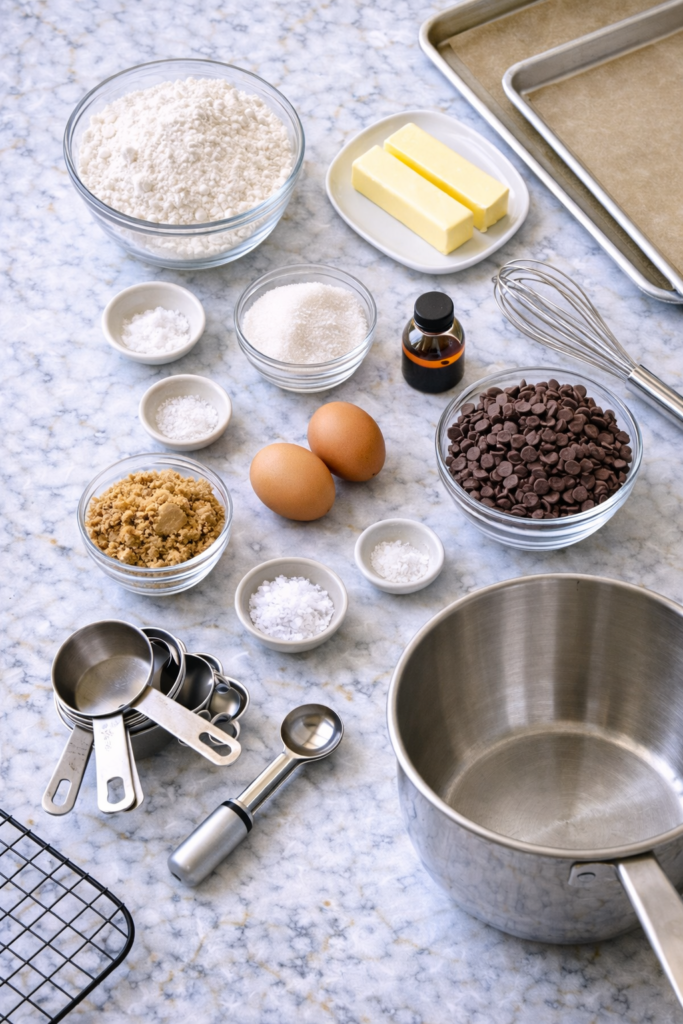
What You’ll Need
Dry Ingredients
| Ingredient | Amount | Notes |
|---|---|---|
| All-purpose flour | 2 ¼ cups | Spoon and level, don’t pack |
| Baking soda | 1 teaspoon | Fresh = better rise |
| Salt | 1 teaspoon | Balances the sweetness |
Wet Ingredients
| Ingredient | Amount | Notes |
|---|---|---|
| Unsalted butter | 1 cup (2 sticks) | Room temp, not melted |
| Granulated sugar | ¾ cup | For crispy edges |
| Brown sugar | ¾ cup packed | For chewy centers |
| Large eggs | 2 | Room temperature works best |
| Vanilla extract | 2 teaspoons | Pure, not imitation |
Mix-Ins
| Ingredient | Amount | Notes |
|---|---|---|
| Semi-sweet chocolate chips | 2 cups | Or your favorite chocolate |
| Flaky sea salt | For topping | Optional but amazing |
Tools You’ll Need
You may also like : chocolate cupcake recipe
Essential:
- Stand mixer or hand mixer
- 2-3 baking sheets
- Parchment paper or silicone baking mats
- 2-tablespoon cookie scoop
- Wire cooling rack
Nice to Have:
- Kitchen scale (for precision)
- Offset spatula
- Extra bowl for chocolate chips
Cookie Texture Comparison Chart
Here’s what happens with different baking times:
| Baking Time | Edge Texture | Center Texture | Best For |
|---|---|---|---|
| 8-9 minutes | Soft, barely set | Very gooey | Cookie dough lovers |
| 9-11 minutes ⭐ | Golden, crispy | Soft & chewy | Perfect balance |
| 11-13 minutes | Crispy | Slightly chewy | Dunking in milk |
| 13+ minutes | Very crispy | Firm | Crunchy cookie fans |
⭐ = My recommended time
Pro Tips
Butter Temperature Matters
Your butter should be 65-68°F. Press it with your finger – it should leave an indent but not sink in. Too soft = flat cookies. Too cold = cakey cookies.
Use a cookie scoop. I resisted this for years and just used spoons. Big mistake. A scoop gives you perfectly sized cookies that bake evenly every time. Plus, it’s so much faster.
Don’t skip the sea salt on top. I know it seems extra, but that little sprinkle of flaky salt before baking takes these from really good to absolutely incredible. The sweet-salty combo is addictive.
Rotate your baking sheets halfway through. Ovens have hot spots. Rotating ensures even browning and prevents burnt bottoms.
Pull them out when they look slightly underdone. They’ll keep cooking on the hot pan after you remove them from the oven. If you wait until they look fully baked, they’ll end up overdone and crunchy instead of chewy.
The Secret to Bakery-Style Cookies
Want to know what separates homemade from bakery cookies? Here’s what professional bakers do differently:
| Home Baker Method | Bakery Method | Why It Works |
|---|---|---|
| Mixed butter/sugar for 1 min | Creamed for 3-5 minutes | More air = lighter texture |
| Baked immediately | Dough chilled 2+ hours | Less spread, thicker cookies |
| Even chocolate distribution | Extra chips pressed on top | Visual appeal + chocolate in every bite |
| Regular salt | Flaky finishing salt | Flavor contrast |
| Standard size | Slightly larger portions | That “wow” factor |
You don’t have to do all of these, but even one or two will level up your cookies dramatically.
You’ll love these too : best chocolate chip cookie recipe
How to Make Chocolate Chip Cookies
Step-by-Step Instructions
Step 1: Prep (5 minutes)
Heat your oven to 375°F. Line your baking sheets with parchment paper.
I like to prep all three sheets at once so I can keep the cookies going in batches without waiting.
Step 2: Mix Dry Ingredients (2 minutes)
In a medium bowl, whisk together:
- 2 ¼ cups flour
- 1 tsp baking soda
- 1 tsp salt
Set this aside. Super simple.
Step 3: Cream Butter and Sugars (3-4 minutes)
This is where the magic happens. In your stand mixer, beat together:
- 1 cup softened butter
- ¾ cup granulated sugar
- ¾ cup brown sugar
Beat on medium speed for 3 minutes minimum. You want it light, fluffy, and almost doubled in volume.
Quick Tip: If your mixture looks curdled or separated, your butter was too cold. Let it sit for 5 minutes, then beat again.
Step 4: Add Eggs and Vanilla (1 minute)
Beat in the eggs one at a time. Make sure each one is fully mixed in before adding the next.
Then add 2 teaspoons of vanilla and mix until combined.
Your dough should look smooth and creamy at this point.
Step 5: Combine Wet and Dry (2 minutes)
Turn your mixer to low. Gradually add the flour mixture, mixing just until you don’t see any more dry flour.
Do not overmix. Once the flour disappears, stop. Overmixing = tough cookies.
Step 6: Fold in Chocolate (1 minute)
Use a spatula or wooden spoon to stir in 2 cups of chocolate chips.
I always save a handful to press into the tops before baking. It makes them look so much prettier.
Step 7: Scoop the Dough (5 minutes)
Using your 2-tablespoon cookie scoop, drop rounded balls of dough onto your prepared baking sheets.
Leave about 2 inches between each cookie. They spread quite a bit.
Step 8: The Finishing Touches (2 minutes)
Press a few extra chocolate chips into the top of each cookie. This is what gives you that bakery look.
If you’re using flaky sea salt, sprinkle just a tiny pinch on each one now. Trust me on this.
Step 9: Bake (9-11 minutes)
Pop them in the oven. Set your timer for 5 minutes, then rotate the pan.
Bake for another 4-6 minutes until the edges are golden brown and the centers still look slightly underdone.
Recommended for you : hot chocolate recipe
Step 10: Cool (5 minutes on pan, then transfer)
This is crucial: Let the cookies sit on the hot baking sheet for 5 minutes. They’re finishing cooking right now.
After 5 minutes, transfer them to a wire rack to cool completely.
While one batch cools, get the next batch in the oven.
Total Time Breakdown
| Task | Time |
|---|---|
| Prep & ingredient gathering | 10 minutes |
| Mixing dough | 15 minutes |
| Baking (per batch of 12) | 11 minutes |
| Cooling | 10 minutes |
| Total for first batch | 46 minutes |
| Full recipe (4 batches) | 1 hour 30 minutes |
Substitutions and Variations
Chocolate Options
| Type | Flavor Profile | Best For |
|---|---|---|
| Semi-sweet chips (original) | Balanced, classic | Everyone |
| Dark chocolate chunks | Rich, less sweet | Adults, coffee pairing |
| Milk chocolate chips | Sweet, creamy | Kids, milk dunking |
| White chocolate chips | Sweet, vanilla notes | Mix with cranberries |
| Mixed chocolates | Complex, interesting | Impressing guests |
My favorite combo? Half dark chocolate chunks, half semi-sweet chips. The variety in each bite is 🔥
Flavor Variations
Brown Butter Version
- Melt butter in a saucepan over medium heat
- Swirl occasionally until golden brown and nutty-smelling
- Cool completely before using
- Result: Deep, caramel-like flavor
Espresso Chocolate Chip
- Add 1 tablespoon instant espresso powder with dry ingredients
- Doesn’t taste like coffee
- Makes chocolate flavor more intense
Salted Caramel
- Swirl in ½ cup caramel sauce after adding chocolate chips
- Don’t overmix – you want caramel ribbons
- Add extra sea salt on top
Double Chocolate
- Replace ½ cup flour with ½ cup cocoa powder
- Use mix of semi-sweet and white chocolate chips
- Bake 1 minute less
Dietary Swaps
| Need | Swap | Notes |
|---|---|---|
| Gluten-free | 1:1 GF flour blend | Slightly different texture |
| Dairy-free | Vegan butter | Use room temp |
| Less sugar | Reduce each sugar by ¼ cup | Less crispy edges |
| Vegan | Flax eggs (2 tbsp flax + 6 tbsp water) | Let sit 5 min before using |
Size Variations
Mini Cookies (1 tablespoon scoop)
- Bake 7-9 minutes
- Makes about 72 cookies
- Perfect for parties
Regular Cookies (2 tablespoon scoop) ⭐
- Bake 9-11 minutes
- Makes about 48 cookies
- All-purpose size
Bakery-Style (3 tablespoon scoop)
- Bake 12-14 minutes
- Makes about 32 cookies
- Impressive, Instagram-worthy
Make Ahead Tips
Freezing Options Compared
| Method | Storage Time | Convenience | Best For |
|---|---|---|---|
| Freeze dough balls | 3 months | Bake anytime | Spontaneous cravings |
| Freeze dough log | 3 months | Slice & bake | Quick batches |
| Refrigerate dough | 3 days | Ready to scoop | Weekend baking |
| Freeze baked cookies | 3 months | Grab & go | Meal prep |
How to Freeze Cookie Dough
Method 1: Pre-Scooped (My Favorite)
- Scoop all cookies onto a baking sheet
- Freeze until solid (about 2 hours)
- Transfer to freezer bag with parchment between layers
- Label with date
- Bake from frozen, add 1-2 extra minutes
Method 2: Dough Log
- Shape dough into 2-inch diameter logs
- Wrap tightly in plastic wrap, then foil
- Label with baking instructions
- Thaw 30 minutes, slice, bake as normal
Method 3: Refrigerated (Short-Term)
- Keep dough in airtight container up to 3 days
- Let sit 15 minutes before scooping
- Actually improves flavor (the sugars dissolve more)
Pro Move: I always keep a bag of frozen cookie dough balls in my freezer. When unexpected guests arrive or I need a quick dessert, I just bake 4-6 cookies fresh. Takes 13 minutes total and they think I’m a baking genius. 😏
Nutritional Information
Per Cookie (Based on 48 cookies)
| Nutrient | Amount | % Daily Value* |
|---|---|---|
| Calories | 130 | – |
| Total Fat | 6g | 8% |
| Saturated Fat | 4g | 20% |
| Cholesterol | 20mg | 7% |
| Sodium | 85mg | 4% |
| Total Carbs | 18g | 6% |
| Dietary Fiber | 0.5g | 2% |
| Sugars | 11g | – |
| Protein | 1.5g | – |
*Based on 2,000 calorie diet
Calorie Comparison by Size
| Cookie Size | Calories | Fat | Sugar |
|---|---|---|---|
| Mini (1 tbsp) | 65 | 3g | 6g |
| Regular (2 tbsp) | 130 | 6g | 11g |
| Bakery (3 tbsp) | 195 | 9g | 17g |
Leftovers and Storage
Storage Methods Compared
| Method | Duration | Texture After | Best For |
|---|---|---|---|
| Airtight container (room temp) | 5 days | Soft if done right | Daily snacking |
| Airtight container + bread slice | 7 days | Stays soft | Keeping them fresh |
| Refrigerated | 10 days | Firms up | Hot climates |
| Frozen (baked) | 3 months | Like fresh when reheated | Long-term storage |
The Bread Slice Trick
Here’s something most people don’t know:
Put a slice of white bread in your cookie container. The cookies will absorb moisture from the bread and stay soft for days longer.
Replace the bread every 2-3 days. Yes, it sounds weird. Yes, it actually works.
Reheating Guide
| Method | Time | Result | Best For |
|---|---|---|---|
| Microwave | 10-15 seconds | Soft, warm | Quick fix |
| Oven (300°F) | 5 minutes | Crispy edges, gooey center | Best texture |
| Air fryer (300°F) | 3 minutes | Crispy all over | Crunchy lovers |
| Toaster oven | 4 minutes | Even warming | Single servings |
Secret Tip: Slightly underbake your cookies if you know you’ll be reheating them. They’ll be perfect after reheating instead of overdone.
Troubleshooting Guide
Common Problems & Solutions
| Problem | Likely Cause | Solution |
|---|---|---|
| Cookies spread too much | Butter too warm | Chill dough 30 min before baking |
| Cookies too thick/cakey | Too much flour | Measure by spooning, not scooping |
| Cookies too hard | Overbaked | Reduce time by 1-2 minutes |
| Flat, crispy cookies | Not enough flour or old baking soda | Check measurements & ingredient freshness |
| Burnt bottoms | Oven too hot or dark pans | Use light-colored pans, reduce temp to 350°F |
| Chocolate sinks | Chips too heavy | Toss chips in 1 tbsp flour first |
| Cookies stick to pan | No parchment | Always use parchment or silicone mats |
Butter Temperature Chart
This is crucial and most people get it wrong:
| Butter State | Temperature | What Happens | Cookie Result |
|---|---|---|---|
| Too cold | <60°F | Won’t cream properly | Cakey, doesn’t spread |
| Perfect | 65-68°F | Creams beautifully | Ideal texture ⭐ |
| Too soft | 70-75°F | Creams but lacks structure | Flat, greasy |
| Melted | 80°F+ | No air incorporation | Very flat, crispy |
Test it: Press your finger into the butter. It should leave an indent but not sink in completely.
FAQ
Baking Questions
Why are my cookies flat?
This usually happens when the butter is too warm or melted. Make sure your butter is softened but still cool to the touch (65-68°F).
Other causes:
- Not enough flour (measure correctly!)
- Old baking soda (test it by adding to vinegar – should fizz)
- Dough was too warm when it went in the oven
Can I use salted butter?
Yes, but reduce the salt in the recipe to ½ teaspoon. I prefer unsalted butter because it gives you more control over the final flavor.
Why did my cookies turn out cakey instead of chewy?
Three main reasons:
- Too much flour (spoon and level, don’t scoop)
- Overbaked (pull them when centers look slightly underdone)
- Not enough fat (make sure you measured butter correctly)
Can I make these without a mixer?
Absolutely. Use a wooden spoon and some elbow grease. The butter and sugar will take longer to cream (5-7 minutes instead of 3), but it’s totally doable. I’ve made these by hand plenty of times.
Ingredient Questions
Can I use chocolate chunks instead of chips?
Yes! Chocolate chunks are amazing in these cookies. They create bigger pockets of melted chocolate. You can also use a mix of both for variety in every bite.
What’s the difference between using all brown sugar vs. all white sugar?
| Sugar Type | Edge Texture | Center Texture | Flavor |
|---|---|---|---|
| All white | Very crispy | Crispy | Sweet, neutral |
| Half & half ⭐ | Crispy | Chewy | Balanced |
| All brown | Soft | Very chewy | Caramel, rich |
The recipe uses half and half for the perfect balance, but you can adjust based on your preference.
Can I use margarine instead of butter?
I wouldn’t recommend it. Butter has milk solids that create flavor and texture that margarine just can’t match. If you need dairy-free, use a high-quality vegan butter instead.
Technique Questions
How do I get that bakery-style thick cookie?
Here’s the secret formula:
- Chill dough for 2-4 hours (or overnight)
- Use a larger cookie scoop (3 tablespoons)
- Bake at 350°F instead of 375°F
- Bake for 12-15 minutes instead of 9-11
- Don’t flatten the dough balls
They’ll spread less and stay thicker.
What’s the secret to getting gooey centers?
Pull them when the edges are set but the centers still look soft and shiny. They’ll firm up as they cool on the pan for 5 minutes.
If you wait until they look fully cooked in the oven, they’ll be overdone.
My chocolate chips sank to the bottom. Help?
Toss the chocolate chips in a tablespoon of flour before adding them to the dough. This coats them lightly and helps them stay suspended throughout the cookie instead of sinking.
How do I get even browning?
- Rotate your pan halfway through baking
- Use light-colored baking sheets (dark ones brown the bottoms too fast)
- Make sure all cookies on a sheet are the same size
- Keep oven temp consistent (use an oven thermometer)
Can I bake these on a cookie sheet without parchment?
You can, but I don’t recommend it. The cookies will stick and the bottoms will brown too much. Parchment paper or silicone mats are game-changers and reusable.
Storage & Timing Questions
How long do these cookies stay fresh?
| Storage Method | Freshness Window |
|---|---|
| Counter (airtight) | 5 days |
| Counter + bread slice | 7 days |
| Refrigerated | 10 days |
| Frozen (dough) | 3 months |
| Frozen (baked) | 3 months |
Can I make the dough ahead and bake later?
Yes! This actually improves the flavor. Refrigerate dough up to 3 days or freeze up to 3 months.
The resting time lets the flour fully hydrate and the flavors develop more deeply.
Do I need to bring frozen dough to room temperature?
Nope! Bake straight from frozen. Just add 1-2 extra minutes to the baking time. This is actually my favorite way to do it.
Wrapping Up
I’ve been making these cookies for years and they never get old.
There’s something about pulling a fresh batch out of the oven that just makes everything better. The smell fills your whole house. The chocolate is melty and perfect. And that first warm, gooey bite is pure happiness.
Make a batch this week. Eat a few warm from the oven. Share some with your neighbors. Freeze the rest for when you need a quick dessert.
And when you make them, come back and let me know how they turned out.
Did you add anything special? Change anything? Try one of the variations?
Drop a comment below with your experience or any questions you have. I read every single one and I’m always happy to help troubleshoot or chat about cookies. 🍪


1 thought on “The Only Chocolate Chip Cookie Recipe You’ll Ever Need”