⏱ Prep: 15 min🔥 Cook: 45 min🧊 Marinate: 30 min – 24 hrs🍗 Serves: 4–5📊 Difficulty: Easy
15mActive Prep
45mIn the Oven
~420Calories / Serving
I said what I said.
If you’ve spent years believing crispy, golden, fall-off-the-bone fried chicken requires a vat of boiling oil and a smoke alarm, keep reading. Because this oven fried chicken quietly ruined me for every other version.
No oil splatter. No standing over a skillet. And somehow, the crust is shatteringly crispy in a way that genuinely shocks people when you say it came out of the oven.
“The crust cracked like fried chicken. The meat was juicy like fried chicken. But my kitchen looked like I hadn’t cooked anything at all.”
The secret is a combination of buttermilk, toasted panko breadcrumbs, and one very specific oven technique most recipes skip entirely. Stick with me.
👀
There’s a make-ahead trick buried in this post that will save you on busy weeknights. Keep scrolling, it’s worth it.
🤯 Did You Know?
Deep-fried chicken absorbs roughly 30–40% of its weight in oil during frying. Oven fried chicken using panko and a wire rack cuts that fat absorption by more than half, while the open-air circulation around the chicken actually produces a crunchier crust than pan-frying does.
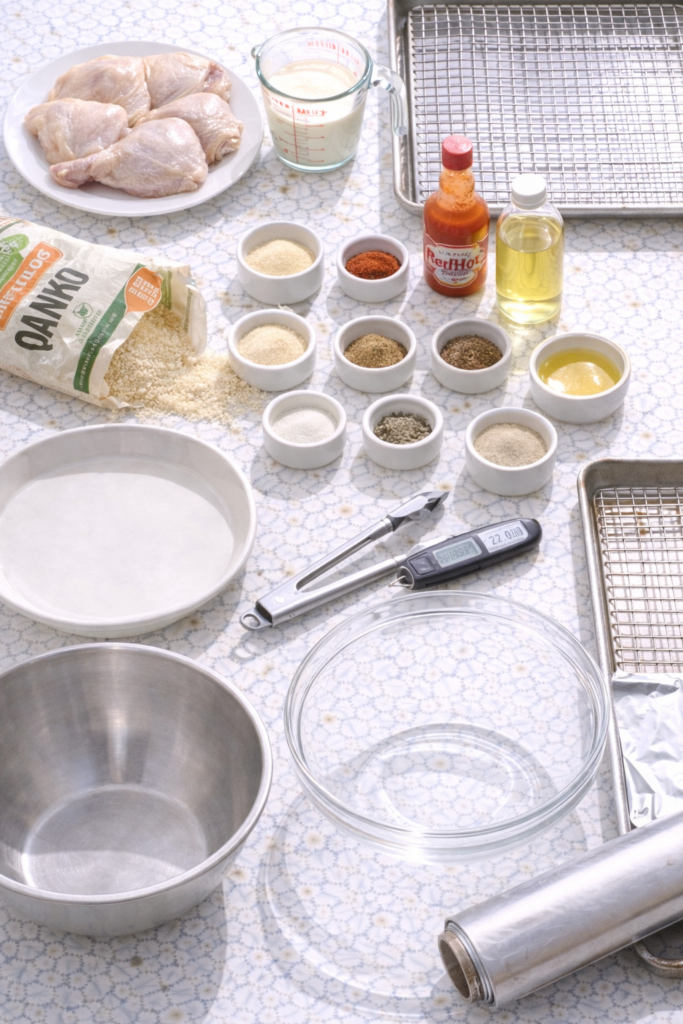
What You’ll Need
For the Chicken
| Ingredient | Amount | Notes |
|---|---|---|
| Bone-in, skin-on chicken pieces | 3 lbs | Thighs + drumsticks recommended |
| Buttermilk | 1½ cups | Full-fat for best flavor |
| Hot sauce | 1 tsp | Adds depth, not heat |
| Garlic powder | 1 tsp | |
| Onion powder | 1 tsp | |
| Smoked paprika | 1 tsp | Not regular paprika |
| Salt | 1 tsp | |
| Black pepper | ½ tsp |
For the Crispy Coating
| Ingredient | Amount | Notes |
|---|---|---|
| Panko breadcrumbs | 1½ cups | Toast before using — non-negotiable |
| All-purpose flour | ½ cup | Or rice flour for GF |
| Garlic powder | 1 tsp | |
| Smoked paprika | 1 tsp | |
| Dried oregano | 1 tsp | |
| Cayenne pepper | ½ tsp | Adjust for heat preference |
| Salt | 1 tsp | |
| Black pepper | ½ tsp | |
| Unsalted butter, melted | 3 tbsp | Helps coating brown and crisp |
| Olive oil | 2 tbsp |
Tools You’ll Need
Recommended for you : fried rice and chicken
| Tool | Why It Matters |
|---|---|
| Large rimmed baking sheet (half-sheet pan) | Catches drips, holds the rack |
| Wire cooling rack (oven-safe) | The single most important tool — air circulation = crispy bottom |
| 2 large mixing bowls | One for the marinade, one for staging |
| Shallow dish or wide bowl | For pressing on the coating |
| Tongs | Keeps coating intact when flipping |
| Instant-read thermometer | Only reliable way to know it’s done safely |
| Aluminum foil | Lines the pan for easy cleanup |
| Cooking spray | Helps coating go golden without adding oil |
⚠️ Key Note
The wire rack is non-negotiable. Placing chicken directly on a sheet pan traps steam underneath and gives you a soggy bottom crust. A cheap oven-safe rack (widely available) completely solves this.
Pro Tips 🏆
1:Toast the panko first. Toss panko in a dry skillet over medium heat for 3–4 minutes until light golden before adding it to the coating mix. The crust starts browning the second it hits the oven instead of waiting to catch up.
2:Marinate overnight if you can. 30 minutes is the minimum. Overnight is where it gets noticeably more tender and flavorful. The buttermilk tenderizes the meat from the inside out.
3:Press the coating firmly. Don’t just dip and shake. Use your palm to pack the panko mixture into the chicken. Full contact means it won’t fall off when you flip it or take that first bite.
4:Preheat the sheet pan. Put your wire rack and baking sheet in the oven while it heats to 425°F. A hot surface immediately starts crisping the bottom of the chicken rather than letting it steam.
5:Don’t flip too early. Flip at exactly 25 minutes. If it’s sticking to the rack, give it 3 more minutes — forcing it will tear the crust clean off.
Substitutions and Variations
| Swap This | For This | Impact on Result |
|---|---|---|
| Buttermilk | Plain yogurt + milk (2:1) OR milk + 1.5 tbsp white vinegar (wait 5 min) | Minimal — same tenderizing effect |
| Panko breadcrumbs | Cornflake crumbs (even crunchier) or regular breadcrumbs (softer crust) | Texture changes noticeably |
| All-purpose flour | Rice flour or GF all-purpose | Gluten-free with no flavor loss |
| Bone-in chicken | Boneless thighs (25–30 min) or tenders (20 min) | Reduce cook time accordingly |
| Butter | Melted coconut oil or vegan butter | Dairy-free; slight flavor shift |
| Cayenne | Skip entirely for mild / double for hot | Controls the heat level |
Make Ahead Tips
This is the part I mentioned at the top. Three ways to make weeknight cooking faster:
| Make Ahead Option | How Long It Keeps | How to Use |
|---|---|---|
| Marinated chicken (raw, in buttermilk) | Up to 24 hours in fridge | Pull out 15 min before coating and baking |
| Pre-mixed dry coating | Up to 1 week in airtight container | Already mixed when you need it |
| Fully cooked chicken (frozen) | Up to 3 months | Bake from frozen at 375°F for 20–25 min |
People also like : chicken fried chicken
How to Make It

1: Marinate the chicken.
Whisk together buttermilk, hot sauce, garlic powder, onion powder, smoked paprika, salt, and pepper in a large bowl. Add chicken pieces, making sure each one is fully submerged. Cover and refrigerate for at least 30 minutes, up to 24 hours.
2: Toast the panko.
In a dry skillet over medium heat, stir panko for 3–4 minutes until lightly golden. Watch closely — it burns fast. Remove from heat and let cool completely before using.
3: Build the coating.
In a shallow dish, combine toasted panko, flour, garlic powder, smoked paprika, oregano, cayenne, salt, and pepper. Drizzle in melted butter and olive oil. Stir until it resembles wet sand.
4: Preheat oven and pan.
Set oven to 425°F (220°C). Place the wire rack on a foil-lined baking sheet and put it in the oven while it preheats. This is the step most recipes leave out, and it makes a real difference.
5: Coat the chicken.
Remove each piece from the buttermilk and let excess drip off. Press firmly into the panko mixture on all sides. Use your palm to pack it in. Set coated pieces aside on a clean plate.
6: Bake first side.
Pull the hot pan from the oven and lightly spray the rack with cooking spray. Place chicken pieces skin-side up. Lightly spray the top of the chicken. Bake at 425°F for 25 minutes without opening the door.
7: Flip and finish.
People also like : chicken fried chicken
Carefully flip each piece. If it’s sticking, wait 3 more minutes before forcing it. Return to oven for 15–20 more minutes until the internal temperature at the thickest part reads 165°F and the coating is deep golden.
8: Rest before serving.
Let the chicken rest on the rack for 5 minutes. This step lets the juices redistribute so you don’t lose them the second you cut in.
Nutritional Breakdown
Per serving (approx. 1 thigh + 1 drumstick). Values are estimates.
~420Calories
38gProtein
18gTotal Fat
5gSat. Fat
22gCarbs
580mgSodium
Oven Fried vs. Deep Fried: The Numbers
| Metric | Deep Fried | Oven Fried |
|---|---|---|
| Calories (per serving) | ~580 kcal | ~420 kcal |
| Total Fat | ~32g | ~18g |
| Oil Absorbed | High (30–40% of weight) | Low (coating only) |
| Crust Texture | Very crispy | Equally or more crispy* |
| Mess Level | Significant | Minimal |
| Active Cook Time | ~40 min standing | ~10 min hands-on |
*With toasted panko + wire rack technique
What to Serve With It
Creamy ColeslawCool crunch against a hot crispy crust — a classic for a reason
Garlic Mashed PotatoesRich and buttery — makes it a full comfort meal
Buttermilk BiscuitsUse the leftover buttermilk from the marinade
Herb Corn on the CobSimple, fresh, balances the richness
Pickled Onion SaladAcid cuts through the coating beautifully
Mac and CheeseFor when you’re fully committed to comfort food
Leftovers and Storage
❄️Refrigerator Airtight container — stays good for up to 4 days
🧊Freezer Freeze pieces individually on a sheet pan first, then bag. Good for 3 months.
🔄Reheat from fridge Wire rack + 375°F oven for 12–15 min. Skip the microwave — it destroys the crust.
🏁Reheat from frozen 375°F for 20–25 min. Cover loosely with foil for the first 15 minutes.
💡 Leftover Hack
Cold leftover oven fried chicken + brioche bun + pickles + hot sauce = the best chicken sandwich you’ll make all week. Don’t overlook this.
FAQ
Can I use chicken breasts?
Yes, but they dry out faster than thighs at high heat. Use bone-in breasts, reduce cook time, and pull them the moment your thermometer reads 165°F.
My coating keeps falling off. What am I doing wrong?
Two likely reasons: too much buttermilk dripping off before coating, or not pressing firmly enough. Shake off excess marinade thoroughly, then use your palm to really press the panko in.
Do I really have to preheat the baking sheet?
You don’t have to, but you’ll notice the difference. A cold pan means the bottom of the chicken steams for the first several minutes instead of crisping. Preheating solves it instantly.
Can I make this dairy-free?
Easily. Swap buttermilk for unsweetened oat milk + 1 tbsp apple cider vinegar (let sit 5 min). Use coconut oil instead of butter in the coating.
My oven runs hot. Should I lower the temp?
Trust your thermometer, not the clock. If you know it runs 25°F+ hot, drop to 400°F. The chicken is done when the thickest part hits 165°F, full stop.
How spicy is this?
At ½ tsp cayenne, it’s mild background warmth — nothing that will challenge a kid. Skip it entirely for zero heat, or double it if you want a real kick.
Can I make this without a wire rack?
You can. Flip the chicken halfway through and expect a softer bottom crust. A cheap oven-safe rack is one of the most useful kitchen buys you’ll make, and it works for roasting vegetables too.
Wrapping Up
If you take one thing from this, let it be the wire rack and the toasted panko. Those two moves completely change what oven-baked chicken is capable of.
This is the kind of recipe that earns a permanent spot on your meal rotation — not because it’s trendy, but because it’s genuinely satisfying, easy to adapt, and just as good on a Tuesday night as it is at a Sunday dinner.
Give it a try this week, then come back and drop a comment. Did you go classic? Swap something out? Make it spicy? I want to know — and if you hit any snags along the way, leave a question below and I’ll get back to you. 👇


1 thought on “Oven Fried Chicken That’s Shockingly Crispier Than the Deep-Fried Version”