Ever wonder why some banana puddings taste like heaven while others taste like cardboard with yellow paste?
The secret’s in the technique.
Paula Deen figured this out years ago when she created this ridiculously simple recipe that’s become the gold standard for Southern potlucks, family reunions, and random Tuesday nights when you need comfort food.
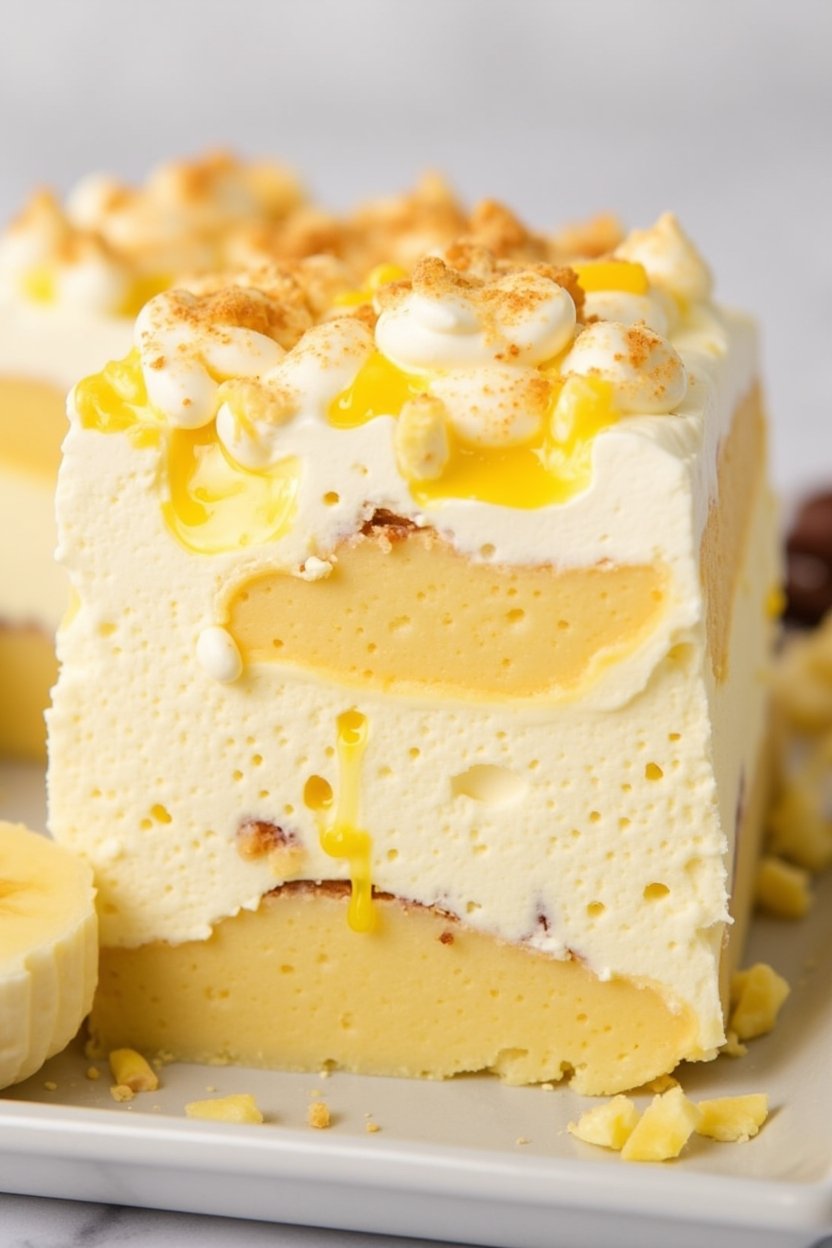
I’m talking about layers of vanilla wafers that get slightly soft but still have a little crunch. Bananas that are perfectly ripe. A custard that’s silky smooth without being too sweet.
And a homemade whipped cream topping that makes store-bought Cool Whip look sad.
Here’s what shocked me: this isn’t complicated at all.
You’re just cooking pudding on the stove, slicing bananas, and layering everything in a dish. The hardest part? Waiting for it to chill in the fridge before diving in face-first.
Trust me, the wait is worth every second.
What You’ll Need
For the Pudding
| Ingredient | Amount | Why It Matters |
|---|---|---|
| Granulated sugar | 2/3 cup | Sweetness without being cloying |
| All-purpose flour | 1/3 cup | Thickening agent for silky texture |
| Salt | Pinch | Balances sweetness, enhances flavor |
| Egg yolks | 3 large | Creates rich, custard-like consistency |
| Whole milk | 2 cups | Full-fat = full flavor |
| Vanilla extract | 1 tsp | That classic pudding taste |
| Unsalted butter | 2 tbsp | Adds richness and shine |
For Assembly
| Ingredient | Amount | Notes |
|---|---|---|
| Vanilla wafers | 1 (11-oz) box | Nilla wafers are the classic choice |
| Ripe bananas | 4-5 | Yellow with minimal brown spots |
| Heavy whipping cream | 2 cups | For homemade whipped topping |
| Powdered sugar | 1/4 cup | Sweetens the whipped cream |
| Vanilla extract | 1 tsp | Extra vanilla never hurt anyone |
Total Time Breakdown:
- Prep: 20 minutes
- Cook: 15 minutes
- Chill: 4-6 hours (overnight is best)
- Servings: 12-15 generous portions
Tools You’ll Need
You may also like : strawberry banana smoothie recipe
✓ Medium saucepan
✓ Whisk (not a spoon, a real whisk)
✓ Measuring cups and spoons
✓ 9×13-inch baking dish (or trifle dish for fancy vibes)
✓ Electric hand mixer or stand mixer
✓ Mixing bowl for whipped cream
✓ Sharp knife for slicing bananas
✓ Plastic wrap
✓ Rubber spatula for spreading
Pro Tips
#1: Nail the custard texture
When you’re cooking the pudding base, whisk constantly. I mean constantly.
If you stop for even 30 seconds, you’ll get lumps that ruin the whole silky texture.
Keep the heat at medium and be patient. It takes about 10-12 minutes for the mixture to thicken properly.
Quick test: The custard should coat the back of a spoon. Run your finger through it. If the line holds without the custard running back together, you’re golden.
#2: Choose bananas wisely
You want bananas that are ripe but not covered in brown spots.
Too green? Flavorless and firm.
Too ripe? They’ll turn mushy and brown within hours of assembling.
Look for bananas that are bright yellow with maybe one or two tiny brown freckles.
#3: Layer strategically
Start with vanilla wafers on the bottom, then bananas, then pudding. Repeat.
This creates the perfect ratio in every spoonful.
Some people just dump everything in randomly and then wonder why their banana pudding is weird. Don’t be those people.
#4: Let it rest overnight
I know you want to eat it immediately.
But if you can wait 4-6 hours (or better yet, overnight), the flavors meld together and the wafers soften just enough to create that signature texture.
That’s what makes banana pudding so ridiculously addictive.
#5: Make fresh whipped cream
Store-bought whipped topping works in a pinch.
But homemade whipped cream takes this from good to “holy crap, can I have the recipe?”
Just beat heavy cream with powdered sugar and vanilla until stiff peaks form. Takes 3 minutes with a hand mixer.
You’ll love these too : banana pudding recipe
How to Make It

Step 1: Make the Custard
Grab your saucepan and whisk together the sugar, flour, and salt until combined.
Add the egg yolks and whisk them in until the mixture looks smooth and pale yellow.
Pour in the milk gradually while whisking constantly. You don’t want lumps here.
Here’s where people mess up: They stop whisking to check their phone or stir something else on the stove.
Don’t do that.
Put the saucepan on the stove over medium heat. Keep whisking as it heats up.
After about 10-12 minutes, the mixture will start to thicken. It should coat the back of a spoon.
Remove from heat and stir in the vanilla extract and butter until the butter melts completely.
Let the custard cool for about 10 minutes. Place plastic wrap directly on the surface to prevent a skin from forming.
Step 2: Assemble the Layers
| Layer Order | What to Do |
|---|---|
| Bottom Layer | Line the dish with vanilla wafers (slight overlap is fine) |
| First Banana Layer | Slice bananas 1/4-inch thick, cover the wafers completely |
| First Pudding Layer | Pour half the custard, spread evenly with spatula |
| Second Wafer Layer | Another layer of cookies over the pudding |
| Second Banana Layer | More sliced bananas, cover everything |
| Final Pudding Layer | Remaining custard spread to the edges |
Pro move: Save a few vanilla wafers to crush for garnish on top. Makes it look restaurant-quality.
Step 3: Make the Whipped Cream
In a clean mixing bowl, pour in the heavy whipping cream, powdered sugar, and vanilla extract.
Beat with your electric mixer on medium speed at first, then increase to high speed.
Watch it carefully.
After about 2-3 minutes, the cream will start forming soft peaks. Keep going until you get stiff peaks.
The cream should hold its shape when you lift the beaters.
Warning: Don’t overbeat or you’ll end up with butter. Stop as soon as you hit stiff peaks.
Recommended for you : banana bread recipe chocolate chip
Step 4: Top and Chill
Spread the whipped cream over the top of your assembled pudding.
Make sure it covers everything and reaches the edges. No bald spots.
If you saved those vanilla wafers, crush them now and sprinkle them on top as garnish.
Cover the whole dish with plastic wrap and refrigerate for at least 4 hours.
Overnight is even better if you have the willpower to wait.
Substitutions and Variations
Ingredient Swaps
| Instead of This | Try This | Result |
|---|---|---|
| Vanilla wafers | Graham crackers | Slightly different texture, still delicious |
| Whole milk | 2% milk | Thinner pudding, less rich |
| Homemade custard | 2 boxes instant vanilla pudding | Easier, not quite as good |
| Fresh whipped cream | Cool Whip | Saves time, less impressive |
| Regular bananas | Add 1/4 tsp banana extract | Extra banana punch |
Fun Twists to Try
Chocolate Lover’s Version: Sprinkle mini chocolate chips between the layers. The chocolate melts slightly and creates pockets of heaven.
Tropical Vibes: Add a thin layer of crushed pineapple (well-drained) with the bananas. Sweet, tangy, different.
Salted Caramel Dream: Drizzle caramel sauce over the whipped cream and sprinkle with flaky sea salt.
Peanut Butter Paradise: Add dollops of peanut butter between layers. Banana + peanut butter is a classic combo for a reason.
Cookies & Cream: Replace half the vanilla wafers with crushed Oreos. Not traditional but ridiculously good.
Make Ahead Tips
This dessert is actually better when made ahead.
2 Days Before: Make the custard. Store it in an airtight container in the fridge with plastic wrap pressed directly on the surface.
1 Day Before: Assemble the whole thing (minus the whipped cream topping). Add the whipped cream right before serving so it stays fresh and fluffy.
4 Hours Before: If you need to make everything ahead, you can whip the cream and add it up to 4 hours before serving. Keep the whole thing covered and refrigerated.
Never slice bananas early. They’ll turn brown if you slice them too far in advance. Wait until you’re ready to assemble.
Nutritional Info (Per Serving)
| Nutrient | Amount |
|---|---|
| Calories | 285 |
| Total Fat | 14g |
| Saturated Fat | 8g |
| Cholesterol | 75mg |
| Sodium | 95mg |
| Carbohydrates | 38g |
| Fiber | 1g |
| Sugar | 26g |
| Protein | 4g |
Based on 12 servings. This is comfort food, not health food. Enjoy it without guilt.
Leftovers and Storage
Keep any leftovers covered tightly with plastic wrap in the refrigerator for up to 3 days.
What happens over time:
- Day 1: Perfection. Wafers are soft but still have texture.
- Day 2: Still great. Wafers are softer, flavors are more blended.
- Day 3: Good but noticeably different. Bananas start browning at edges.
- Day 4+: Skip it. The texture gets weird and the bananas look sad.
Don’t freeze banana pudding. The bananas turn to mush and the texture of the custard gets weird when thawed. Just don’t.
Party hack: Make individual servings in small mason jars or cups. They look cute, portions are built-in, and people can take leftovers home easily.
FAQ
Q: Why is my pudding lumpy?
You either didn’t whisk constantly while cooking or your heat was too high.
The proteins in the eggs cook unevenly when the temperature spikes, creating lumps.
Keep whisking and use medium heat next time. If you do get lumps, pour the pudding through a fine-mesh strainer to smooth it out.
Q: Can I use pudding mix instead of making it from scratch?
Yes. Use two 3.4-ounce boxes of instant vanilla pudding prepared with 3 cups of milk.
It’s easier but not quite as rich as homemade. You lose some of that silky, luxurious texture. But if you’re short on time, it totally works.
Q: My bananas turned brown. What happened?
Bananas oxidize when exposed to air. It’s just science.
Toss the slices in a little lemon juice before layering if you want to slow down the browning. Or just make sure you’re using bananas that aren’t overly ripe to begin with.
Also, assemble and serve the same day for best appearance.
Q: Do I have to use whole milk?
Whole milk gives you the creamiest pudding. That’s the truth.
But 2% milk works if that’s what you have. Skim milk will make a thinner, less rich pudding that won’t taste as indulgent.
For this recipe, use the good stuff. You’re already committing to homemade custard.
Q: How do I know when the pudding is thick enough?
It should coat the back of a spoon and hold a line when you drag your finger through it.
If it’s still watery and runs back together immediately, keep cooking and whisking.
The mixture will go from thin to thick fairly quickly once it starts thickening, so pay attention during those last few minutes.
Q: Can I make this in a trifle dish?
Absolutely. A clear trifle dish shows off the pretty layers and makes it look fancy for parties.
Just layer everything the same way you would in a 9×13-inch pan. People go crazy for the visual presentation.
Q: My whipped cream deflated. What did I do wrong?
You probably overbeat it and it started separating, or your cream wasn’t cold enough when you started.
Use cold cream straight from the fridge and stop beating as soon as you hit stiff peaks. The second it holds its shape, you’re done.
Q: Is this really Paula Deen’s exact recipe?
This is based on her classic recipe with a few tweaks for clarity and technique.
The proportions and method are essentially the same as what she’s been making for decades. It’s the real deal.
Wrapping Up
Paula Deen’s banana pudding isn’t trying to be fancy.
It’s just layers of simple ingredients that somehow create something way better than the sum of their parts.
The custard gets silky smooth when you take your time with it. The vanilla wafers soften just enough without turning to mush. The bananas add that perfect sweetness and creamy texture.
And the homemade whipped cream ties everything together.
Make this for your next family gathering and watch it disappear in about 10 minutes flat.
Or make it on a random weeknight when you need something comforting that doesn’t require you to be Martha Stewart.
Either way, you’ll have people asking for the recipe.
Drop a comment below after you make this and let me know if you added any fun twists or if you ate half the pan before it even made it to the fridge 😊
No judgment here. We’ve all been there.


1 thought on “Paula Deen’s Banana Pudding Recipe (The Real Deal)”