
You know those three bananas sitting on your counter right now?
The ones that are probably just past their prime and looking a little too brown for breakfast?
They’re about to become your favorite afternoon snack.
Banana nut bread is one of those recipes that feels like home. It’s the kind of thing you make when you need your kitchen to smell amazing or when you want something warm and comforting on a lazy Sunday morning.
And I’m going to be honest with you about something: not all banana nut bread recipes are created equal.
Some are too dry. Some are weirdly dense. Others barely taste like banana at all.
This one? It’s different.
I’ve spent years tweaking this recipe, and I can confidently say it’s one of the best versions out there. The texture is perfectly moist (yes, I said it), the banana flavor actually comes through, and those toasted walnuts add the most satisfying crunch to every bite.
Fun fact: Americans throw away approximately 60 million tons of produce each year, and bananas are the #1 wasted fruit. This recipe is basically a delicious way to be a food waste hero. 🍌
If you’ve been looking for a banana bread recipe that actually lives up to the hype, you’re in the right place.
Let’s get into it.
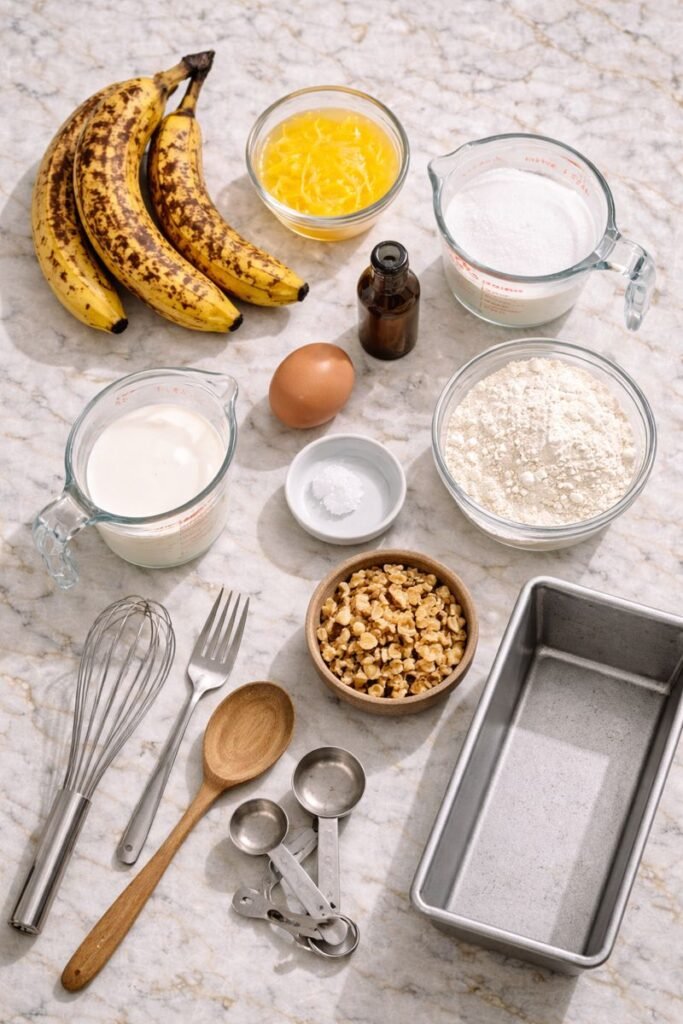
What You’ll Need
The ingredients for banana nut bread are super straightforward.
You probably have most of them in your pantry already.
For the bread:
| Ingredient | Amount | Why It Matters |
|---|---|---|
| Overripe bananas | 3 | The browner, the sweeter and more flavorful |
| Melted butter | 1/3 cup | Adds richness and keeps it moist |
| Granulated sugar | 3/4 cup | Sweetness and helps with browning |
| Large egg | 1 (beaten) | Binds everything together |
| Vanilla extract | 1 tsp | Enhances the banana flavor |
| Baking soda | 1 tsp | Makes it rise and creates tender crumb |
| Salt | Pinch | Balances sweetness and enhances flavor |
| All-purpose flour | 1 1/2 cups | The structure of your bread |
| Chopped walnuts | 1/2 cup (toasted) | The crunch factor |
| Ground cinnamon | 1/2 tsp | Warm, cozy flavor |
| Ground nutmeg | 1/4 tsp | Subtle depth and complexity |
Optional topping:
- Extra walnuts for sprinkling on top
- A sprinkle of coarse sugar for crunch
Here’s something most recipes won’t tell you: The overripe bananas are key here. Those ugly, spotty ones you’re tempted to throw away? Those are exactly what you want.
They’re sweeter and mash easier, which means better flavor and texture in your final loaf.
The darker the peel, the more the starches have converted to sugar. That’s science working in your favor.
Tools You’ll Need
You may also like : best banana bread recipe
You don’t need anything fancy to make this banana bread.
Just the basics:
| Essential Tools | Optional But Helpful |
|---|---|
| 9×5 inch loaf pan | Parchment paper (easier cleanup) |
| Large mixing bowl | Kitchen scale (for precision) |
| Medium mixing bowl | Stand mixer (saves arm work) |
| Fork (for mashing) | Instant-read thermometer |
| Whisk or wooden spoon | |
| Measuring cups/spoons | |
| Rubber spatula | |
| Cooling rack |
Pro Tips
Here’s what I’ve learned from making this recipe more times than I can count:
1. Toast your walnuts first 🔥
Just 5 minutes in a dry pan over medium heat. This brings out their natural oils and makes them taste so much richer.
Skip this step and you’re missing out on serious flavor.
2. Don’t overmix the batter
Once you add the flour, mix until you just don’t see any more dry streaks.
Overmixing develops the gluten and makes your bread tough instead of tender. A few small lumps are totally fine.
Think of it like this: you’re folding, not beating.
3. Use room temperature ingredients when possible
Your butter should be melted but not hot, and your egg should be at room temp.
This helps everything combine smoothly and gives you a better texture.
4. Check for doneness early
Every oven is different. Start checking at 50 minutes by inserting a toothpick into the center.
It should come out with just a few moist crumbs (not wet batter).
If it needs more time, check every 5 minutes.
5. Let it cool completely before slicing
I know this is torture, but trust me on this one.
If you cut into it while it’s still warm, it’ll be gummy and fall apart. Let it cool for at least 30 minutes in the pan, then transfer to a cooling rack.
Chef’s secret: Professional bakers wait a full 24 hours before slicing their quick breads. The texture improves dramatically and it’s easier to get clean slices. I know that’s asking a lot, but even waiting a few hours makes a difference.
Substitutions and Variations
One of the best things about banana nut bread is how flexible it is.
You can make it work with what you have on hand:
Ingredient Swaps That Actually Work
| Original | Substitute | What Changes |
|---|---|---|
| Walnuts | Pecans, almonds, macadamia nuts | Different flavor profile, same crunch |
| White sugar | Brown sugar | Deeper, more caramel-like flavor |
| Butter | Coconut oil | Dairy-free, slight coconut taste |
| All-purpose flour | Half whole wheat | Heartier texture, more fiber |
| Regular milk | Almond/oat milk | Dairy-free option |
Fun Add-Ins to Try
Want to make this recipe your own? Here are some combinations I love:
The Classic Upgrade:
- Add 1/2 cup dark chocolate chips
- Sprinkle flaky sea salt on top before baking
The Tropical Twist:
- Replace walnuts with macadamia nuts
- Add 1/3 cup shredded coconut
- Fold in 1/4 cup diced pineapple
The Decadent Version:
- Swirl in 1/4 cup Nutella
- Top with extra chocolate chips
- Drizzle with chocolate ganache after cooling
The Health-Conscious Option:
- Use coconut sugar instead of white sugar
- Replace half the flour with almond flour
- Add 2 tablespoons ground flaxseed
- Use coconut oil instead of butter
Make Ahead Tips
This banana bread actually gets better after sitting for a day.
The flavors meld together and the texture becomes even more moist.
Make the batter ahead: Prepare the batter the night before and keep it covered in the fridge. Let it sit at room temperature for about 15 minutes before baking fresh in the morning.
Freeze the baked loaf: Wrap tightly in plastic wrap, then aluminum foil. It’ll keep for up to 3 months.
Portion control hack: Slice the whole loaf, wrap individual slices, then freeze. You can grab one slice at a time for breakfast or snacks.
You’ll love these too : banana bread recipe moist
How to Make Banana Nut Bread
Here’s the step-by-step process.
It’s easier than you think.
Step 1: Prep your pan and preheat your oven
Preheat your oven to 350°F (175°C).
Grease your 9×5 inch loaf pan with butter or cooking spray, or line it with parchment paper.
I like using parchment because it makes it super easy to lift the loaf out later.
Step 2: Toast the walnuts
Place your chopped walnuts in a dry skillet over medium heat.
Stir them frequently for about 5 minutes until they’re fragrant and lightly golden.
Pour them onto a plate to cool so they stop cooking.
Watch them closely! Nuts go from perfectly toasted to burnt in about 30 seconds.
Step 3: Mash the bananas
Peel your overripe bananas and put them in a large mixing bowl.
Use a fork to mash them until they’re mostly smooth.
A few small chunks are fine and actually add nice texture to the finished bread.
Texture tip: Want super smooth bread? Mash until completely smooth. Prefer some banana chunks? Leave it a bit chunky. Both work great.
Step 4: Mix the wet ingredients
Add the melted butter to your mashed bananas and stir until combined.
Then add the sugar, beaten egg, and vanilla extract.
Mix everything together until it’s well blended and slightly lighter in color.
This should take about 1 minute of mixing.
Step 5: Add the baking soda and salt
Sprinkle the baking soda and salt over your banana mixture and stir them in.
The baking soda will react slightly with the acidic bananas, which helps give your bread a nice rise.
You might see some bubbling. That’s exactly what you want!
Step 6: Fold in the flour and spices
In a separate bowl, whisk together your flour, cinnamon, and nutmeg.
Pour this dry mixture over your wet ingredients.
Using a rubber spatula, gently fold everything together until you just barely see any streaks of flour left.
This is where you need to resist the urge to overmix.
The folding technique: Cut down through the center of the batter, scrape along the bottom of the bowl, and bring it up and over. Rotate the bowl a quarter turn and repeat. Stop when you see just a few flour streaks.
Step 7: Add the walnuts
Fold in your toasted walnuts, saving a few to sprinkle on top if you want.
Again, be gentle here.
You’re not trying to work the batter, just distribute the nuts evenly.
Step 8: Transfer to the pan
Pour your batter into your prepared loaf pan and smooth the top with your spatula.
If you saved some walnuts and want to add coarse sugar, sprinkle them on top now.
Pro move: Tap the pan on the counter 2-3 times to release any air bubbles.
Recommended for you : banana smoothie recipe
Step 9: Bake
Place your loaf pan in the preheated oven and bake for 50-60 minutes.
Start checking at 50 minutes by inserting a toothpick into the center.
It should come out with just a few moist crumbs attached. If it’s still wet, give it another 5 minutes and check again.
Visual cues to look for:
- Top is golden brown
- Small crack down the middle (totally normal!)
- Edges are pulling away slightly from the pan
- Springs back lightly when touched
Step 10: Cool
This is the hardest part.
Let the bread cool in the pan for about 30 minutes. Your kitchen will smell incredible and you’ll be tempted to dig in immediately, but patience pays off here.
After 30 minutes, carefully lift the loaf out of the pan (this is where parchment paper really helps) and transfer it to a cooling rack.
Let it cool completely before slicing, another 30 minutes or so.
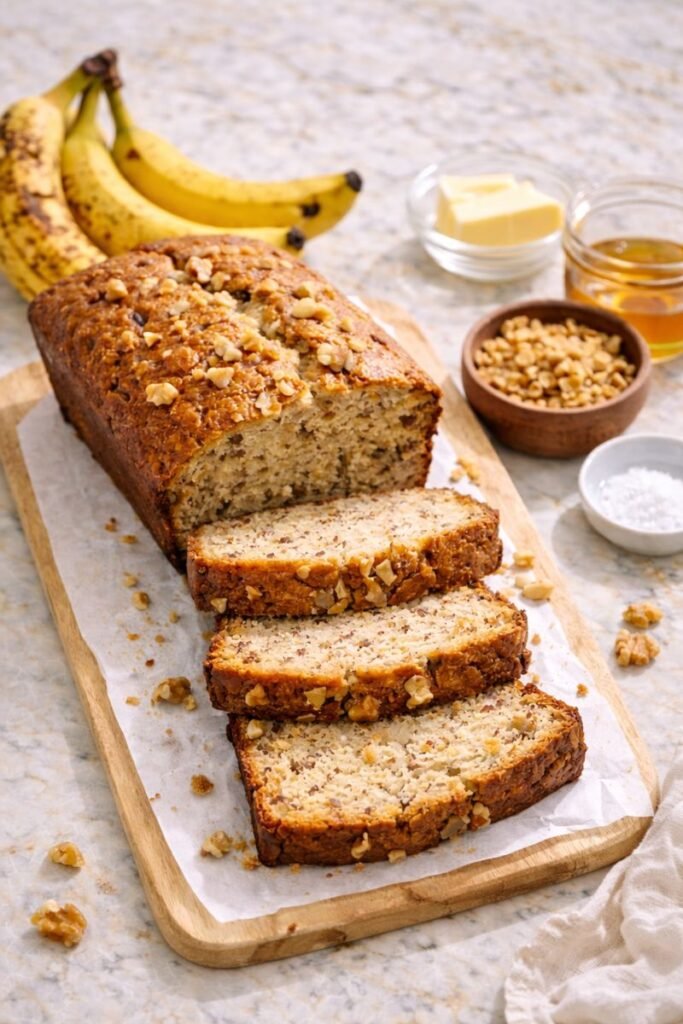
Step 11: Slice and serve
Once your banana bread has cooled, use a sharp serrated knife to cut it into thick slices.
I usually get about 10-12 slices from one loaf.
Slicing hack: Wipe your knife with a damp cloth between each slice for the cleanest cuts.
Serve it as is, or toast it lightly and spread with butter. Some people love it with cream cheese or a drizzle of honey.
Do whatever makes you happy.
Leftovers and Storage
Like I mentioned earlier, this banana bread keeps really well.
Storage Guide
| Method | Duration | Best For | Pro Tip |
|---|---|---|---|
| Room temperature | 3-4 days | Quick consumption | Wrap tightly in plastic wrap |
| Refrigerator | Up to 1 week | Humid climates | Warm before eating |
| Freezer (whole loaf) | Up to 3 months | Long-term storage | Double wrap in plastic + foil |
| Freezer (slices) | Up to 3 months | Grab-and-go | Individual plastic wrap + freezer bag |
Room temperature: Wrap the loaf (or individual slices) tightly in plastic wrap or aluminum foil.
It’ll stay fresh for 3-4 days on your counter. If you live somewhere humid, you might want to store it in the fridge instead to prevent mold.
Refrigerator: Wrapped banana bread will last up to a week in the fridge.
The cold does dry it out slightly, so I recommend warming it up before eating. Just pop a slice in the microwave for 15-20 seconds or in a toaster oven for a few minutes.
Freezer: This is my favorite way to store banana bread because it freezes beautifully.
Wrap individual slices tightly in plastic wrap, then place them all in a freezer-safe bag or container. They’ll keep for up to 3 months.
When you want a slice, just let it thaw at room temperature for about 30 minutes or microwave it for 30-45 seconds.
Life hack: I freeze individual slices so I can grab one for breakfast or a snack without having to thaw the entire loaf. It’s like having homemade banana bread on demand.
If your banana bread does start to feel a little dry after a few days, toast it.
Toasting brings it back to life and adds a nice crispy exterior while keeping the inside soft.
Nutrition Information
Here’s a rough breakdown per slice (assuming 12 slices per loaf):
| Nutrient | Amount | % Daily Value |
|---|---|---|
| Calories | 210 | 11% |
| Total Fat | 9g | 12% |
| Saturated Fat | 4g | 20% |
| Cholesterol | 30mg | 10% |
| Sodium | 150mg | 7% |
| Total Carbs | 30g | 11% |
| Dietary Fiber | 2g | 7% |
| Sugars | 15g | – |
| Protein | 4g | 8% |
Keep in mind this is an estimate and will vary depending on the exact ingredients you use and how thickly you slice your loaf.
Want to Lighten It Up?
Here are some swaps that won’t sacrifice too much flavor:
- Reduce sugar to 1/2 cup (bananas provide natural sweetness)
- Replace half the butter with unsweetened applesauce
- Use Greek yogurt in place of some butter for extra protein
- Add ground flaxseed for fiber and omega-3s
What to Serve With Banana Nut Bread
Banana nut bread is pretty versatile.
Here are some of my favorite ways to serve it:
Meal Pairing Ideas
For breakfast: ☕
- Cup of hot coffee (the classic combo)
- Scrambled eggs with herbs
- Fresh berries on the side
- Greek yogurt parfait
For brunch: 🥐
- Fresh fruit salad
- Crispy bacon or sausage
- Mimosas or fresh orange juice
- Cream cheese schmear
For dessert: 🍨
- Vanilla ice cream (warm the bread first!)
- Caramel sauce drizzle
- Whipped cream and sliced bananas
- Chocolate ganache
For snacking: 🥛
- Cold glass of milk
- Hot tea (black tea or chai works great)
- Nut butter spread
- Just by itself!
The warm spices in the bread complement spiced teas perfectly. I’m talking chai, cinnamon tea, or even a good Earl Grey.
Time Breakdown
Let’s be real about how long this actually takes:
| Task | Time | What You’re Doing |
|---|---|---|
| Prep work | 15 min | Toasting nuts, mashing bananas, measuring |
| Mixing | 10 min | Combining wet and dry ingredients |
| Baking | 50-60 min | Oven does the work |
| Cooling | 60 min | Hardest part (waiting!) |
| Total active time | 25 min | Hands-on work |
| Total time | 2-2.5 hours | Start to first slice |
Real talk: You can have this mixed and in the oven in under 30 minutes. The rest is just waiting for the magic to happen.
Troubleshooting Common Issues
Things don’t always go perfectly. Here’s how to fix common problems:
| Problem | Likely Cause | Solution for Next Time |
|---|---|---|
| Bread is too dense | Overmixing the batter | Fold gently, stop when flour just disappears |
| Top is browning too fast | Oven too hot | Tent with foil after 40 minutes |
| Sinks in the middle | Underbaked or overmixed | Bake longer, mix less |
| Too dry | Overbaked or not enough banana | Check earlier, use very ripe bananas |
| Gummy texture | Cut too soon | Wait until completely cool |
| Sticks to pan | Not enough grease | Use parchment paper next time |
FAQ
Can I make this without eggs?
Yes! You can substitute the egg with a “flax egg” (1 tablespoon ground flaxseed mixed with 3 tablespoons water, let sit for 5 minutes) or use 1/4 cup of unsweetened applesauce.
The texture will be slightly different but still delicious.
My bananas aren’t ripe enough. What should I do?
If you need to speed up the ripening process, place your bananas on a baking sheet and bake them at 300°F for about 15-20 minutes until the peels turn black.
Let them cool, then use as directed.
They won’t be quite as sweet as naturally ripened bananas, but they’ll work in a pinch.
Can I make this in muffin form?
Absolutely!
This batter makes about 12 muffins. Bake them at 350°F for 18-22 minutes, checking at 18 minutes with a toothpick.
Muffins are great for portion control and freeze really well.
Why did my banana bread sink in the middle?
This usually happens if the batter was overmixed or if the bread wasn’t baked long enough.
Make sure you’re mixing the batter gently once you add the flour, and check for doneness with a toothpick before removing it from the oven.
Can I reduce the sugar?
Yes, you can reduce it to 1/2 cup if you prefer less sweetness.
The bananas provide natural sweetness, so the bread will still taste good. You might need to reduce the baking time by a few minutes since there’s less sugar to caramelize.
What’s the difference between banana bread and banana cake?
Great question!
Banana bread typically has less sugar and fat than cake, and it’s mixed using the muffin method (wet and dry ingredients combined separately, then folded together). It has a denser, more bread-like texture.
Banana cake is lighter and fluffier, more like traditional cake.
Can I add chocolate chips?
Go for it!
Fold in 1/2 to 3/4 cup of chocolate chips along with the walnuts. Dark chocolate, milk chocolate, or even white chocolate all work.
Just be aware that adding chocolate chips will increase the calorie count.
How do I know when it’s done?
Insert a toothpick or cake tester into the center of the loaf.
It should come out with just a few moist crumbs attached. If it comes out completely clean, your bread might be slightly overbaked. If it has wet batter on it, give it more time.
Can I make this gluten-free?
You can use a 1:1 gluten-free flour blend in place of all-purpose flour.
The texture might be slightly different, but it should still work well. Make sure your blend contains xanthan gum or add 1/2 teaspoon to the dry ingredients.
Why do you toast the walnuts?
Toasting brings out the natural oils in the nuts and deepens their flavor.
It also makes them crunchier, which creates a better texture contrast in the soft bread. Raw walnuts can taste a bit bitter in comparison.
Can I use frozen bananas?
Yes! Thaw them completely first and drain any excess liquid.
Frozen bananas actually work great because the freezing process breaks down the cell walls, making them even easier to mash.
Wrapping Up
There you have it.
The banana nut bread recipe that’ll make you excited about those overripe bananas sitting on your counter.
This is one of those recipes I keep coming back to because it’s just so reliable. It works every single time, it makes your house smell incredible, and people always ask for the recipe when you bring it somewhere.
So go grab those brown bananas, preheat your oven, and give yourself something to look forward to in about an hour.
Your kitchen is about to smell like heaven.
Once you’ve made it, I’d love to hear how it turned out for you.
Did you add chocolate chips? Toast the walnuts? Make it into muffins? Eat a slice warm with butter at midnight? (We’ve all been there.)
Drop a comment below and let me know what you think! 💛


1 thought on “The Only Banana Nut Bread Recipe You’ll Ever Need (Trust Me)”