Ever notice how Korean beef always tastes better at restaurants?
I used to think the same thing. Then I figured out the secret (spoiler: it’s embarrassingly simple) and now I make this at least twice a week.
The crazy part? You probably have most of these ingredients sitting in your pantry right now. And if you don’t, they’re all at your regular grocery store.
No specialty shop runs needed.
This recipe hits different than your average weeknight dinner. The beef gets this sweet-savory glaze that’s sticky, caramelized, and honestly a little dangerous because you’ll want to eat it straight from the pan.
I’m talking about bulgogi-style ground beef that cooks in 15 minutes flat.
No marinating overnight, no fancy cuts of meat, just pure flavor that’ll have everyone asking for seconds.
What You’ll Need
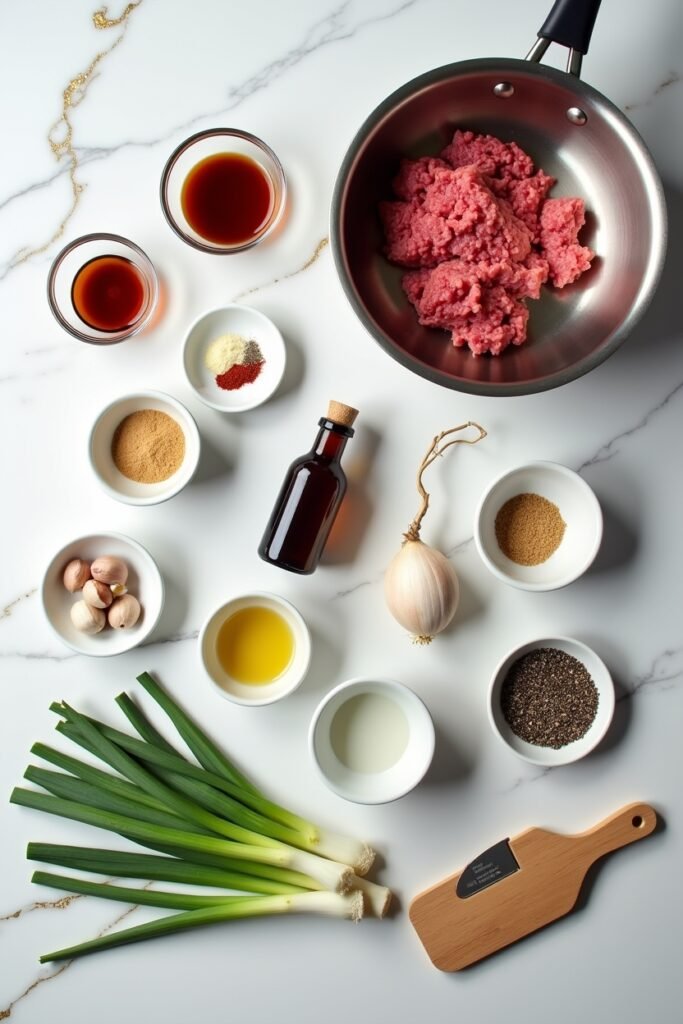
For the Beef:
| Ingredient | Amount | Notes |
|---|---|---|
| Ground beef | 1.5 lbs | 80/20 works great |
| Soy sauce | 1/3 cup | Low sodium if preferred |
| Brown sugar | 3 tablespoons | Balances the saltiness |
| Sesame oil | 2 tablespoons | Don’t skip this! |
| Garlic | 4 cloves, minced | Fresh only |
| Fresh ginger | 1 tablespoon, grated | Game-changer ingredient |
| Red pepper flakes | 1/4 teaspoon | Adjust for heat level |
| Black pepper | 1/4 teaspoon | Freshly ground is best |
| Water | 2 tablespoons | Helps sauce blend |
For Serving:
- 3 green onions, sliced thin
- 1 tablespoon sesame seeds
- Cooked white rice or cauliflower rice
- Optional: shredded carrots, cucumber slices
Tools You’ll Need
Handpicked for you : beef shank recipe
- Large skillet or wok
- Mixing bowl
- Grater (for ginger)
- Measuring spoons and cups
- Wooden spoon or spatula
- Knife and cutting board
Pro Tips
Chef’s Secret: The difference between okay Korean beef and restaurant-quality Korean beef comes down to one thing: caramelization. Let that beef sit undisturbed for 30-45 seconds at a time once the sauce reduces. Those crispy, sticky edges? That’s where all the flavor lives.
1. Break up the beef properly
Don’t just let it sit in chunks. Use your spatula to break it into small crumbles as it cooks.
This gives you more surface area for that caramelized goodness and every bite gets coated in sauce.
2. Don’t skip the ginger
I know fresh ginger can feel like a pain to deal with, but it makes such a difference here.
The bright, slightly spicy flavor balances out the sweetness perfectly. Ground ginger from a jar won’t give you the same punch.
3. Let it caramelize
Once the beef is cooked through and the sauce reduces, resist the urge to keep stirring.
Let it sit for 30-45 seconds at a time so the bottom gets those crispy, caramelized edges.
4. Taste and adjust
Every soy sauce brand is different. Some are saltier, some are sweeter.
After your first batch, you’ll know if you need to dial back the soy sauce or add a little more brown sugar next time.
5. Prep everything first
This cooks fast, so have your garlic minced, ginger grated, and sauce mixed before you even turn on the stove.
You don’t want to be scrambling while your beef overcooks.
people are loving : beef tips recipe
How to Make Korean Beef
Step 1: Mix your sauce
In a small bowl, whisk together the soy sauce, brown sugar, sesame oil, garlic, ginger, red pepper flakes, black pepper, and water.
Set it aside.
Step 2: Brown the beef
Heat a large skillet over medium-high heat. Add the ground beef and break it up with your spatula.
Cook for 5-7 minutes until it’s mostly browned and no longer pink.
Step 3: Drain excess fat
If there’s a lot of grease pooling in the pan (depends on your beef’s fat content), drain most of it off.
Leave just a tablespoon or so for flavor.
Step 4: Add the sauce
Pour your sauce mixture over the cooked beef.
Stir everything together so the beef is completely coated.
Step 5: Reduce and caramelize
Let the mixture simmer for 3-4 minutes, stirring occasionally.
The sauce will thicken and start to cling to the beef. This is when the magic happens.
Once the sauce has reduced and the beef looks glossy and sticky, turn off the heat.
You may also like : beef stew recipe
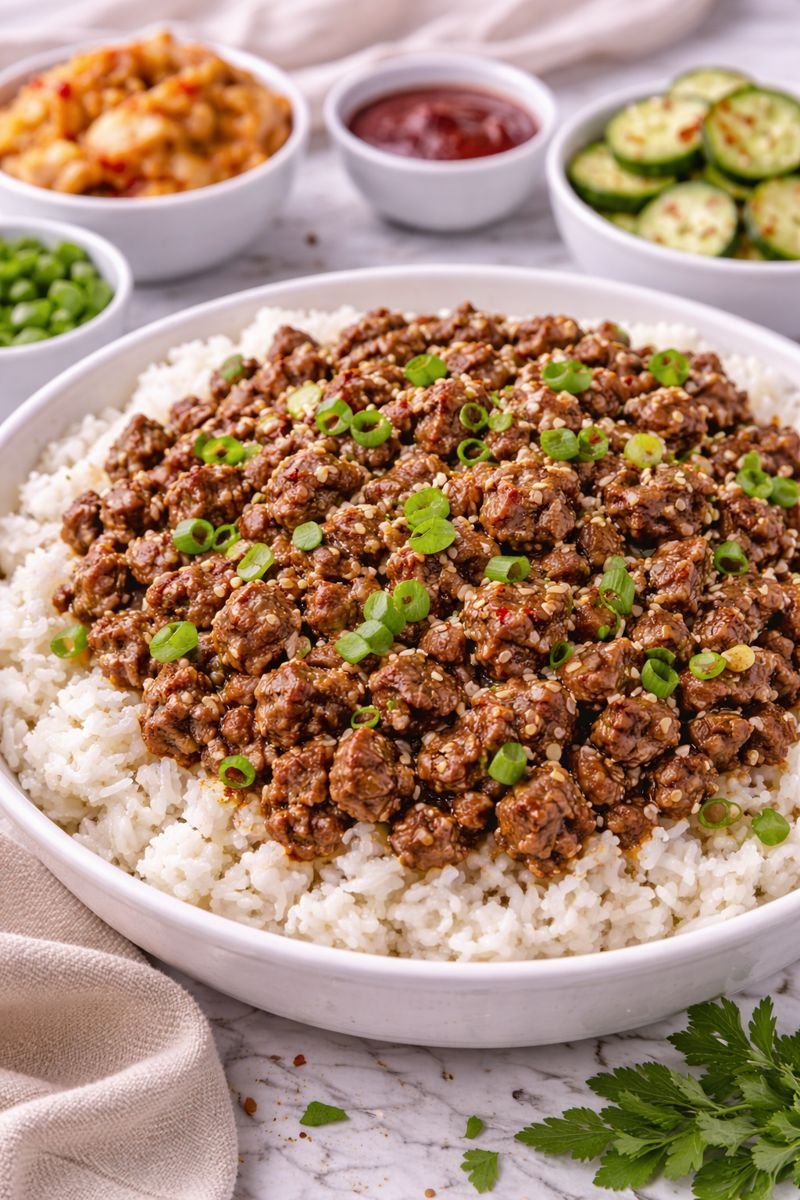
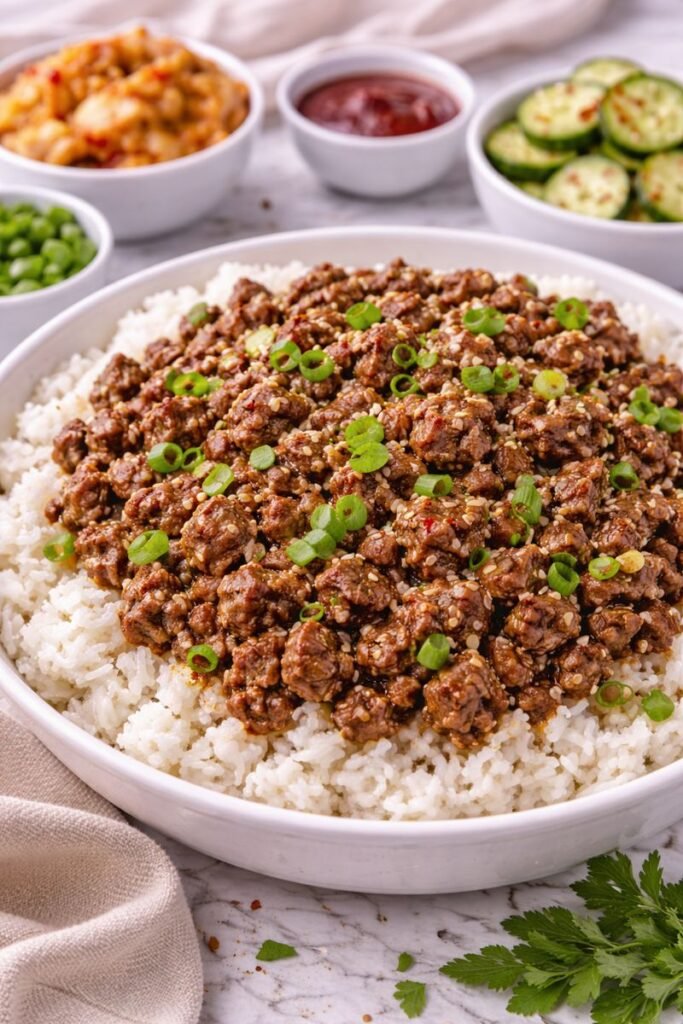
Step 6: Finish and serve
Top with sliced green onions and sesame seeds.
Serve over rice (white, brown, or cauliflower) with your choice of sides.
Total time: About 15 minutes start to finish. Seriously.
Substitutions and Variations
| Instead of This | Try This | What You’ll Get |
|---|---|---|
| Ground beef | Ground turkey | Leaner, milder flavor |
| Ground beef | Ground chicken | Lighter, more delicate |
| Ground beef | Ground pork | Richer, slightly sweeter |
| Brown sugar | Honey or maple syrup | More complex sweetness |
| White rice | Cauliflower rice | Low-carb option |
| White rice | Rice noodles | Asian noodle bowl vibe |
| Soy sauce | Coconut aminos | Gluten-free, less salty |
Want More Veggies?
Throw in some diced bell peppers, snap peas, or broccoli during the last few minutes of cooking.
They’ll pick up all that sauce and add crunch.
Spice It Up 🌶️
- Double the red pepper flakes for more heat
- Add a squeeze of sriracha at the end
- Mix in some gochugaru (Korean chili flakes) for authentic kick
- Top with sliced fresh jalapeños
Make It a Bowl
Layer your components like this:
- Rice on the bottom
- Korean beef in the center
- Quick-pickled cucumbers on one side
- Shredded carrots on the other
- Fried egg on top (runny yolk is mandatory)
- Sprinkle with sesame seeds and green onions
Now you’ve got a restaurant-worthy bowl.
Make Ahead Tips
Meal Prep Win: This reheats beautifully, which makes it perfect for Sunday meal prep. Cook a double batch and you’ve got lunch sorted for the entire week.
Cook a double batch and store it in airtight containers in the fridge for up to 4 days.
It actually tastes better the next day once all the flavors have had time to meld together.
You can also freeze portions for up to 3 months. Just thaw overnight in the fridge and reheat in a skillet or microwave.
Time-Saving Hack: Mix your sauce in advance. Keep it in a jar in the fridge for up to a week. Then all you have to do is brown the beef and pour it in.
Nutritional Breakdown
Here’s what you’re getting per serving (based on 4 servings):
| Nutrient | Amount | % Daily Value |
|---|---|---|
| Calories | 520 | 26% |
| Protein | 35g | 70% |
| Carbohydrates | 48g | 16% |
| Fat | 20g | 26% |
| Fiber | 1g | 4% |
| Sugar | 12g | – |
| Sodium | 890mg | 39% |
Notes: Using 93/7 lean ground beef drops the fat to 12g per serving. Serving without rice cuts carbs in half.
Meal Pairing Suggestions
Classic Korean Sides (Banchan):
Kimchi is the obvious choice and cuts through the richness perfectly.
The spicy, fermented tang balances all that sweet-savory beef.
Quick Pickled Vegetables
Thinly slice cucumbers, carrots, or radishes. Toss them with rice vinegar, a pinch of sugar, and salt.
Let them sit while you cook and you’ve got a fresh, tangy side.
Asian Cucumber Salad
Smashed cucumbers tossed with sesame oil, rice vinegar, garlic, and a pinch of sugar.
Takes 5 minutes and adds the perfect crunch.
Protein Boost Options:
| Add This | Why It Works |
|---|---|
| Fried egg (runny yolk) | Yolk mixes with sauce = heaven |
| Soft scrambled eggs | Mixed right into the beef |
| Edamame | Extra protein and color |
| Tofu cubes (pan-fried) | Vegetarian protein option |
Veggie Sides:
- Steamed broccoli
- Roasted brussels sprouts
- Sautéed bok choy
- Stir-fried green beans
- Grilled zucchini
Leftovers and Storage
Refrigerator Storage:
Store in an airtight container for 3-4 days.
The beef might release a little liquid as it sits, just drain it off before reheating.
Freezer Storage:
Portion into freezer-safe containers or bags. Remove as much air as possible.
Keeps for up to 3 months.
Reheating Methods:
| Method | Instructions | Time |
|---|---|---|
| Stovetop | Add splash of water, heat over medium | 5 min |
| Microwave | Stir halfway, add tiny bit of water | 2-3 min |
| Air fryer | 350°F, gets extra crispy | 5 min |
Leftover Hack: The beef gets more flavorful after sitting overnight, so don’t feel bad about making extra. Use it as filling for lettuce wraps, stuff it in rice paper rolls, add it to fried rice, or pile it on top of a salad.
Creative Ways to Use Leftovers
Lettuce Wraps
Spoon beef into butter lettuce leaves. Add shredded carrots, cucumber, and extra green onions.
Fried Rice
Add leftover beef to day-old rice with scrambled eggs and frozen veggies. Game-changer breakfast.
Korean Beef Tacos
Warm corn tortillas, add beef, top with quick-pickled onions and cilantro. Fusion at its finest.
Rice Paper Rolls
Wrap beef with rice noodles, cucumber, and herbs in rice paper. Dip in peanut sauce.
Loaded Nachos
Swap your usual taco meat for Korean beef. Top with cheese, jalapeños, and green onions.
FAQ
Q: Can I use ground chicken or turkey instead?
Yes! Both work great. Ground chicken will be milder, ground turkey has a bit more flavor.
Just make sure you use something with at least 7% fat so it doesn’t dry out.
Q: Is this actually authentic bulgogi?
Not exactly. Traditional bulgogi uses thinly sliced beef that’s been marinated.
This is more of an Americanized, weeknight-friendly version using ground beef. It’s got similar flavors but cooks way faster.
Q: How spicy is this?
Pretty mild with just 1/4 teaspoon red pepper flakes.
You’ll get a tiny kick but nothing that’ll make you reach for water. Adjust up or down based on your preference.
Q: Can I make this in the Instant Pot?
You could use the sauté function, but there’s really no point.
This is so quick on the stovetop that pulling out a pressure cooker would actually take longer.
Q: What kind of rice works best?
Short grain white rice is traditional and soaks up the sauce really well.
But jasmine rice, brown rice, or even quinoa all work fine. I’ve done it with cauliflower rice for a low-carb option and it’s still delicious.
Q: My sauce is too salty. What do I do?
Add a little more brown sugar or honey to balance it out.
You can also add more beef (if you have it) or bulk it up with vegetables to dilute the saltiness.
Q: Can I double this recipe?
Absolutely. Just make sure you use a large enough pan so the beef can brown properly instead of steaming.
You might need to brown it in batches if your pan isn’t huge.
Q: How do I know when the beef is done?
It should be completely browned with no pink remaining.
Use your spatula to break apart any large chunks and check the center. Internal temp should hit 160°F if you want to be precise.
Q: Can I meal prep this for the whole week?
Yes! It stays fresh in the fridge for 4 days and actually gets better as it sits.
I make it every Sunday and have it for lunches all week.
Common Mistakes to Avoid
| Mistake | Why It’s Bad | The Fix |
|---|---|---|
| Using extra-lean beef | Gets dry and crumbly | Stick with 80/20 for best flavor |
| Crowding the pan | Beef steams instead of browns | Use large skillet or cook in batches |
| Not draining fat | Sauce gets greasy | Drain excess after browning |
| Skipping fresh ginger | Loses that authentic flavor | Fresh ginger is non-negotiable |
| Over-stirring at the end | No caramelization happens | Let it sit undisturbed |
Time-Saving Tips
Prep on Sunday: Mince garlic, grate ginger, mix sauce. Store in fridge. Cuts cooking time to 10 minutes flat.
Use pre-minced garlic: Yeah, fresh is better, but jarred garlic from Costco will work in a pinch.
Buy pre-riced cauliflower: If you’re doing the low-carb version, save yourself the hassle.
Cook rice in advance: Make a big batch on Sunday. Reheats in 2 minutes.
Wrapping Up
This Korean beef is one of those recipes that’ll become a regular in your dinner rotation.
It’s stupid easy, tastes like you put in way more effort than you actually did, and everyone loves it.
Kids go crazy for the sweet-savory flavors, picky eaters can’t complain because it’s basically just seasoned beef, and you can have it on the table faster than delivery would arrive.
Make a batch this week. Serve it over rice with some quick-pickled cucumbers and call it dinner.
Then come back and let me know what you think in the comments below.
Did you add anything extra? Change up the spice level? I want to hear about it. 💬


1 thought on “Korean Beef That’ll Make You Ditch Takeout Forever”