
I used to think healthy bread was an oxymoron.
You know what I’m talking about. That dense, cardboard-tasting stuff at the grocery store that promises all the fiber and none of the fun. I’d buy a loaf with good intentions, take two bites, and watch it slowly fossilize in my pantry.
But here’s what changed everything: I started making my own healthy bread at home.
And not the complicated sourdough starter situation that requires a PhD in fermentation. I’m talking about a straightforward, foolproof recipe that takes maybe 10 minutes of actual work.
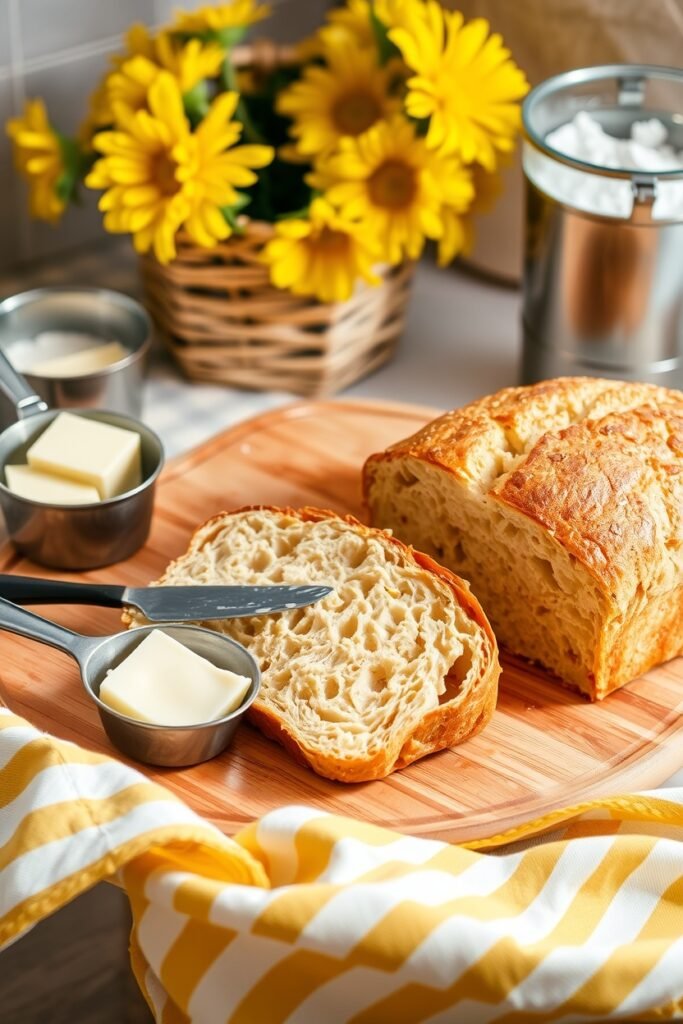
The texture? Soft and fluffy with just enough chew.
The flavor? Rich, slightly nutty, and complex enough that you’ll want it plain.
The nutrition? Packed with whole grains, seeds, and zero weird preservatives.
I’ve been making this bread twice a week for months now, and it’s become one of those recipes I can’t shut up about at dinner parties. My husband requests it specifically for his morning toast. I’ve converted at least five friends from store-bought to homemade.
So if you’re tired of choosing between bread that tastes good and bread that’s good for you, this recipe is about to solve that problem.
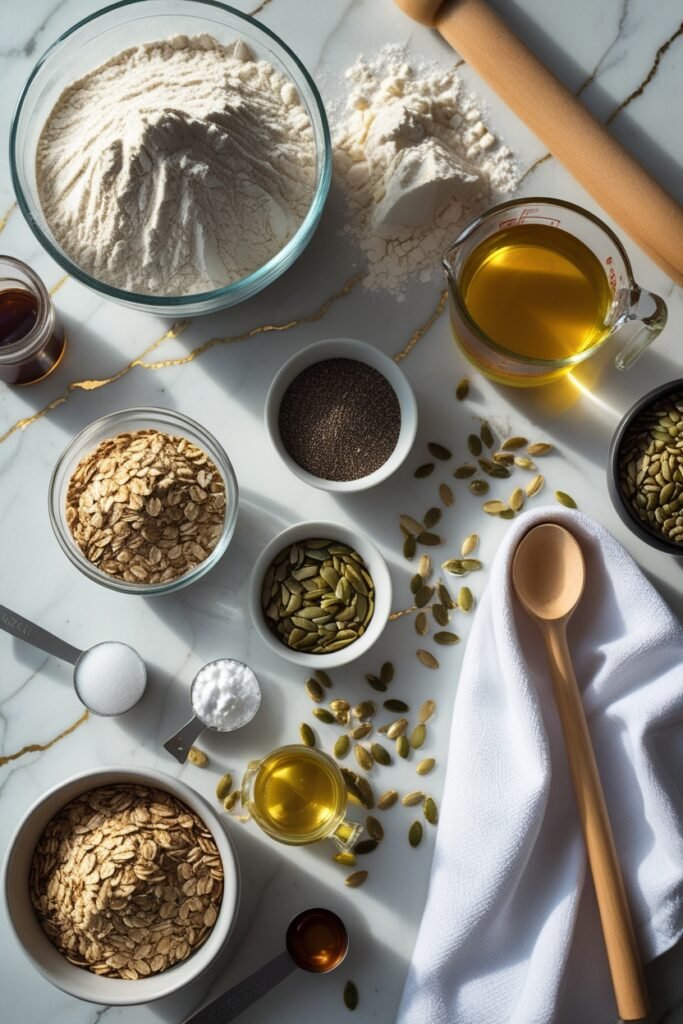
What You’ll Need
The Dry Squad
| Ingredient | Amount | Why It Matters |
|---|---|---|
| Whole wheat flour | 2 cups | The nutrition powerhouse |
| All-purpose flour | 1 cup | Keeps it light and fluffy |
| Ground flaxseed | 1/4 cup | Omega-3s and binding power |
| Rolled oats | 1/4 cup | Adds texture and fiber |
| Salt | 1 1/2 teaspoons | Flavor enhancer |
| Mixed seeds | 2 tablespoons | The crunchy factor |
The Wet Crew
| Ingredient | Amount | Temperature Note |
|---|---|---|
| Warm water | 1 1/4 cups | Must be 110°F |
| Honey | 2 tablespoons | Or maple syrup |
| Olive oil | 2 tablespoons | Extra virgin works |
| Active dry yeast | 2 1/4 teaspoons | One standard packet |
Quick Tip: Mixed seeds = sunflower + pumpkin + sesame. But honestly? Use whatever you have.
Tools You’ll Need
People also like : white bread recipe homemade
✓ Large mixing bowl
✓ 9×5 inch loaf pan
✓ Measuring cups and spoons
✓ Kitchen thermometer (helpful but optional)
✓ Clean kitchen towel
✓ Wooden spoon or whisk
✓ Cooling rack
Pro Tips
🔥 Test your yeast first.
I learned this the hard way after wasting ingredients on a loaf that never rose.
Mix your yeast with warm water and a pinch of honey, then wait 5 minutes. If it gets foamy and bubbly, you’re golden. If nothing happens, your yeast is dead and you need a fresh packet.
No foam = no rise = sad, flat bread.
⏰ Don’t skip the resting time.
I know you’re excited to bake, but the dough needs time to rise properly.
This isn’t just about size. It’s about developing flavor and that perfect texture. Rush it and you’ll end up with a dense brick instead of fluffy bread.
First rise: 1-1.5 hours
Second rise: 30-45 minutes
🌡️ Keep your water temperature right.
| Too Cold | Just Right | Too Hot |
|---|---|---|
| Yeast won’t activate | Yeast thrives | Yeast dies |
| No rise | Perfect rise | No rise |
| 🥶 Below 100°F | ✅ 105-115°F | 🔥 Above 120°F |
No thermometer? The water should feel like a comfortable bath on your wrist. Warm but not hot.
✨ Add seeds to the top for texture.
Right before baking, brush the top with a little water or egg wash and sprinkle extra seeds on top.
They’ll toast up beautifully and add this amazing crunch that makes every slice feel special. This is what separates homemade bread from store-bought vibes.
🧊 Let it cool completely before slicing.
This might be the hardest tip to follow because fresh bread smells incredible.
But cutting into hot bread will give you gummy, uneven slices. The interior is still steaming and setting up. Give it at least 30 minutes on a cooling rack.
I’ve ruined many loaves by being impatient. Don’t be like me.
Substitutions and Variations
Flour Flexibility
All whole wheat: You can do this, but the texture will be denser and the flavor more intense. Great if you’re going full health mode.
White whole wheat flour: This is my secret weapon. Lighter color and milder flavor than regular whole wheat, but same nutrition. It’s the perfect middle ground.
Bread flour instead of all-purpose: Your loaf will have more structure and chew. Good option if you like a heartier slice.
Sweetener Swaps
| Original | Swap Option | What Changes |
|---|---|---|
| Honey | Maple syrup | Slightly different flavor |
| Honey | Agave nectar | More neutral taste |
| Honey | Mashed banana (1/4 cup) | Adds banana flavor, more moisture |
| Honey | Coconut sugar | Deeper, caramel-like taste |
Seed Mix-Ins
The world is your oyster here.
I love sunflower and pumpkin seeds, but you could add:
- Chia seeds (adds gel-like texture)
- Hemp hearts (nutty and protein-packed)
- Chopped walnuts (earthy crunch)
- Sesame seeds (classic flavor)
Just keep the total around 2-3 tablespoons so the dough doesn’t get too heavy.
Flavor Variations That Slap
Herb-infused version: Mix in 1-2 tablespoons of dried rosemary, thyme, or Italian seasoning. This version is incredible with soups or as a base for sandwiches.
Sweet cinnamon raisin: Add 1 tablespoon cinnamon and 1/2 cup raisins during the last minute of kneading. Morning toast game changer.
Everything bagel style: Skip the seeds on top and use everything bagel seasoning instead. You’re welcome.
Garlic and cheese: Add 1 teaspoon garlic powder and 1/2 cup shredded cheddar to the dough. Pizza bread vibes.
Gluten-Free Adaptation
While I haven’t tested this myself, readers have had success using a 1:1 gluten-free flour blend.
You might need to:
- Add an extra tablespoon of water
- Add 1 teaspoon xanthan gum (if your blend doesn’t include it)
- Expect a slightly different texture
Make Ahead Tips
This bread freezes beautifully, which is why I usually make two loaves at once.
For the freezer:
- Let the bread cool completely (this is crucial)
- Wrap tightly in plastic wrap
- Follow with aluminum foil
- Label with the date
- Freeze for up to 3 months
To thaw:
- Room temperature for 3-4 hours
- Or slice before freezing and toast from frozen 🎯
Overnight dough hack:
After the first rise, punch it down, shape it into a loaf, and stick it in the fridge overnight.
In the morning, let it come to room temperature for about 30 minutes, then bake as usual. The slow rise in the fridge actually develops even better flavor. It’s like aging wine, but for bread.
Handpicked for you : zuchinis bread recipe
How to Make Healthy Bread
Step 1: Activate the Yeast ⏱️ 5 minutes
Pour the warm water into your large mixing bowl.
Add the honey and yeast, give it a quick stir, and let it sit for 5 minutes.
You’re looking for a foamy layer on top that tells you the yeast is alive and ready to work its magic. If nothing happens, your yeast is dead. Toss it and start with fresh yeast.
What you’ll see: Bubbles forming on the surface, slight expansion, creamy foam layer.
Step 2: Mix the Dry Ingredients ⏱️ 2 minutes
In a separate bowl, whisk together:
- Whole wheat flour
- All-purpose flour
- Ground flaxseed
- Rolled oats
- Salt
This ensures everything gets evenly distributed so you don’t end up with pockets of salt or flour clumps in your bread.
Pro move: Sift the flour if you want an extra-light texture. Not necessary, but it helps.
Step 3: Combine Everything ⏱️ 3 minutes
Pour the olive oil into the yeast mixture.
Then add your dry ingredients.
Stir with a wooden spoon until it forms a shaggy dough. It’ll look rough and uneven at this point, which is totally normal. You’re not trying to win any beauty contests yet.
Step 4: Knead the Dough ⏱️ 8-10 minutes
Turn the dough out onto a lightly floured surface and knead for about 8-10 minutes.
Kneading basics:
- Push down and away with the heels of your hands
- Fold the dough back over itself
- Turn it 90 degrees
- Repeat
You want it to become smooth and elastic.
Texture check:
- Too sticky? Add 1 tablespoon flour at a time
- Too dry? Add 1 teaspoon water at a time
- Just right? Slightly tacky but not sticking to your hands
This is where the magic happens. You’re developing gluten strands that give bread its structure.
You may also like : banana bread recipe
Step 5: First Rise ⏱️ 1-1.5 hours
Place the dough in a lightly oiled bowl, turning it once to coat all sides.
Cover with a damp kitchen towel and let it rise in a warm spot until it’s doubled in size.
Best rising spots:
- Near a sunny window ☀️
- In the oven with just the light on
- On top of the fridge
- Near (not on) a heating vent
The poke test: Gently press your finger into the dough. If the indentation springs back slowly, it’s ready. If it springs back immediately, give it more time.
Step 6: Shape the Loaf ⏱️ 3 minutes
Punch down the dough to release the air bubbles. This sounds violent but it’s satisfying.
Shape it into a rectangle roughly the length of your loaf pan.
Roll it up tightly from the short end, like a sleeping bag.
Pinch the seams closed and place it seam-side down in a greased 9×5 inch loaf pan.
Step 7: Second Rise ⏱️ 30-45 minutes
Cover the pan with a towel again and let it rise.
The dough should rise just above the rim of the pan. This second rise is what gives you that beautiful domed top that screams “homemade.”
Don’t skip this step. I tried once and the bread was dense and sad.
Step 8: Add the Topping ⏱️ 1 minute
Right before baking, brush the top with a little water and sprinkle your mixed seeds over the surface.
Press them in gently so they stick during baking.
Alternative toppings:
- Rolled oats
- Everything bagel seasoning
- Coarse sea salt
- More flaxseed
Step 9: Bake ⏱️ 35-40 minutes
Oven temp: 375°F
Bake until the top is golden brown and the bread sounds hollow when you tap it.
An instant-read thermometer should read around 190-200°F in the center.
| Time | What’s Happening |
|---|---|
| 0-15 min | Dough expands, yeast is still active |
| 15-25 min | Crust starts forming, browning begins |
| 25-35 min | Interior sets, crust darkens |
| 35-40 min | Final browning, hollow sound when tapped |
Visual cues: Deep golden brown top, pulls away slightly from pan sides, smells incredible.
Step 10: Cool Completely ⏱️ 30+ minutes
Turn the bread out onto a cooling rack and resist the urge to cut into it immediately.
Give it at least 30 minutes to set.
The bread is still cooking slightly as it cools, and cutting too early will give you gummy slices. Steam needs to escape gradually.
I know this is torture. Pour yourself some coffee and practice patience. 😅
Quick Reference: Timeline at a Glance
| Step | Time | Can You Multitask? |
|---|---|---|
| Yeast activation | 5 min | Watch it |
| Mixing | 5 min | Active work |
| Kneading | 10 min | Active work |
| First rise | 1-1.5 hours | ✅ Go do laundry |
| Shaping | 3 min | Active work |
| Second rise | 30-45 min | ✅ Prep dinner |
| Baking | 35-40 min | ✅ Binge Netflix |
| Cooling | 30 min | ✅ Set the table |
| Total time | 3-3.5 hours | Active: 25 min |
Leftovers and Storage
Room Temperature Storage
This bread stays fresh at room temperature for about 3-4 days when stored properly.
How to store:
- Sealed container
- Bread bag
- Or wrapped in a clean kitchen towel
Don’t refrigerate. I know that seems counterintuitive, but refrigeration actually makes bread go stale faster. The cold temperature causes the starches to crystallize, which is exactly what you don’t want.
Freezer Storage
After day 4, if you haven’t finished it, slice and freeze what’s left.
Freezer timeline:
- Week 1-4: Peak quality
- Week 5-8: Still great
- Week 9-12: Starting to lose flavor
Revival Tricks
| Bread State | Solution | Method |
|---|---|---|
| Slightly stale | Toast it | 2-3 min in toaster |
| Very stale | Make breadcrumbs | Food processor |
| Rock hard | French toast | Soak in egg mixture |
| Getting there | Garlic bread | Brush with butter + garlic |
Slightly stale bread actually works better for French toast and bread pudding because it absorbs flavors without getting mushy.
Nutritional Breakdown
Per Slice (12 slices per loaf)
| Nutrient | Amount | % Daily Value |
|---|---|---|
| Calories | 145 | – |
| Protein | 5g | 10% |
| Carbohydrates | 25g | 8% |
| Fiber | 4g | 16% |
| Fat | 4g | 5% |
| Sugar | 3g | – |
| Sodium | 245mg | 11% |
Why This Bread Wins
Store-bought whole wheat:
- 2g fiber per slice
- Usually has added sugar
- Contains preservatives
This recipe:
- 4g fiber per slice 💪
- Natural sweetness from honey
- Zero preservatives
- Omega-3s from flaxseed
- Whole grains + seeds
This bread packs about double the fiber of most store-bought whole wheat breads. The seeds add healthy omega-3 fatty acids, and the combination of whole wheat and all-purpose flour keeps it light without sacrificing nutrition.
Meal Pairing Suggestions
Breakfast Combos
The Classic:
- Toast + butter + flaky salt
- Simple but shows off the bread’s flavor
The Fancy:
- Mashed avocado + poached egg + red pepper flakes
- The nutty bread flavor pairs perfectly with rich yolk
The Sweet:
- Almond butter + sliced banana + drizzle of honey
- Protein-packed start to your day
Lunch Ideas
| Sandwich Type | Key Ingredients | Vibe |
|---|---|---|
| Turkey Club | Turkey, cheddar, mustard, lettuce | Classic |
| Veggie Deluxe | Hummus, roasted red peppers, arugula | Fresh |
| Tuna Melt | Tuna salad, Swiss cheese, tomato | Comfort |
| Caprese | Mozzarella, tomato, basil, balsamic | Italian |
The hearty texture holds up to juicy fillings without getting soggy.
Dinner Pairings
This bread is fantastic alongside soups and stews.
Perfect matches:
- Chili (any kind)
- Tomato soup
- Lentil stew
- Chicken noodle soup
- Beef stew
- Bean soup
The hearty texture holds up to being dunked, and it doesn’t fall apart like lighter breads do.
Dinner party move: Slice, brush with olive oil, toast until golden, rub with a garlic clove. Instant crowd-pleaser.
Troubleshooting Guide
Common Problems & Fixes
“My bread didn’t rise”
Possible causes:
- Dead yeast (always test first)
- Water too hot (killed the yeast)
- Water too cold (yeast didn’t activate)
- Not enough time in a warm spot
- Old flour (yes, flour expires)
“My bread is too dense”
What went wrong:
- Didn’t knead long enough (gluten didn’t develop)
- Added too much flour while kneading
- Didn’t let it rise long enough
- Oven temperature was too low
“The top burned but inside is raw”
Fix this:
- Lower oven temp by 25°F
- Tent with foil after 25 minutes
- Check oven calibration
“It tastes bland”
Solutions:
- Add more salt (taste the dough before first rise)
- Toast the seeds before adding
- Let it rise longer for more flavor development
“The texture is gummy”
You probably:
- Cut it while still hot
- Underbaked it (internal temp should be 190-200°F)
- Used too much liquid
FAQ
Can I use instant yeast instead of active dry yeast?
Yep, absolutely. Use the same amount and mix it directly into your dry ingredients instead of proofing it first. Everything else stays the same. Instant yeast is slightly more powerful, so your rise times might be 10-15 minutes shorter.
Why didn’t my bread rise?
Usually it’s one of three things: dead yeast, water that was too hot or too cold, or not enough time in a warm environment.
Make sure to test your yeast first and give the dough plenty of time to rise in a draft-free spot. If your house is cold, stick the bowl in the oven with just the light on.
Can I make this without a stand mixer?
You don’t need one at all. This entire recipe is made by hand, which I actually prefer for bread.
You get a better feel for the dough’s texture when you’re kneading it yourself. Plus, it’s a decent arm workout. Win-win.
How do I know when it’s done baking?
Three ways to check:
- Visual: Top is golden brown
- Sound: Tap the bottom, it sounds hollow
- Temperature: Internal temp is 190-200°F
Use all three for confidence, but temperature is the most reliable.
Can I add other mix-ins like dried fruit or cheese?
You can, but add them during the last minute of kneading so they get distributed evenly.
Dried cranberries, raisins, or cubed cheddar cheese all work great. Just don’t add more than 1/2 cup total or the dough won’t hold together well. The extra weight interferes with the rise.
Why is my bread dense?
Usually this means either:
- The yeast didn’t activate properly
- You didn’t let it rise long enough
- You added too much flour during kneading
Remember, the dough should be slightly tacky but not sticky. When in doubt, err on the side of slightly wetter dough.
Can I use this recipe to make rolls instead?
Definitely. After the first rise, divide the dough into 12 pieces, shape them into balls, and place them on a baking sheet.
Let them rise for 30 minutes, then bake at 375°F for 18-22 minutes. Brush the tops with butter right when they come out of the oven.
Does whole wheat flour brand matter?
Kind of. Some brands are finer than others, which affects how much liquid the dough needs.
King Arthur and Bob’s Red Mill are both consistent and reliable. If your dough seems too dry or wet, adjust by adding flour or water a tablespoon at a time. Dough is forgiving.
How long will this really take start to finish?
About 3-3.5 hours total, but only 20-25 minutes of that is active work.
The rest is just waiting for the dough to rise and bake. Perfect for a lazy Sunday when you’re home anyway.
Can I double this recipe?
Yes, but mix it in two separate batches. Doubling the dough makes it harder to knead properly by hand. Make two loaves back-to-back, freeze one, thank yourself later.
Wrapping Up
Making your own healthy bread is one of those small things that makes a surprisingly big difference in how you eat.
There’s something about knowing exactly what’s in your food. About the simple satisfaction of pulling a golden loaf out of your oven. That makes you want to keep doing it.
And when that bread actually tastes incredible?
You’ll wonder why you ever bought the store-bought stuff in the first place.
This recipe has become a staple in my kitchen, and I’m betting it’ll become one in yours too. Give it a try this weekend. Your kitchen will smell amazing, you’ll have fresh bread for days, and you might just impress yourself with what you can pull off.
Drop a comment below once you’ve made it. I want to know what you think, if you made any tweaks, or if you have questions.
And if you’re wondering if you can handle making bread from scratch?
Stop overthinking it. You absolutely can. 🍞


