
You know that moment when you sit down at an Italian restaurant and they bring out warm bread with that herb-infused olive oil?
That’s what we’re making today, except yours is going to taste even better because you’ll know exactly what’s in it.
I’ve made this bread dipping oil probably a hundred times at this point. It’s one of those recipes that sounds fancy but takes about 5 minutes to throw together.
And once you start making it at home, you’ll realize how easy it is to elevate a simple dinner or impress guests without breaking a sweat.
The thing about store-bought versions is they’re either too oily, not flavorful enough, or packed with preservatives.
When you make it yourself, you control everything. The spice level, the garlic intensity, the herbs you use.
Plus, it keeps well for about a week, so you can make a batch and have it ready whenever you need it.
Let me walk you through exactly how to make this.
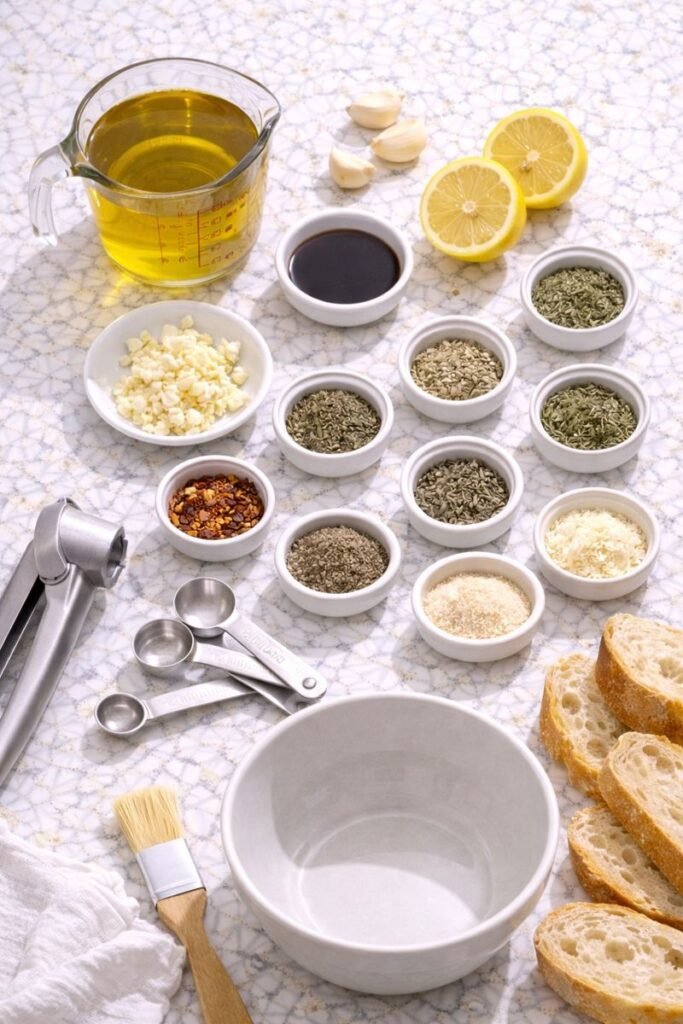
What You’ll Need
Oil Base
| Ingredient | Amount | Notes |
|---|---|---|
| Extra virgin olive oil | 1 cup | Use the good stuff here, it matters |
| Fresh garlic, minced | 3-4 cloves | Fresh only, no jarred garlic |
| Balsamic vinegar | 2 tablespoons | Adds sweetness and tang |
| Fresh lemon juice | 1 tablespoon | Brightens everything up |
Herb & Spice Mix
| Ingredient | Amount | What It Does |
|---|---|---|
| Dried basil | 1 tablespoon | Sweet, peppery base flavor |
| Dried oregano | 1 tablespoon | Classic Italian herb |
| Dried rosemary, crushed | 1 teaspoon | Pine-like, savory depth |
| Dried thyme | 1 teaspoon | Earthy, subtle |
| Red pepper flakes | 1 teaspoon | The kick you crave |
| Freshly cracked black pepper | 1 teaspoon | Sharpness and heat |
| Sea salt or kosher salt | ½ teaspoon | Brings out all flavors |
| Garlic powder | ½ teaspoon | Extra garlic punch |
| Onion powder | ½ teaspoon | Sweet, savory layer |
| Dried parsley | ¼ teaspoon | Color and mild flavor |
Optional Add-Ins (Pick Your Favorites!)
- Freshly grated Parmesan cheese (2 tablespoons) → adds nutty, salty richness
- Sun-dried tomatoes, finely chopped → sweet, tangy burst
- Kalamata olives, minced → briny, Mediterranean vibe
- Smoked paprika (a pinch) → smoky depth
For Serving
- Fresh crusty bread (Italian, sourdough, or baguette)
Tools You’ll Need
✓ Small mixing bowl or shallow serving dish
✓ Measuring spoons
✓ Garlic press or knife for mincing
✓ Spoon for mixing
✓ Small jar with lid (if storing)
You probably have all of these already.
Pro Tips
1. Let It Sit (This Is Not Optional)
The flavors need at least 30 minutes to meld together, but it’s even better after a few hours.
I usually make mine in the morning if I’m serving it for dinner. By then, the herbs have softened slightly and released all their oils into the olive oil base.
Pro move: Make it the night before and let it sit in the fridge overnight. The flavors will be insanely good.
2. Warm Your Bread, Not the Oil
A lot of people think you need to heat the oil, but room temperature oil tastes better and the herbs stay more aromatic.
Just warm your bread in the oven at 350°F for 5-7 minutes until it’s crusty on the outside and soft inside.
3. Fresh Garlic Is Non-Negotiable
Jarred minced garlic has a weird metallic taste that’ll ruin the whole thing.
Take the extra 30 seconds to mince fresh cloves. Your taste buds will thank you.
4. Use a Shallow Dish
The oil spreads out more, making it easier to dip your bread without it getting too soggy or falling apart.
I use a wide, shallow pasta bowl and it’s perfect.
5. Taste as You Go
Everyone’s palate is different.
Start with the measurements I’ve given, then adjust the spice level, salt, or garlic to your liking. This is your recipe now.
Substitutions and Variations
Can’t find exactly what you need? Here’s what works:
| Instead of This | Use This | How It Changes the Flavor |
|---|---|---|
| Extra virgin olive oil | Light olive oil | Milder, less peppery taste |
| Balsamic vinegar | Red wine vinegar | Sharper, less sweet |
| Fresh lemon juice | Lime juice | Slightly different citrus note |
| Dried herbs | Fresh herbs (triple the amount) | Brighter, more vibrant flavor |
| Parmesan cheese | Pecorino Romano | Saltier, sharper, more intense |
| Red pepper flakes | Cayenne pepper | More heat, less visual appeal |
For a Milder Version:
Skip the red pepper flakes entirely if you’re serving this to kids or people who don’t like heat.
For Extra Garlic Lovers:
Add 1-2 more cloves of fresh garlic. You can never have too much garlic in my opinion.
For a Sweeter Version:
Add a teaspoon of honey or increase the balsamic vinegar to 3 tablespoons.
Make Ahead Tips
This is actually better when made ahead. Here’s how to do it:
3 Days Before:
Mix all dried herbs and spices. Store in an airtight container in a cool, dark place.
Morning of Serving:
Add olive oil, balsamic vinegar, fresh garlic, and lemon juice. Let sit at room temperature for at least 2-3 hours.
Why this works:
The dried herbs need time to rehydrate and release their flavors. The fresh garlic stays pungent without getting bitter.
Bulk Prep Hack:
Make a big batch of just the herb mix (multiply the dried ingredients by 4-5). Store it in a jar.
When you need dipping oil, just scoop out 3-4 tablespoons of the mix, add oil, vinegar, garlic, and lemon. Done in 2 minutes.
How to Make Bread Dipping Oil
Step 1: Mix Your Dry Ingredients (2 minutes)
Grab a small bowl and dump in all your dried herbs and spices.
Basil, oregano, rosemary, thyme, red pepper flakes, black pepper, salt, garlic powder, onion powder, and parsley.
Give it a good stir to distribute everything evenly. This is your flavor base.
Step 2: Add the Liquids (1 minute)
Pour in your olive oil first. It should pool at the bottom of the bowl.
Then add the balsamic vinegar and fresh lemon juice.
Why the acid matters:
The vinegar and lemon balance out the richness of the olive oil. Without it, the dip tastes flat and one-dimensional.
Step 3: Add Fresh Garlic (1 minute)
Mince your garlic cloves as finely as you can.
I use a garlic press because it releases more of the oils and gives you a stronger, more intense flavor.
Stir the garlic into the oil mixture. You’ll see little specks of garlic throughout.
Step 4: Let It Rest (30 minutes to 3 hours)
This is the step most people skip, and it’s the most important one.
Let your dipping oil sit at room temperature for at least 30 minutes.
The dried herbs need time to rehydrate slightly and release their flavors into the oil. If you can wait a few hours, even better.
What happens during resting:
- Dried herbs soften and bloom
- Garlic infuses into the oil
- Flavors meld together
- Oil takes on a greenish tint from the herbs
Step 5: Taste and Adjust (1 minute)
Before serving, dip a small piece of bread in and taste it.
Does it need more salt? More heat? More garlic? More acid?
This is your chance to customize it exactly how you like it.
Common adjustments:
- Too bland → add more salt and garlic
- Too oily → add a splash more vinegar or lemon
- Not spicy enough → more red pepper flakes
- Too spicy → add more olive oil to dilute
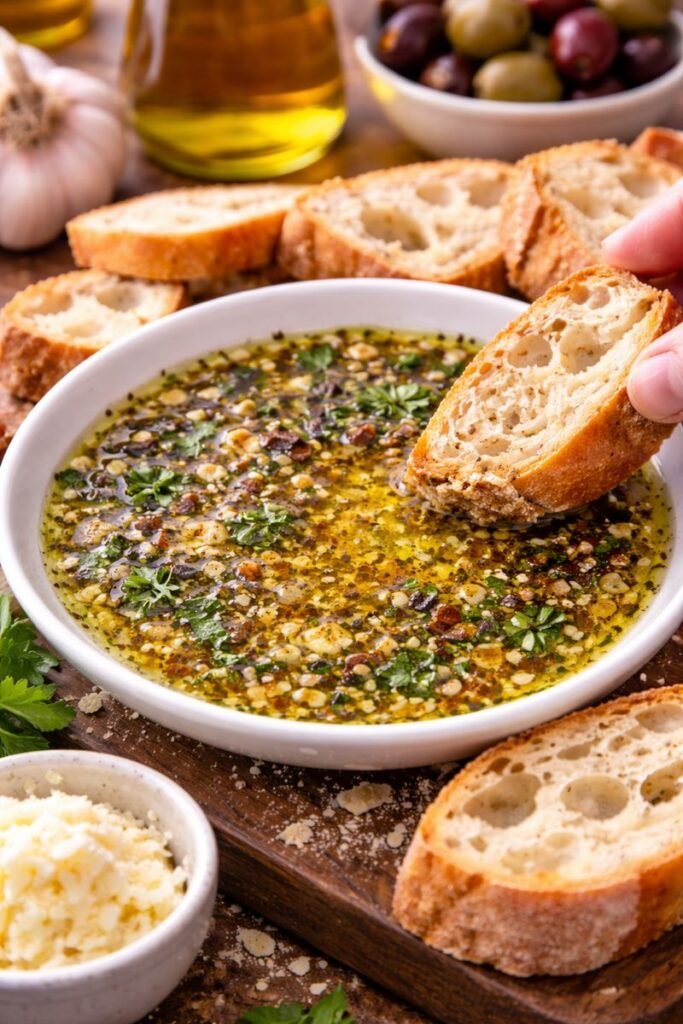
Step 6: Serve (0 minutes, just enjoy!)
Transfer your dipping oil to a shallow bowl or plate.
If you’re using Parmesan, sprinkle it on top right before serving. It’ll create this beautiful crust on the surface.
Serve it alongside warm, crusty bread cut into thick slices. You want pieces big enough to dip without falling apart.
Serving tip:
Arrange everything on a wooden board with the oil in the center, bread pieces around it, and maybe some grapes or olives on the side. Looks fancy, tastes incredible.
Nutritional Information
Per 2-tablespoon serving (oil only, bread not included):
| Nutrient | Amount |
|---|---|
| Calories | 240 |
| Total Fat | 27g |
| Saturated Fat | 4g |
| Sodium | 150mg |
| Total Carbohydrates | 2g |
| Protein | 0g |
Note: This is a healthy fat from olive oil. It’s good for your heart and loaded with antioxidants.
Leftovers and Storage
If you have leftover dipping oil (which you probably won’t, but just in case), here’s how to store it:
Short-term (up to 1 week):
Store in an airtight container in the refrigerator. The olive oil will solidify, so take it out 30 minutes before serving to let it come to room temperature.
What to do with leftovers:
- Drizzle over roasted vegetables
- Use as a marinade for chicken or fish
- Toss with hot pasta for a quick dinner
- Brush on pizza crust before baking
- Mix into mashed potatoes for extra flavor
Important: Fresh garlic has a short shelf life. Don’t keep it longer than a week. After that, the garlic can start to develop a weird, bitter taste.
Recipe Variations You’ll Love
Mediterranean Version
Add: Kalamata olives (minced), sun-dried tomatoes (chopped), feta cheese crumbles
Skip: Red pepper flakes
Spicy Italian Version
Add: Extra red pepper flakes, cayenne pepper, hot Italian sausage seasoning
Double: The garlic
Herb Garden Version
Use: All fresh herbs instead of dried (triple the amounts)
Add: Fresh chives, fresh basil leaves (torn), fresh thyme sprigs
Balsamic-Heavy Version
Increase: Balsamic vinegar to ½ cup
Add: 1 teaspoon honey
This creates more of a dipping sauce than an oil
Pairing Suggestions
Wine Pairings:
- Chianti (red)
- Pinot Grigio (white)
- Prosecco (sparkling)
Serve alongside:
- Antipasto platter with cured meats and cheeses
- Caprese salad
- Bruschetta
- Roasted vegetables
- Grilled chicken or fish
Bread options ranked:
- Fresh Italian bread (crusty outside, soft inside)
- Sourdough (tangy, chewy)
- Ciabatta (airy, perfect for soaking)
- French baguette (classic, never fails)
- Focaccia (already has olive oil, doubles down on flavor)
FAQ
Can I use dried garlic instead of fresh?
You can, but it won’t taste the same. Fresh garlic has a sharpness and complexity that dried garlic just doesn’t have.
If you absolutely have to use dried, add an extra ½ teaspoon of garlic powder. Just know you’re settling for second best.
What’s the best bread to serve with this?
Any crusty bread works. Italian bread, sourdough, ciabatta, or a fresh baguette are all great options.
Just make sure it’s good quality bread because it’s half the experience. Day-old bread from the grocery store won’t cut it.
Can I make this spicy?
Absolutely. Add more red pepper flakes, or throw in some cayenne pepper if you want it really spicy.
You can also add a few drops of hot sauce or use spicy Italian seasoning.
Do I need to refrigerate this?
Only if you’re storing it for later. If you’re serving it the same day, room temperature is fine.
Just don’t leave it out for more than 4 hours if it has fresh garlic in it.
Can I use this on pasta?
Yes! It makes a great quick pasta sauce. Just toss it with hot pasta and maybe some fresh vegetables or grilled chicken.
Add a splash of pasta water to help it coat the noodles better.
Is this gluten-free?
The dipping oil itself is 100% gluten-free. Just make sure to serve it with gluten-free bread if you need it to be completely gluten-free.
How long does it take for the flavors to develop?
Minimum 30 minutes, but I think it tastes best after 2-3 hours.
Some people even make it the night before and let it sit overnight in the fridge. The flavor will blow your mind.
Can I add other ingredients?
Definitely. Chopped sun-dried tomatoes, capers, anchovies (if you’re brave), or even a bit of honey for sweetness are all great additions.
Just taste as you go so you don’t overdo it.
Why is my oil bitter?
Usually because the garlic sat too long or the olive oil is low quality. Use fresh, good quality extra virgin olive oil and don’t let the garlic sit for more than a week.
Can I heat this oil?
You can, but you’ll lose a lot of the fresh herb flavors. If you want warm dipping oil, heat it very gently on the lowest setting for 2-3 minutes max.
Time Breakdown
Here’s exactly how long this takes:
| Task | Time |
|---|---|
| Gathering ingredients | 3 minutes |
| Mincing garlic | 1 minute |
| Mixing dry ingredients | 2 minutes |
| Adding liquids | 1 minute |
| Resting time | 30 minutes – 3 hours |
| Total active time | 7 minutes |
| Total time (with resting) | 37 minutes – 3 hours |
This is one of those rare recipes where the “hardest” part is just waiting.
Wrapping Up
This bread dipping oil is one of those recipes that feels special but requires almost no effort. 😊
It’s perfect for when you want to make a regular dinner feel a little more elevated, or when you need an easy appetizer that’ll impress people without stressing you out.
The flavors are way better than anything you’d buy at the store, and you can customize it however you want. Make it spicier, add more herbs, throw in some cheese. It’s yours to play with.
Give this a try and let me know how it turns out! I’d love to hear what tweaks you made or if you discovered any flavor combinations I haven’t tried yet.
Drop a comment below and tell me what bread you served it with.


