
You know that feeling when you bite into something warm, cheesy, and impossibly soft?
That’s pão de queijo for you.
I’m not exaggerating when I say I probably ate my weight in these little cheese puffs when I was in Brazil. They’re sold everywhere from fancy cafes to gas stations, and honestly, I get it.
Once you try one fresh from the oven, you’ll understand why Brazilians eat these daily.
Here’s what makes them crazy addictive: they’re crispy on the outside, soft and chewy on the inside, and packed with so much cheese that every bite feels like a tiny celebration. 🧀
The first time I had them, I ate seven in one sitting. No shame.
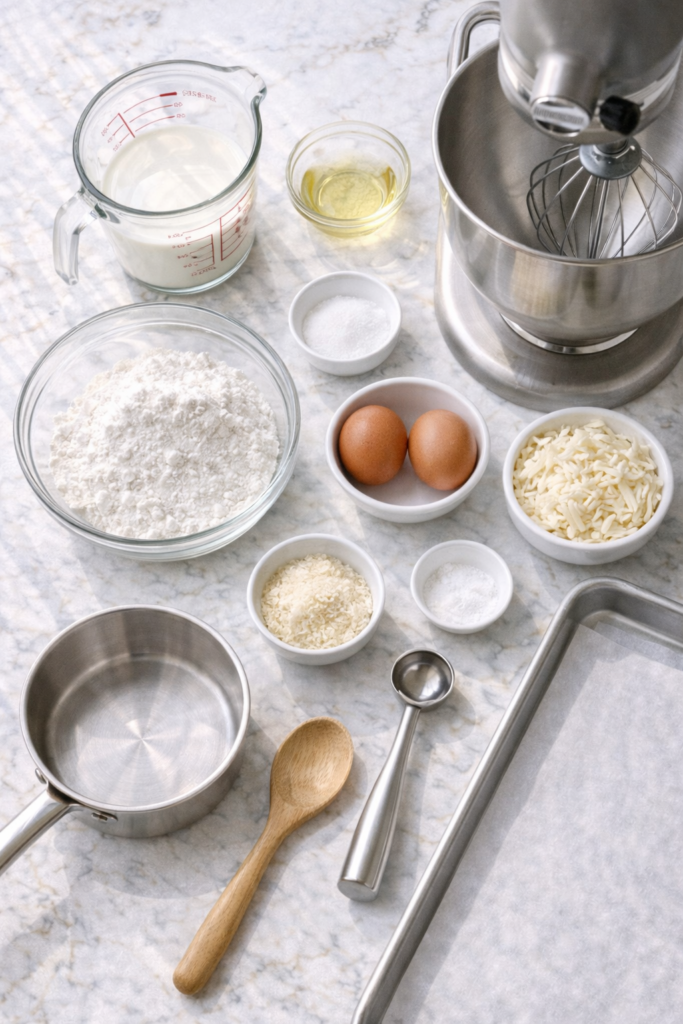
What You’ll Need
Let me walk you through what goes into these little balls of heaven.
| Ingredient | Amount | Why It Matters |
|---|---|---|
| Whole milk | 1 cup | Creates steam for that perfect puff |
| Vegetable oil | ½ cup | Keeps them moist and tender |
| Salt | 1 tsp | Balances all that cheese |
| Tapioca flour | 2 cups | The secret to that chewy texture |
| Eggs (room temp) | 2 large | Binds everything together |
| Mozzarella cheese | 1½ cups shredded | Gives you that gooey stretch |
| Parmesan cheese | ½ cup grated | Adds sharp, salty flavor |
Quick Shopping Tip: Can’t find tapioca flour in the baking aisle? Check the international or gluten-free section. Some stores label it as “cassava starch” or “manioc flour.”
Tools You’ll Need
✓ Medium saucepan
✓ Wooden spoon or silicone spatula
✓ Large mixing bowl
✓ Electric mixer (stand or hand)
✓ Measuring cups and spoons
✓ Baking sheet
✓ Parchment paper
✓ Small cookie scoop (game changer!)
Pro Tips
These come straight from my kitchen disasters and wins.
1. Temperature matters like crazy
Your eggs need to be room temperature. Cold eggs will seize up the dough and you’ll end up with a lumpy mess instead of smooth, stretchy dough.
Take them out of the fridge at least 30 minutes before you start.
2. Don’t skimp on the cheese
I’ve tried making these with less cheese thinking I could save calories.
Nope.
They turned out sad and flavorless. The cheese is what makes these special, so use the full amount.
3. The dough should be sticky but workable
Here’s what you’re looking for:
Perfect Dough Test: When you lift the beater, the dough should fall off in thick ribbons. If it’s too liquidy, add 1 tablespoon of tapioca flour at a time. Too stiff? Add milk by the teaspoon.
4. Size consistency is your friend
Use a cookie scoop to portion these out. They’ll bake more evenly and you won’t end up with some burnt and some undercooked.
I learned this the hard way after burning half a batch.
5. Let them cool for exactly 2 minutes
Not 5, not 10. Two minutes.
That’s the sweet spot where they’re cool enough to handle but still warm and gooey inside.
Substitutions and Variations
Life happens and sometimes you don’t have exactly what a recipe calls for.
Cheese Swap Guide
| Instead of… | Use this… | Flavor Profile |
|---|---|---|
| Mozzarella | Provolone | Sharper, more tangy |
| Mozzarella | Monterey Jack | Milder, creamier |
| Parmesan | Aged cheddar | Bolder, more intense |
| Parmesan | Pecorino Romano | Saltier, sharper |
| Any cheese | Pepper Jack | Spicy kick! 🌶️ |
Dietary Modifications
Dairy-Free?
- Use almond or oat milk (unsweetened)
- Replace cheese with vegan alternatives
- Nutritional yeast adds cheesy flavor
Want More Protein?
- Add 2 tablespoons of protein powder to the dry mix
- Mix in ¼ cup cottage cheese with the eggs
Low-Sodium?
- Cut salt to ½ teaspoon
- Use low-sodium cheese
- The cheese already has plenty of salt
Flavor Twists I’ve Tried
✓ Garlic Lover’s: Add 3 minced garlic cloves to the hot milk
✓ Herby: Stir in 2 tablespoons fresh chives or rosemary
✓ Bacon Everything: Mix in ½ cup crumbled bacon
✓ Spicy: Add ½ teaspoon cayenne pepper
✓ Everything Bagel: Roll in everything bagel seasoning before baking
My personal favorite? The garlic version. It’s ridiculously good.
Make Ahead Tips
This is where these really shine for busy people.
Your Make-Ahead Options
| Method | Storage Time | Reheating Instructions |
|---|---|---|
| Freeze unbaked dough balls | 3 months | Bake from frozen, add 5 min |
| Refrigerate dough | 24 hours | Bring to room temp, then bake |
| Freeze baked bread | 2 months | 350°F for 10-12 min |
| Partially bake | 2 months | 350°F for 10 min to finish |
My Go-To Strategy:
I always keep a batch of unbaked dough balls in my freezer. Scoop them onto a parchment-lined sheet, freeze until solid (about 2 hours), then transfer to a freezer bag.
Game changer for surprise guests or when you need a quick snack.
How to Make Brazilian Cheese Bread

Ready to do this? Let’s go.
Step 1: Heat Your Liquid Ingredients
⏱️ Time: 3 minutes
Pour the milk, oil, and salt into a medium saucepan. Place it over medium-high heat.
Bring it to a gentle boil. You’ll see bubbles forming around the edges.
Don’t walk away from the stove here.
What You’re Looking For: Small bubbles breaking the surface all around the edges of the pan. That’s your cue to move to step 2.
Step 2: Mix in the Tapioca Flour
⏱️ Time: 2 minutes
Take the pan off the heat immediately once it boils.
Dump all the tapioca flour in at once. Stir it hard with a wooden spoon until everything comes together into a sticky blob.
It’ll look weird and lumpy at first. Keep stirring. It’ll smooth out.
Let this mixture cool for about 10 minutes. If you add the eggs too soon, you’ll scramble them.
Cooling Hack: Transfer the mixture to your mixing bowl to speed up cooling by about 3 minutes.
Step 3: Add the Eggs
⏱️ Time: 5 minutes
Transfer your cooled dough to a large bowl if you haven’t already.
If you have a stand mixer, use it. If not, a hand mixer works fine.
Add one egg and beat on medium speed until it’s completely mixed in. The dough will look broken and separated.
Don’t panic.
Add the second egg and keep beating. After about 2 minutes, the dough will come together into a smooth, elastic mixture that looks like thick cake batter.
Step 4: Mix in All That Cheese
⏱️ Time: 2 minutes
Fold in both cheeses with a spatula.
Make sure they’re evenly distributed throughout the dough. This is where it starts smelling incredible.
The dough should look thick and stretchy at this point.
Step 5: Shape and Bake
⏱️ Time: 25 minutes
Preheat your oven to 375°F. Line a baking sheet with parchment paper.
Use a small cookie scoop or spoon to portion out the dough into balls about 1½ inches in diameter.
Space them about 2 inches apart on the baking sheet. They’ll puff up as they bake.
| Size | Baking Time | Final Size |
|---|---|---|
| 1 inch balls | 18-20 min | Bite-sized |
| 1.5 inch balls | 20-25 min | Standard |
| 2 inch balls | 25-30 min | XL version |
Bake for 20-25 minutes. You want them golden brown on top with slightly darker spots.
The bottoms should be crispy.
Step 6: Cool (Briefly) and Devour
⏱️ Time: 2 minutes
Let them sit on the baking sheet for 2 minutes.
Then transfer to a plate and eat them while they’re still warm.
The outside will be crispy and the inside will be stretchy, chewy, and full of melted cheese.
Visual Baking Guide
What They Should Look Like:
| Time | Appearance | What’s Happening |
|---|---|---|
| 0 min | Pale, dough balls | Just went in the oven |
| 10 min | Starting to puff | Steam creating air pockets |
| 15 min | Doubled in size | Still pale colored |
| 20 min | Light golden | Almost there! |
| 25 min | Golden brown spots | Perfect! Take them out |
| 30 min+ | Too dark | Oops, a bit over |
Leftovers and Storage
Here’s the truth about leftovers: there usually aren’t any.
But if you somehow have self-control, here’s what to do.
Storage Comparison Chart
| Storage Method | Duration | Best For | Texture When Reheated |
|---|---|---|---|
| Room temp (sealed container) | 2 days | Eating same day | Slightly soft |
| Refrigerator (airtight) | 5 days | Week planning | Crispy if reheated right |
| Freezer (freezer bag) | 2 months | Long-term storage | Like fresh! |
Reheating Instructions
Oven Method (Best):
- Preheat to 350°F
- Place on baking sheet
- Heat for 5-7 minutes
- Let cool 1 minute
Air Fryer Method (Fastest):
- Set to 350°F
- Heat for 3-4 minutes
- Shake basket halfway
Microwave (Last Resort):
- 15-20 seconds per piece
- They’ll be soft, not crispy
- Only do this if desperate
Pro Tip: Brush them lightly with melted butter before reheating if they seem dry. Brings them back to life!
Nutritional Breakdown
Per Serving (1 cheese bread, recipe makes 24)
| Nutrient | Amount | % Daily Value |
|---|---|---|
| Calories | 85 | 4% |
| Total Fat | 6g | 8% |
| Saturated Fat | 2g | 10% |
| Cholesterol | 25mg | 8% |
| Sodium | 135mg | 6% |
| Carbohydrates | 9g | 3% |
| Fiber | 0g | 0% |
| Sugar | 1g | – |
| Protein | 3g | 6% |
| Calcium | 65mg | 5% |
Good to Know:
- Naturally gluten-free ✓
- Good source of calcium ✓
- Contains protein from cheese ✓
- Lower calorie than most bread ✓
Meal Pairing Suggestions
Brazilian cheese bread goes with basically everything.
Perfect Pairings by Meal
Breakfast Combos:
- Scrambled eggs + fresh fruit + Brazilian coffee
- Açai bowl + pão de queijo on the side
- Avocado toast replacement (yes, really)
Lunch Ideas:
- Pair with tomato soup for dipping
- Serve alongside a green salad
- Use as burger buns (try it!)
Dinner Matches:
- Brazilian feijoada (black bean stew)
- Grilled steak + roasted vegetables
- Any pasta dish needs these on the side
Snack Time:
- Plain with nothing else needed
- Dipped in marinara sauce
- Served with guacamole
- Paired with a cold beer 🍺
Party Serving Ideas
| Occasion | Serving Suggestion | Quantity Needed |
|---|---|---|
| Game day | Basket with dipping sauces | 3-4 per person |
| Dinner party | Bread basket appetizer | 2-3 per person |
| Brunch | Alongside main dishes | 2-3 per person |
| Kids party | Mini versions | 4-5 per kid |
I like making a big batch for game day. They disappear faster than chips.
Time Management Guide
Let’s break down exactly how long this takes.
Complete Timeline
| Task | Duration | Can Multitask? |
|---|---|---|
| Boil milk mixture | 3 min | Watch the pot |
| Cool mixture | 10 min | ✓ Prep baking sheet |
| Mix in eggs | 5 min | Focused mixing |
| Add cheese | 2 min | ✓ Preheat oven |
| Scoop dough | 5 min | Focused work |
| Bake | 25 min | ✓ Clean up kitchen |
| Cool | 2 min | Set the table |
| Total | 52 min | – |
Speed Hacks:
- Use stand mixer: saves 3 minutes
- Bake two sheets: cuts time in half
- Prep ingredients first: saves 5 minutes
Realistic Timeline: Plan for 1 hour from start to eating if you’re doing this for the first time.
Troubleshooting Guide
Things go wrong sometimes. Here’s how to fix them.
| Problem | Why It Happened | The Fix |
|---|---|---|
| Dough too runny | Eggs too large or not enough flour | Add tapioca flour, 1 tbsp at a time |
| Dough too thick | Too much flour or not enough liquid | Add milk, 1 tsp at a time |
| Didn’t puff up | Oven too cool or old eggs | Check oven temp with thermometer |
| Burnt bottoms | Oven too hot | Lower temp by 25°F |
| Dense, heavy | Didn’t beat eggs enough | Mix for full 2-3 minutes |
| Not cheesy enough | Not enough cheese (duh) | Use the full amount next time |
| Flat, spread out | Dough too warm | Chill dough 15 min before baking |
FAQ
Can I make these without tapioca flour?
No. Regular flour won’t work here. Tapioca flour (also called tapioca starch) is what gives these their signature chewy texture.
You can find it at most grocery stores in the gluten-free section or at international markets. Bob’s Red Mill makes a good one.
Why is my dough too runny?
Two reasons: your eggs might have been too large, or you didn’t measure the tapioca flour correctly.
Add more tapioca flour, one tablespoon at a time, until the dough thickens to a scoopable consistency.
Can I bake these in a mini muffin tin?
Yes! Grease the tin well and fill each cup about ¾ full.
Bake for 15-18 minutes. They’ll pop out looking like little cheese muffins. Kids love these.
Why didn’t mine puff up?
Your oven temperature was probably too low. Use an oven thermometer to check.
Pão de queijo needs that initial blast of heat to puff properly. Another culprit: old eggs that have lost their rising power.
Are these gluten-free?
Yes! Tapioca flour is naturally gluten-free.
Just make sure all your other ingredients are certified gluten-free if you have celiac disease. Check your cheese labels.
Can I use a food processor?
You can, but a mixer works better.
The dough needs to be beaten to develop that stretchy texture, and a food processor might over-process it. Stick with a hand or stand mixer.
What’s the difference between tapioca flour and tapioca starch?
Nothing. They’re the same thing, just different names.
Look for either one. Some brands also call it “cassava flour” but make sure it says “tapioca” on the label.
How do I know when they’re done?
They should be golden brown on top with some darker spots.
The bottoms should sound hollow when you tap them. If they’re still pale, give them another 3-5 minutes.
Can kids help make these?
Absolutely. Let them measure ingredients, mix in the cheese, or scoop the dough onto the baking sheet.
Just keep them away from the hot stove and oven. My niece loves making these with me.
Do I really need both kinds of cheese?
The mozzarella gives you that gooey stretch and the parmesan adds sharp flavor.
You could use all mozzarella, but you’ll lose some of that depth of flavor that makes these special. Trust me, use both.
Can I make these egg-free?
It’s tricky because eggs provide structure. You can try using flax eggs (2 tbsp ground flaxseed + 5 tbsp water), but the texture won’t be quite the same.
They’ll be more crumbly and less chewy.
Wrapping Up
There you have it.
The same cheese bread I fell in love with in Brazil, right in your kitchen.
These little cheese puffs are proof that simple ingredients can create something really special. Seven ingredients, less than an hour, and you’ve got a batch of warm, cheesy, addictive Brazilian pão de queijo that’ll make you feel like you’re sitting in a cafe in Florianópolis.
Make them for breakfast, serve them at your next dinner party, or just eat a whole batch by yourself while binge-watching your favorite show.
No judgment here.
Now I want to hear from you. Are you going to try these this week? Have you had pão de queijo before? Drop a comment below and let me know how they turned out or if you have any questions I didn’t cover.


