
You know that smell when someone’s baking fresh bread?
That warm, yeasty, can’t-ignore-it aroma that makes you drop everything and follow your nose to the kitchen like you’re in a cartoon?
That’s what we’re making today.
And before you say “homemade bread is too hard” – stop right there. I used to think the same thing until I realized I was overthinking it.
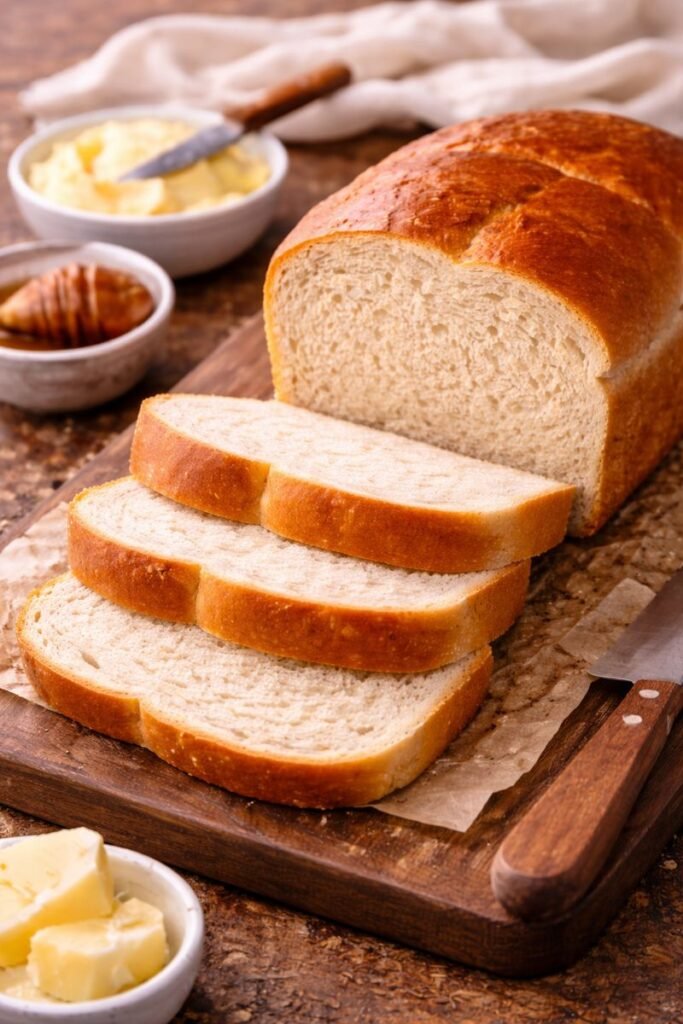
This white bread? Soft as a cloud. Golden crust that just crispy enough. Perfect for sandwiches, toast, or eating straight out of the oven with butter melting into every bite.
I’ve made this at least 50 times. Still get butterflies when it comes out of the oven.
Let’s do this.
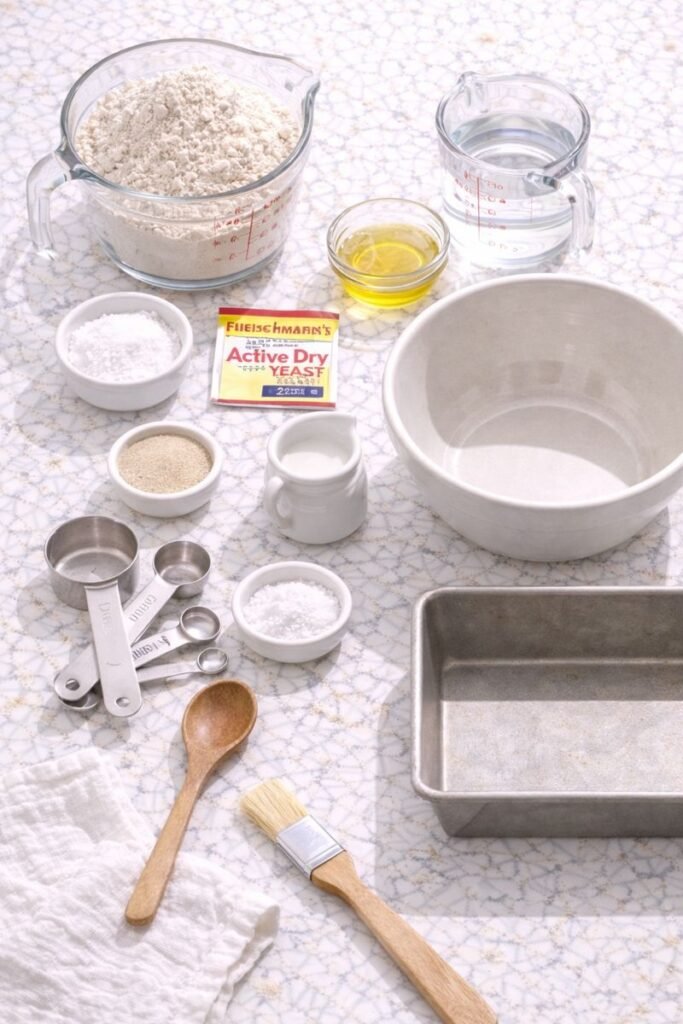
What You’ll Need
The Bread Ingredients
| Ingredient | Amount | Why It Matters |
|---|---|---|
| All-purpose flour | 4 cups (+ extra) | The foundation – gives structure |
| Granulated sugar | 2 tablespoons | Feeds the yeast, adds subtle sweetness |
| Salt | 2 teaspoons | Flavor + controls yeast growth |
| Active dry yeast | 2¼ teaspoons (1 packet) | The magic that makes it rise |
| Warm water | 1½ cups (110°F) | Activates the yeast |
| Unsalted butter | 3 tablespoons (melted) | Softness + rich flavor |
| Milk | 2 tablespoons | For brushing (that golden top!) |
Tools (Nothing Fancy)
✓ Large mixing bowl
✓ Measuring cups & spoons
✓ Wooden spoon or stand mixer with dough hook
✓ Clean kitchen towel
✓ 9×5 inch loaf pan
✓ Pastry brush
✓ Cooling rack
Quick Budget Check: This entire loaf costs about $1.50 to make. A store-bought artisan loaf? Easily $5-7. You do the math. 💰
Pro Tips (The Game-Changers)
🔥 Hot Tip #1: Test Your Yeast First
Mix yeast with warm water + a pinch of sugar. Wait 5-10 minutes. Foamy and bubbly = good to go. Nothing happening = dead yeast, grab a new packet. Don’t skip this or you’ll waste everything else.
🌡️ Hot Tip #2: Water Temperature Is CRITICAL
Too hot = dead yeast. Too cold = sad, lazy yeast that won’t rise. Aim for 110°F (feels like a warm bath). No thermometer? Stick your finger in. Warm but not uncomfortable.
💪 Hot Tip #3: The Windowpane Test
Stretch a small piece of dough between your fingers. Can you see light through it without it tearing? You’re done kneading. Tears immediately? Keep going.
⏰ Hot Tip #4: Don’t Rush the Second Rise
That second rise in the pan = bakery-style dome on top. Worth. Every. Minute.
🧈 Hot Tip #5: Butter Brush = Secret Weapon
Brush melted butter on top RIGHT when it comes out of the oven. Gives you that soft, glossy, professional-looking crust.
The Full Recipe (Step-by-Step)
Step 1: Wake Up That Yeast ⏱️ 10 minutes
Pour warm water into your large bowl.
Sprinkle yeast on top. Add a pinch of sugar.
Quick stir. Walk away for 10 minutes.
What you’re looking for: Foamy top, yeasty smell. That’s your green light.
Step 2: Build the Dough ⏱️ 5 minutes
Add to your foamy yeast mixture:
- Rest of the sugar
- Salt
- Melted butter
- 2 cups flour
Stir until combined. Looks like thick batter? Perfect.
Gradually add remaining 2 cups flour (half cup at a time).
Stop when: Dough pulls away from bowl sides and starts coming together.
Step 3: Knead Like You Mean It ⏱️ 8-10 minutes
Flour your counter. Turn dough out.
By hand: Push away with heel of hand → fold back → quarter turn → repeat for 8-10 minutes.
Stand mixer: Medium speed, 5-6 minutes.
Texture check: Smooth, elastic, slightly tacky (NOT sticky).
| Too Sticky? | Too Dry? |
|---|---|
| Add 1 tbsp flour at a time | Add 1 tsp water at a time |
| Knead between additions | Knead between additions |
Step 4: First Rise ⏱️ 1 hour
Grease bowl with butter or oil.
Plop dough back in. Turn once so top is greased.
Cover with kitchen towel.
My trick: Turn oven on for 1 minute. Turn OFF. Put bowl inside. Perfect warm spot.
Goal: Doubled in size (poke test: finger leaves indent that slowly springs back).
Step 5: Shape Your Loaf ⏱️ 5 minutes
Punch down the dough. (So satisfying!)
Turn out onto counter.
Shape into rectangle (same width as your loaf pan).
Roll tightly from short end like a cinnamon roll.
Pinch seam. Tuck ends under.
Pro move: Roll it TIGHT. Loose = air pockets and weird texture.
Step 6: Second Rise ⏱️ 30-45 minutes
Grease 9×5 loaf pan.
Place dough seam-side down.
Cover. Let rise until it’s about 1 inch above pan rim.
Meanwhile: Preheat oven to 375°F.
Step 7: Bake to Golden Perfection ⏱️ 30-35 minutes
Brush top with milk (hello, golden color!).
Bake 30-35 minutes.
Done when:
- Top is golden brown
- Tap bottom = hollow sound
- Internal temp = 190°F
Browning too fast? Tent with foil for last 10 minutes.
Step 8: The Final Touch ⏱️ 15 minutes
Remove from oven immediately.
Turn out onto cooling rack.
Brush top with melted butter RIGHT NOW. (This is the secret to that soft, bakery-style crust!)
Cool at least 15 minutes before slicing.
I know waiting is torture. But hot bread = gummy inside. Trust me.
Total Time Breakdown
| Stage | Time |
|---|---|
| Prep & mixing | 15 min |
| First rise | 1 hour |
| Shaping | 5 min |
| Second rise | 30-45 min |
| Baking | 30-35 min |
| Cooling | 15 min |
| TOTAL | ~2.5-3 hours |
Actual hands-on time? About 30 minutes. The rest is just waiting.
Substitutions & Variations
Swap It Out
Going dairy-free?
Use oil instead of butter. Brush with plant-based milk or oil.
Want honey wheat?
Swap sugar for honey. Use half whole wheat flour (add 1-2 tbsp more water).
No active dry yeast?
Use instant yeast (same amount). Skip activation step – mix directly with flour.
Level It Up
| Variation | What to Add | When to Add It |
|---|---|---|
| Garlic Herb | 2 tsp garlic powder + 1 tbsp Italian herbs | Mix with flour |
| Cinnamon Swirl | Butter + cinnamon sugar layer | Roll out dough, spread, roll up |
| Seeded Top | Sesame seeds, poppy seeds, oats | Sprinkle before baking |
| Cheese Bread | 1 cup shredded cheddar | Last minute of kneading |
Make Ahead Magic
Option 1: Refrigerate After First Rise
Punch down dough. Cover tightly with plastic wrap. Refrigerate up to 24 hours.
When ready: Let come to room temp (30 min) → shape → second rise → bake.
Option 2: Freeze Unbaked Loaf
Shape dough. Wrap tightly in plastic, then foil. Freeze up to 3 months.
To bake: Thaw overnight in fridge → room temp → let rise → bake.
Option 3: Freeze Baked Bread
Slice completely cooled bread. Freeze in freezer bag up to 3 months.
Pop slices straight into toaster from frozen. 🙌
Storage Secrets
| Storage Method | How Long | Best For |
|---|---|---|
| Room temp (plastic bag) | 4 days | Daily eating |
| Sliced & frozen | 3 months | Long-term storage |
| DON’T refrigerate | Never | Makes bread stale faster! |
Bread getting stale? French toast, bread pudding, croutons. Nothing goes to waste.
Nutrition Facts (Per Slice)
Based on 12 slices per loaf
| Nutrient | Amount | % Daily Value* |
|---|---|---|
| Calories | 145 | – |
| Total Fat | 3g | 4% |
| Saturated Fat | 2g | 10% |
| Cholesterol | 8mg | 3% |
| Sodium | 195mg | 8% |
| Total Carbs | 26g | 9% |
| Fiber | 1g | 4% |
| Sugars | 2g | – |
| Protein | 4g | 8% |
Based on 2,000 calorie diet
Troubleshooting Guide
“My bread didn’t rise!” 😤
Possible culprits:
- Dead yeast (always test first!)
- Water too hot (killed the yeast)
- Room too cold (yeast is hibernating)
- Expired flour
Fix: Start over with fresh yeast. Check water temp carefully.
“It’s dense like a brick.” 🧱
Why this happens:
- Not enough kneading (gluten didn’t develop)
- Too much flour added
- Didn’t rise long enough
Fix: Knead until windowpane test passes. Dough should be soft, not stiff.
“The crust is too hard.” 😩
Common mistakes:
- Baked too long
- Oven too hot
- Skipped the butter brush
Fix: Check at 30 minutes. Tent with foil if browning fast. ALWAYS brush with butter.
“How do I know it’s actually done?”
Three ways to check:
- Golden brown top ✓
- Tap bottom = hollow sound ✓
- Internal temp = 190°F ✓
Hit all three? You’re golden.
FAQ
Can I make this without a stand mixer?
YES. I actually prefer kneading by hand. Takes 8-10 minutes but you get a better feel for the dough. Plus it’s therapeutic.
Can I use instant yeast instead?
Yep! Same amount. Skip the activation step and mix directly with flour.
Can I add seeds or other mix-ins?
Absolutely. Add during last 1-2 minutes of kneading. Sesame seeds, poppy seeds, rolled oats, dried herbs, cheese – all fair game.
Why can’t I slice it hot?
The inside is still setting. Cutting hot bread = gummy, doughy texture. Wait at least 15 minutes. I know it’s hard.
My kitchen is cold. Where should I let it rise?
Try these warm spots:
- Oven (turned on for 1 min then OFF)
- Near (not on) a heating vent
- Inside microwave with a cup of just-boiled water
- On top of fridge
Can I double this recipe?
Sure! Make two loaves. Same process, same baking time. Just bake on separate racks (swap halfway through for even browning).
Serving Ideas
Classic ways:
- Toast with butter and jam
- Turkey sandwich with all the fixings
- French toast (game-changer with homemade bread)
- Grilled cheese (the BEST)
Next-level ideas:
- Bread pudding with vanilla sauce
- Garlic bread (slice, butter, garlic, broil)
- Breakfast strata
- Homemade croutons for salads
Why Homemade Beats Store-Bought
| Homemade | Store-Bought |
|---|---|
| $1.50 per loaf | $3-7 per loaf |
| No preservatives | 15+ ingredients you can’t pronounce |
| Made in 3 hours | Sits on shelf for weeks |
| Tastes fresh AF | Tastes like… bread |
| You know what’s in it | Mystery ingredients |
| Impresses everyone | Nobody cares |
The math checks out. 📊
Wrapping Up
Here’s the thing about homemade white bread.
It’s not just about saving money (though you definitely will).
It’s not just about avoiding preservatives (though that’s a bonus).
It’s about that moment when you slice into a warm loaf you made with your own hands. When your kitchen smells like a bakery. When people ask “where’d you buy this?” and you get to say “I made it.”
That feeling? Can’t buy it.
So grab your ingredients and give this a shot. Follow the steps. Don’t rush the rises. Trust the process.
Then come back and tell me how it went. Drop a comment below with your results, questions, or what variation you tried. I read every single one and I’d love to hear from you. 🍞
Now stop reading and go make some bread!


