
You know that dry, crumbly mess most gluten free bread turns into after five minutes?
This isn’t that.
I’ve spent years testing gluten free bread recipes, and most of them end up tasting like cardboard had a baby with sawdust.
But this one?
This one actually pulls apart like real bread, tastes like real bread, and doesn’t fall to pieces the second you try to spread butter on it.
If you’ve been gluten free for a while, you probably know the struggle.
You miss real bread.
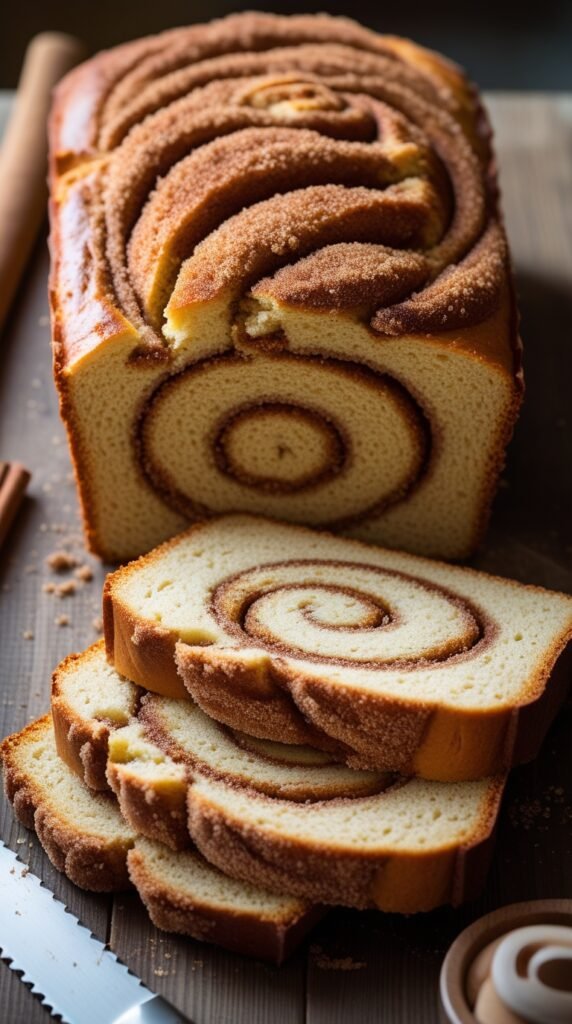
The kind that’s soft and fluffy inside with a golden crust that actually crunches when you bite into it. The kind you can make into a sandwich without it disintegrating in your hands.
This recipe gives you all of that.
And here’s what surprised me most: it’s actually easier to make than regular bread.
No kneading, no complicated folding techniques, just mix, rise, bake.
That’s it.
I’m not going to tell you it tastes exactly like wheat bread (that would be a lie), but it’s genuinely good. Like, you’ll-eat-three-slices-warm-from-the-oven good.
Your non-gluten-free friends won’t even know they’re eating gluten free bread unless you tell them.
What You’ll Need
For the Bread
| Ingredient | Amount | Notes |
|---|---|---|
| Gluten free all-purpose flour blend | 3 cups | Bob’s Red Mill 1-to-1 or King Arthur |
| Granulated sugar | 2 tablespoons | Feeds the yeast |
| Instant yeast | 2¼ teaspoons | One standard packet |
| Xanthan gum | 1½ teaspoons | Skip if your flour has it |
| Salt | 1½ teaspoons | Don’t skip this |
| Warm water | 1¼ cups | 110°F is perfect |
| Large eggs | 3 | Room temperature |
| Olive oil | ¼ cup | Or any neutral oil |
| Apple cider vinegar | 1 teaspoon | Secret ingredient ✨ |
For the Egg Wash
- 1 egg
- 1 tablespoon water
Tools You’ll Need
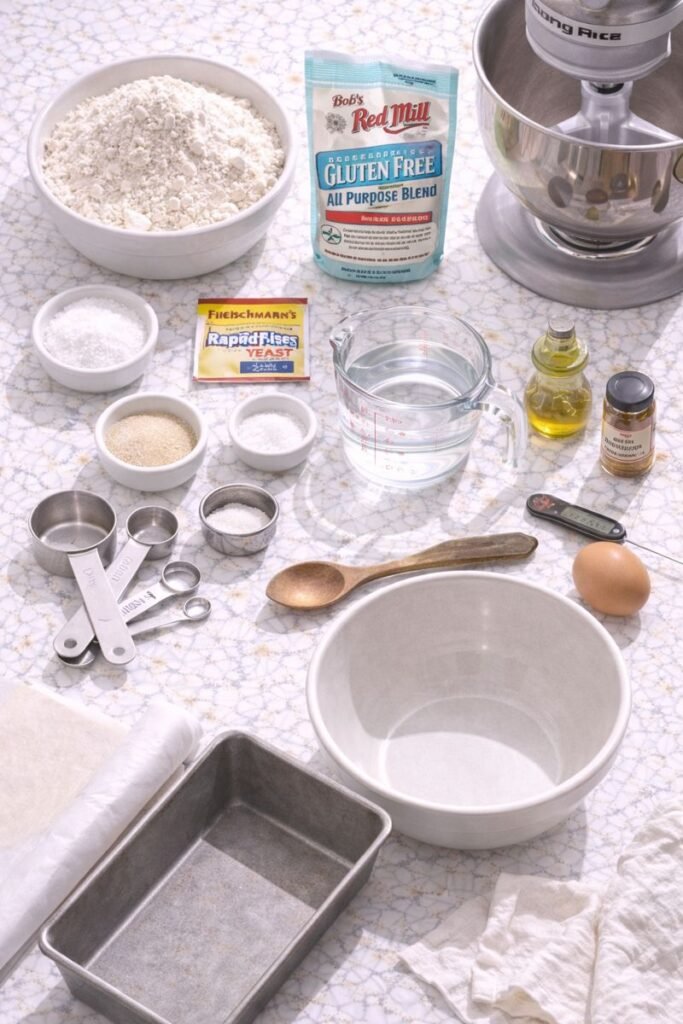
🔪 9×5 inch loaf pan
🔪 Stand mixer with paddle attachment (or hand mixer)
🔪 Instant-read thermometer
🔪 Measuring cups and spoons
🔪 Parchment paper
🔪 Kitchen towel
Pro Tips
Use the right flour blend. Not all gluten free flours are created equal. I’ve had the best results with Bob’s Red Mill 1-to-1 or King Arthur Measure for Measure. These already contain xanthan gum, which is what helps the bread hold together.
Temperature matters more than you think. Your water needs to be between 105-115°F. Too cold and the yeast won’t activate. Too hot and you’ll kill it. I killed so many batches before I started using a thermometer.
Don’t skip the vinegar. I know it seems random, but that tiny bit of apple cider vinegar helps activate the xanthan gum and gives the bread better structure. You won’t taste it in the final loaf.
Room temperature eggs are non-negotiable. Cold eggs will cool down your dough and mess with the yeast. If you forget to take them out ahead of time, just place them in a bowl of warm water for 5 minutes.
Let it rise in a warm spot. Gluten free dough needs more help than regular dough. I turn my oven to the lowest setting for 2 minutes, turn it off, then let the dough rise in there. Works every time.
How to Make Gluten Free Bread
Step 1: Prep your pan
Line your 9×5 loaf pan with parchment paper, letting it hang over the sides.
This makes it so much easier to lift the bread out later. Trust me on this.
Step 2: Mix the dry ingredients
In your stand mixer bowl, whisk together the flour, sugar, yeast, xanthan gum (if using), and salt.
Make sure everything is evenly distributed.
Step 3: Add the wet ingredients
In a separate bowl or measuring cup, whisk together the warm water, eggs, olive oil, and vinegar.
Pour this into your dry ingredients.
Step 4: Mix the dough
Using the paddle attachment, mix on medium speed for 3-4 minutes.
The dough will look more like thick cake batter than bread dough.
This is normal.
Gluten free bread dough is much wetter and stickier than regular bread dough.
Step 5: First rise
Scrape the dough into your prepared loaf pan.
Smooth the top with a wet spatula (the wetness keeps it from sticking).
Cover with a damp kitchen towel.
Let it rise in a warm place for 45-60 minutes. You want it to rise about 1 inch above the rim of the pan.
Step 6: Preheat and prep
About 15 minutes before the rise time is up, preheat your oven to 375°F.
Make your egg wash by whisking together the egg and water.
Gently brush it over the top of the risen dough.
Step 7: Bake
Bake for 45-50 minutes.
The top should be deep golden brown and the internal temperature should hit 205-210°F when you stick a thermometer in the center.
Step 8: Cool completely
This is the hardest part.
I know you want to slice into it immediately (I always do), but you need to let it cool completely on a wire rack first.
At least 2 hours.
Gluten free bread continues to set as it cools. If you cut it too early, the inside will be gummy.
Substitutions and Variations
| Swap This | For This | What Changes |
|---|---|---|
| Olive oil | Melted coconut oil or avocado oil | Nothing, works perfectly |
| Eggs | 3 flax eggs (3 tbsp flax + 9 tbsp water) | Slightly denser texture |
| Plain loaf | Add 2 tbsp rosemary + seeds | Herby, crunchy goodness |
| Plain loaf | Add cinnamon + raisins | Breakfast bread vibes |
| Full loaf | Divide into 12 muffin cups | Makes rolls, bake 20-25 min |
Flavor Ideas That Actually Work
🌿 Rosemary Olive: Add 2 tablespoons fresh rosemary + ½ cup chopped olives
🧀 Cheesy Garlic: Mix in 1 cup shredded cheddar + 2 teaspoons garlic powder
🌰 Seeded: Top with everything bagel seasoning before baking
🍯 Honey Oat: Swap sugar for honey + sprinkle oats on top
Make Ahead Tips
Freeze the unbaked dough:
After mixing, scrape it into your parchment-lined pan, cover tightly with plastic wrap, and freeze for up to 3 months.
When you’re ready to bake, let it thaw in the fridge overnight, then bring to room temperature and let it do its final rise before baking.
Freeze the baked loaf:
Slice it first (this is key), then wrap individual slices in plastic wrap and store in a freezer bag.
Pull out slices as needed and toast from frozen.
Storage Guide
| Method | Duration | Best For |
|---|---|---|
| Room temperature (wrapped in towel) | 2-3 days | Daily eating |
| Refrigerator (in bag) | 5-7 days | Extended freshness |
| Freezer (sliced) | 3 months | Long-term storage |
Pro tip: Don’t use plastic bags right away because the crust will get soft. Wait until day 3, then bag it up.
Nutrition Breakdown
Per slice (based on 12 slices)
| Nutrient | Amount |
|---|---|
| Calories | 180 |
| Protein | 5g |
| Carbs | 28g |
| Fat | 6g |
| Fiber | 2g |
| Sugar | 2g |
Troubleshooting Common Problems
“My bread is dense and heavy”
The problem: Your yeast wasn’t active.
The fix: Check the expiration date and make sure your water temperature was between 105-115°F. Also make sure you mixed it long enough (3-4 minutes is important for gluten free bread).
“The bread is perfect when it comes out but gets gummy later”
The problem: You’re cutting it too soon.
The fix: Wait the full 2 hours. I know it’s torture, but that cooling time is when the structure fully sets.
“My loaf didn’t rise”
The problem: Either dead yeast or the environment was too cold.
The fix: Make sure your yeast is fresh and create a warm rising environment (like a turned-off oven that was preheated for 2 minutes).
“The top cracked”
The good news: This actually means it’s working! The bread is rising properly in the oven.
If you want a smoother top: Score it with a sharp knife before baking.
“It’s raw in the middle but burnt on top”
The problem: Oven temp is too high or you need to tent it.
The fix: If the top is browning too quickly, tent it with foil at the 30-minute mark and continue baking until the internal temp hits 205-210°F.
Time Breakdown
| Step | Time |
|---|---|
| Prep | 10 minutes |
| First rise | 45-60 minutes |
| Baking | 45-50 minutes |
| Cooling | 2 hours minimum |
| Total | 3 hours 40 minutes |
FAQ
Can I use a different size pan?
You can, but you’ll need to adjust the baking time.
An 8×4 pan will need 50-55 minutes. A 10×5 pan will need 40-45 minutes.
Always check the internal temp.
Can I make this without a stand mixer?
Yes, but it’s harder.
You’ll need a hand mixer and strong arms. Mix on high for 5-6 minutes to make sure everything is fully incorporated.
Can I double this recipe?
You can, but make it in two separate pans.
Don’t try to fit it all in one larger pan because the timing and structure will be off.
Why does gluten free bread go stale so fast?
There’s no gluten to keep it fresh and moist.
That’s why slicing and freezing is your friend.
Can I add seeds or nuts?
Absolutely!
Add up to ½ cup of seeds, nuts, or dried fruit. Mix them in at the end of step 4.
What’s the difference between instant yeast and active dry yeast?
Instant yeast doesn’t need to be proofed first.
If you only have active dry, dissolve it in the warm water with a pinch of sugar and wait 5 minutes before adding to the recipe.
Meal Pairing Suggestions
This bread goes with literally everything, but here are my favorites:
For breakfast: Toasted with butter and jam, or make French toast (yes, it works!)
For lunch: Turkey and avocado sandwiches, grilled cheese that actually holds together
For dinner: Alongside soup or stew, garlic bread (brush with butter + garlic before the final 10 minutes of baking)
For snacks: Bruschetta, cinnamon toast, or just warm with good butter
Wrapping Up
Making good gluten free bread at home seemed impossible to me for years.
Every recipe I tried was either complicated, required weird ingredients I’d never use again, or just tasted terrible.
This one changed everything.
It’s simple enough to make on a weeknight. It tastes good enough that you’ll actually want to eat it. And it holds up well enough to use for sandwiches, toast, or just eating warm with butter.
The first time you pull a loaf of real, actual bread out of your oven and it doesn’t crumble to pieces, you’ll get it.
Give it a try this week. And when you do, come back and drop a comment about how it turned out. Did you add herbs? Make it into rolls? I want to hear all about it.


