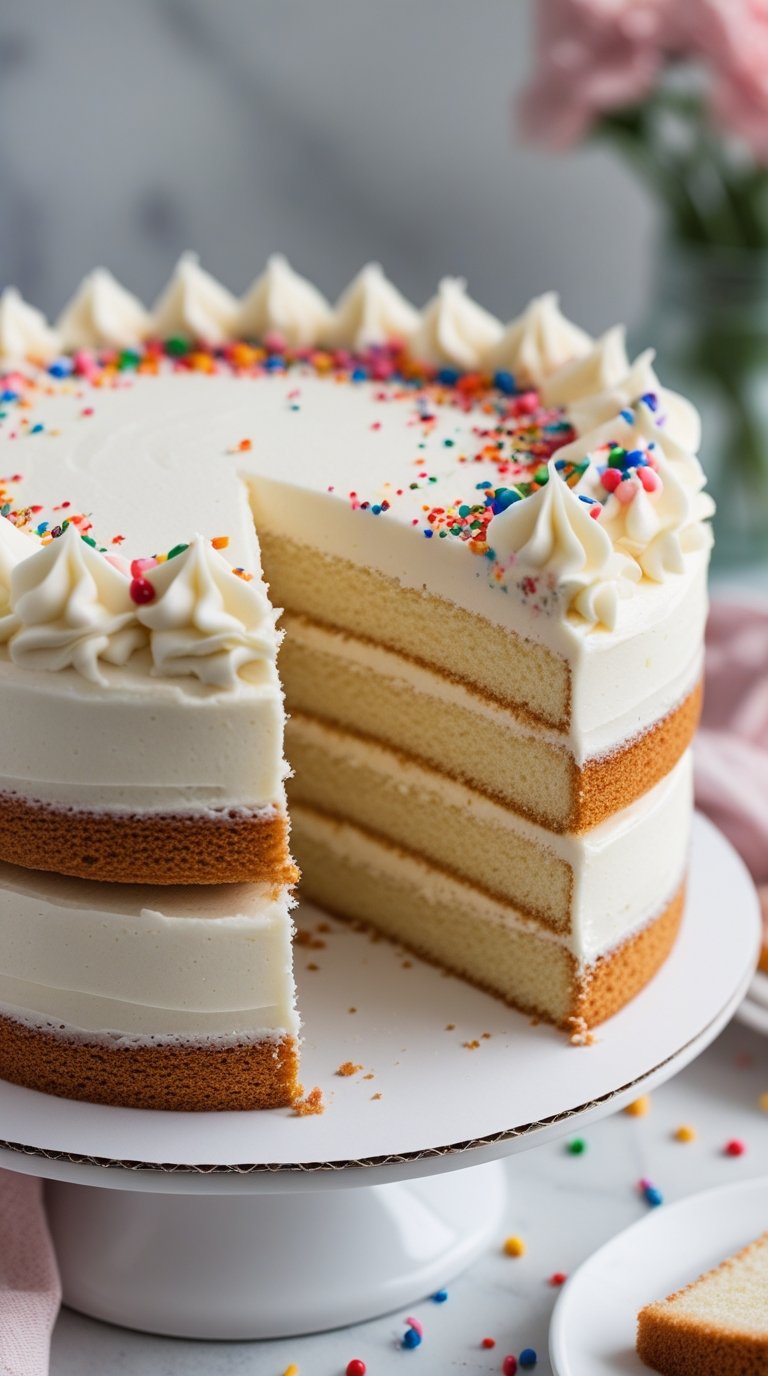
You know that feeling when you bite into a cake and it’s so good you close your eyes?
That’s exactly what happens with this white cake.
I’m not talking about the dry, tasteless stuff you get at grocery stores. This is the kind of cake that makes people ask for the recipe before they’ve even finished their first slice.
And here’s the thing: it’s easier to make than you think.
White cake has this reputation for being tricky. Too many egg whites. Too much structure. One wrong move and you’re stuck with something that tastes like sweet cardboard.
But I’ve made this recipe dozens times, and I can tell you right now that it’s foolproof.
Light, fluffy, and with just enough vanilla flavor that you’ll want to eat it straight from the cooling rack (I won’t judge).
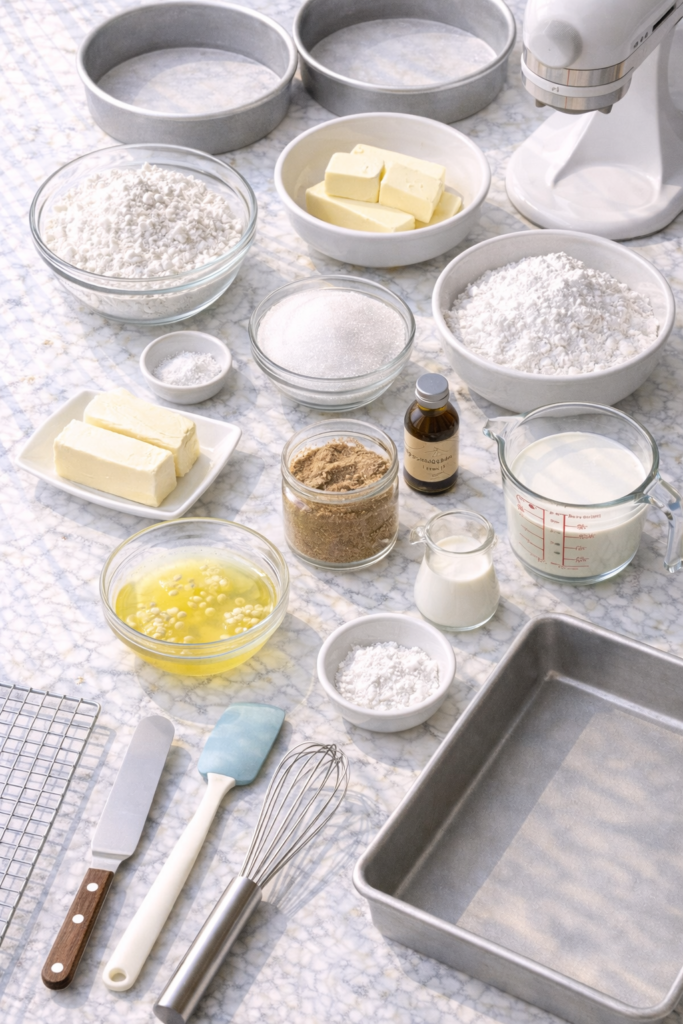
What You’ll Need
For the Cake:
- 2 ¾ cups all-purpose flour
- 1 tablespoon baking powder
- ½ teaspoon salt
- 1 cup unsalted butter, softened to room temperature
- 2 cups granulated sugar
- 5 large egg whites, room temperature
- 1 tablespoon pure vanilla extract
- 1 ½ cups whole milk, room temperature
For the Vanilla Buttercream:
- 1 ½ cups unsalted butter, softened
- 5 cups powdered sugar
- 2 teaspoons vanilla extract
- 3-4 tablespoons heavy cream
Tools You’ll Need:
You may also like : coconut cake recipe
✓ Three 8-inch round cake pans
✓ Electric mixer (stand or hand mixer)
✓ Mixing bowls (medium and large)
✓ Whisk
✓ Rubber spatula
✓ Cooling racks
✓ Offset spatula (for frosting)
✓ Parchment paper
Pro Tips
1. Room Temperature is Non-Negotiable
This isn’t one of those recipes where you can wing it.
Cold ingredients won’t mix properly and you’ll end up with a dense cake.
Take everything out of the fridge 30-45 minutes before you start baking.
Quick Hack: Forgot to take out your butter? Cut it into small cubes and let it sit for 15 minutes. For eggs, place them in a bowl of warm (not hot) water for 5 minutes.
2. Don’t Overmix the Batter
Once you add the flour, mix just until you can’t see dry streaks anymore.
Overmixing develops gluten and turns your fluffy cake into something chewy.
Stop when it looks combined, even if there are a few tiny lumps.
3. The Toothpick Test is Your Friend
Ovens lie. Timers lie.
The only thing that tells the truth is a toothpick inserted into the center of your cake.
Wet batter on the toothpick? Keep baking.
A few moist crumbs? You’re golden.
Completely clean? You might have overbaked it slightly, but it’ll still taste good.
4. Cool Before Frosting
I know you’re excited. I get it.
But if you frost a warm cake, your buttercream will melt into a puddle and you’ll be sad.
Let those layers cool completely. Put them in the fridge for 20 minutes if you’re in a hurry.
5. Level Your Layers
Those domed tops on your cakes? Slice them off.
It might feel wasteful, but level layers mean a stable cake that doesn’t lean like the Tower of Pisa.
Plus, you get to eat the scraps while you work 😋
Substitutions and Variations
| Instead of This | Use This | Notes |
|---|---|---|
| Vanilla extract | Almond extract | Use only 1 ½ teaspoons (it’s strong!) |
| Whole milk | Oat milk or almond milk | Works great for dairy-free |
| Butter | Vegan butter | Texture changes slightly but still delicious |
| Three 8-inch pans | Two 9-inch pans | Add 5-7 minutes to baking time |
| Layer cake | 30 cupcakes | Bake at 350°F for 18-22 minutes |
| Layer cake | 9×13 sheet cake | Bake for 30-35 minutes |
Flavor Variations:
- Add lemon zest for a citrus twist
- Mix in ½ cup rainbow sprinkles for funfetti cake
- Replace ½ cup milk with coconut milk and add coconut extract
- Swirl in raspberry jam between layers
Make Ahead Tips
The Cake Layers:
Freeze for up to 3 months. Wrap tightly in plastic wrap, then aluminum foil.
Thaw in the fridge overnight. They’ll taste just as fresh as the day you baked them.
The Buttercream:
Make 3 days ahead and store in the fridge.
Let it come to room temperature and give it a quick whip before using.
Fully Assembled Cake:
Assemble and frost the day before your event. Store in the fridge, but bring to room temperature 30 minutes before serving for the best flavor.
You’ll love these too : cake pops recipe
How to Make White Cake

Step 1: Prep Everything
Preheat your oven to 350°F.
Grease three 8-inch round pans with butter or cooking spray, then line the bottoms with parchment paper.
Grease the parchment too.
This double-greasing method means your cakes will slide right out. No sticking, no crying over broken layers.
Step 2: Mix the Dry Ingredients
In a medium bowl, whisk together the flour, baking powder, and salt.
Set it aside.
Step 3: Cream the Butter and Sugar
In a large bowl, beat the softened butter on medium speed for about 2 minutes until it’s smooth and creamy.
Add the sugar and beat for another 3-4 minutes.
You’re looking for a light, fluffy texture. The mixture should look almost white and have increased in volume.
What you’re doing: This process is called creaming, and it creates tiny air pockets in the butter. Those air pockets expand in the oven and make your cake fluffy.
Step 4: Add the Egg Whites
Add the egg whites one at a time, beating well after each addition.
The mixture might look a little curdled at first, but keep going. It’ll come together.
Mix in the vanilla extract.
Step 5: Alternate Wet and Dry
This is where the magic happens.
Add about ⅓ of the flour mixture to the butter mixture and mix on low speed just until combined.
Pour in half the milk and mix again.
Add another ⅓ of the flour, then the rest of the milk, then the final bit of flour.
Stop mixing as soon as you don’t see any more dry flour.
Scrape down the sides of the bowl with a rubber spatula to catch any hiding flour.
Why alternate? Starting and ending with flour protects the batter from overmixing. The flour coats the gluten strands and prevents them from getting tough.
Step 6: Divide and Bake
Divide the batter evenly among your three pans.
A kitchen scale makes this easy, but eyeballing works too. Each pan should have about 2 cups of batter.
Smooth the tops with your spatula and tap each pan gently on the counter a few times to release air bubbles.
Bake for 25-30 minutes.
| Time | What to Check |
|---|---|
| 20 minutes | Don’t open the oven yet! |
| 25 minutes | Start checking with a toothpick |
| 30 minutes | If it’s not done, check every 2 minutes |
The cakes are done when they spring back lightly when touched and a toothpick comes out clean or with just a few crumbs.
Step 7: Cool the Cakes
Let the cakes cool in their pans for 10 minutes, then turn them out onto cooling racks.
Peel off the parchment paper and let them cool completely.
This takes about an hour.
Go watch an episode of something. Read a book. Just don’t frost warm cakes.
Step 8: Make the Buttercream
Beat the softened butter in a large bowl for 2-3 minutes until it’s smooth and creamy.
Add the powdered sugar one cup at a time, mixing on low speed after each addition.
Add the vanilla extract.
Once all the sugar is in, turn the mixer to medium-high and beat for 3 minutes.
Add 3 tablespoons of heavy cream and beat again.
Troubleshooting:
- Too thick? Add more cream, 1 tablespoon at a time
- Too thin? Add more powdered sugar, ¼ cup at a time
- Grainy? Keep beating for another 2-3 minutes
Step 9: Assemble the Cake
Place your first layer on a cake stand or serving plate.
Spread about ¾ cup of buttercream on top. Use the back of a spoon or an offset spatula to spread it evenly.
Add the second layer and repeat.
Top with the third layer.
Cover the entire cake with a thin layer of buttercream. This is called a crumb coat and it seals in all the loose crumbs.
Pop the whole thing in the fridge for 15-20 minutes until the frosting is firm.
Recommended for you : dirt cake recipe
Step 10: Final Frosting
Spread the remaining buttercream over the chilled cake.
Use an offset spatula to smooth it out, or leave it textured if that’s your thing.
Decorating Ideas:
- Fresh berries on top
- Rainbow sprinkles
- Edible flowers
- Chocolate shavings
- Keep it simple and clean
- Pipe rosettes around the edges
Nutritional Information
| Per Slice | (1/12 of cake) |
|---|---|
| Calories | 580 |
| Fat | 28g |
| Saturated Fat | 17g |
| Carbohydrates | 78g |
| Sugar | 62g |
| Protein | 4g |
| Sodium | 210mg |
Leftovers and Storage
Room Temperature: Up to 3 days covered with a cake dome or plastic wrap
In the Fridge: 5-6 days in an airtight container
Let slices come to room temperature before eating for the best flavor
Freezer:
- Individual slices: 3 months wrapped in plastic wrap
- Unfrosted layers: 3 months (they freeze better than frosted cake!)
Thaw in the fridge overnight.
Pairing Suggestions
| Occasion | Serve With |
|---|---|
| Classic Birthday | Vanilla ice cream + rainbow sprinkles |
| Fancy Dinner Party | Macerated berries + champagne |
| Afternoon Tea | Fresh strawberries + whipped cream |
| Casual Weeknight | Strong coffee or cold milk |
| Summer BBQ | Lemon curd + fresh blueberries |
FAQ
Q: Why did my cake turn out dense?
Three main reasons:
- Overmixing the batter after adding flour
- Using cold ingredients
- Measuring flour incorrectly (spoon it into the cup, don’t scoop)
Q: Can I use egg whites from a carton?
Yes, but fresh egg whites give better results.
If you’re using carton whites, you need about ⅔ cup.
Q: My cake stuck to the pan. What did I do wrong?
You either didn’t grease well enough or you let the cake sit in the pan too long after baking.
Ten minutes max, then turn it out.
Q: How do I get my cake layers perfectly level?
Two options:
- Use cake strips (wet fabric strips wrapped around the pans) while baking
- Slice the domes off with a long serrated knife after cooling
Q: Can I make this cake without a mixer?
Technically yes, but your arm will be tired.
You need to beat the butter and sugar for several minutes to get the right texture.
A hand mixer works great if you don’t have a stand mixer.
Q: Why is my buttercream grainy?
The powdered sugar wasn’t mixed in properly, or your butter was too cold.
Keep beating it on medium-high speed for a few more minutes and it should smooth out.
Q: Can I color this cake?
Absolutely!
Gel food coloring works better than liquid. Start with a tiny amount and add more until you get the shade you want.
Q: Do I have to use three layers?
Nope. Two layers work fine.
You’ll have thicker slices and less assembly stress.
Q: Can I make this ahead for a big event?
Yes! Bake the layers up to 3 days ahead and store wrapped at room temperature.
Or freeze them for up to 3 months.
Frost the day before your event and store in the fridge.
Wrapping Up
This white cake is the kind of recipe you’ll make for every birthday, every celebration, every excuse you can find.
It’s simple enough for a Tuesday and impressive enough for the fanciest occasions.
The key is in the technique: room temperature ingredients, gentle mixing, and patience while it cools.
Once you nail this recipe, you can experiment with different frostings and fillings. Chocolate ganache, cream cheese frosting, lemon curd between the layers.
The options are endless.
But honestly? Sometimes plain vanilla buttercream is exactly what you need.
Make this cake. Take a photo of your slice. Drop a comment below and let me know how it turned out.
I love hearing about your baking wins (and helping troubleshoot if something goes sideways).
And if you have questions before you start, ask away. I’m here to help you make the best white cake of your life 🍰


1 thought on “The White Cake That’ll Make You Forget Every Other Cake Recipe”