
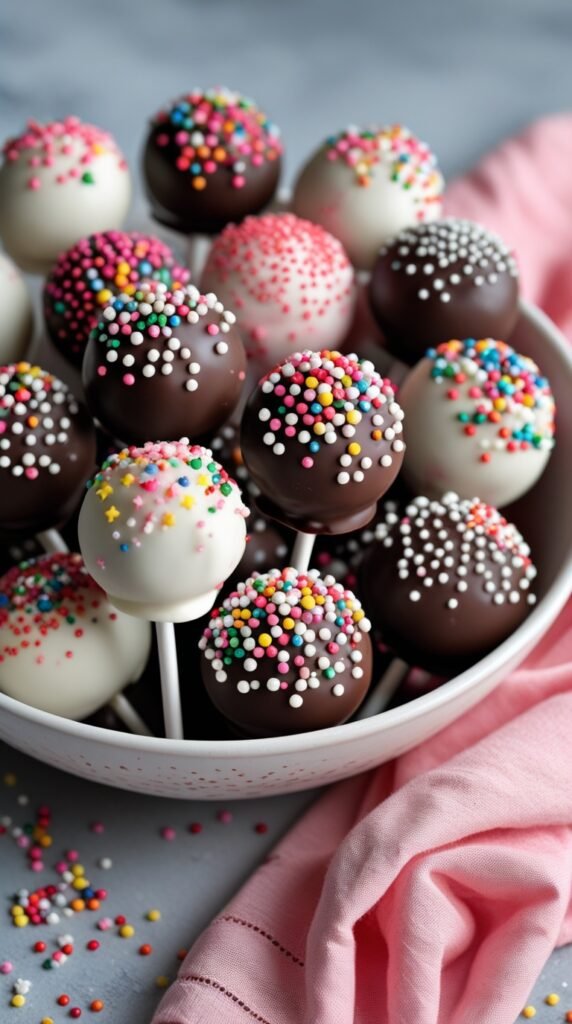
You’ve seen them at every birthday party, bakery window, and Pinterest board since 2010.
But here’s what nobody tells you about cake pops: most of them taste like sugary cardboard on a stick.
I’m talking about those store-bought ones that look perfect but crumble into dust the second you bite them. Or the ones so sweet they make your teeth hurt just looking at them.
Real cake pops? They’re moist, rich, and actually taste like cake instead of frosting-covered regret.
And before you start thinking this is some complicated bakery-level recipe that’ll take you three hours and leave your kitchen looking like a flour bomb went off, let me stop you right there.
This recipe is stupid simple. You’re basically making cake, crumbling it up, mixing it with frosting, and shaping it into balls. That’s it.
The hardest part is waiting for the chocolate coating to set because you’ll want to eat them all immediately.
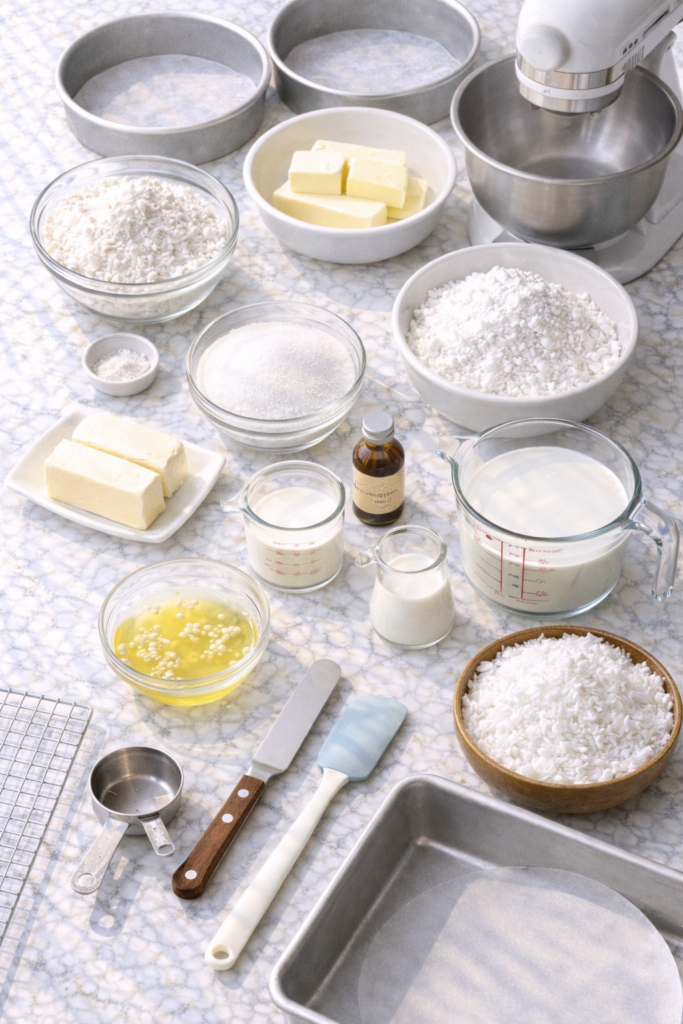
What You’ll Need
The Cake Base
| Ingredient | Amount | Notes |
|---|---|---|
| Cake mix (any flavor) | 1 box (15.25 oz) | Boxed or homemade works |
| Eggs | 3 large | Room temp is best |
| Vegetable oil | 1/2 cup | Canola works too |
| Water | 1 cup |
The Coating & Assembly
| Ingredient | Amount | Why You Need It |
|---|---|---|
| Chocolate candy melts | 16 oz | Milk, dark, or white |
| Vegetable or coconut oil | 1 tbsp | Thins the chocolate |
| Frosting | 1 cup | Store-bought is fine |
| Lollipop sticks | 24 sticks | |
| Sprinkles/toppings | Optional | Get creative! |
Tools You’ll Need
You may also like : dirt cake recipe
Essential:
- 9×13 inch baking pan
- Large mixing bowl
- Electric mixer or whisk
- Cookie scoop (makes life easier)
- Baking sheet
- Parchment paper
For Assembly:
- Tall glass or jar for dipping
- Styrofoam block OR cardboard box with holes poked in it
Time Saver: I use an ice cream scoop to portion everything out perfectly. Makes them all the same size and takes 30 seconds instead of 10 minutes.
Pro Tips
1. Temperature matters more than you think
Your cake needs to be completely cool before you crumble it. If it’s even slightly warm, you’ll end up with mushy cake pops that won’t hold their shape.
I let mine sit for a full hour. Put on a show, do your laundry, scroll TikTok. Just don’t rush this step.
2. The frosting ratio is everything
Start with 3/4 cup and add more only if needed. Too much frosting makes the mixture too soft and your cake pops will slide right off the sticks.
You want the texture of Play-Doh, not cookie dough. When you squeeze a handful, it should hold together without feeling sticky or wet.
3. Freeze before dipping (seriously)
Pop your shaped balls in the freezer for 15 minutes before coating them.
This prevents them from falling apart when you dip them in warm chocolate. I learned this the hard way after watching five cake pops plop into the melted chocolate like little chocolate torpedoes.
4. The double-dip technique saves lives
Dip your stick in chocolate first, then insert it into the cake ball. This creates a seal that keeps everything together.
Game changer. Life changer. Cake pop changer.
5. Don’t swirl them around
Just dip straight down and pull straight up with a gentle tap on your wrist. Swirling creates ridges and makes the chocolate coating too thick on one side.
Three gentle taps. That’s it.
You’ll love these too : tres leches cake recipe
How to Make Cake Pops
Step 1: Bake the Cake
Preheat your oven to 350°F.
Make your cake according to package directions and bake in a 9×13 inch pan. Usually takes 28-32 minutes.
Let it cool completely. I’m talking room temperature, not “it’s been out for 20 minutes so it’s probably fine.” Give it at least an hour.
Step 2: Crumble the Cake
Break the cooled cake into chunks and dump them in a large bowl.
Use your hands or a fork to crumble it into fine crumbs. You want it to look like wet sand. No big chunks allowed.
This is actually kind of therapeutic. Destroy that cake.
Step 3: Mix in the Frosting
Add 3/4 cup of frosting to your cake crumbs.
Mix with your hands (yes, get messy) until everything is combined. The mixture should hold together when you squeeze it but not feel sticky.
If it’s too dry, add more frosting one tablespoon at a time. If it’s too wet, you added too much and you’re kinda screwed, but you can try adding more cake crumbs.
Step 4: Shape the Balls
Use a cookie scoop or tablespoon to portion out the mixture.
Roll each portion between your palms to make smooth balls about 1.5 inches in diameter. Not golf ball size. Not ping pong ball size. Right in between.
Place them on a parchment-lined baking sheet as you go.
Quick Size Reference:
| Size | Diameter | Makes |
|---|---|---|
| Small | 1 inch | 30-35 pops |
| Medium (recommended) | 1.5 inches | 24-26 pops |
| Large | 2 inches | 18-20 pops |
Step 5: Chill Them Out
Stick the whole tray in the fridge for 30 minutes or the freezer for 15 minutes.
This firms them up so they don’t fall apart during dipping. I always do freezer because I’m impatient.
Step 6: Melt the Chocolate
Put your candy melts in a microwave-safe bowl.
Microwave in 30-second bursts, stirring between each one, until smooth. Usually takes 2-3 rounds.
Stir in 1 tablespoon of oil to thin it out slightly. This makes dipping way easier and gives you a thinner, prettier coating.
Don’t Skip This: The oil is the difference between a thick, clunky coating and a smooth, professional-looking one. Trust me on this.
Step 7: Dip and Decorate
Dip a lollipop stick about 1/2 inch into the melted chocolate, then insert it into a cake ball about halfway through.
This creates a seal. Let that set for a minute.
Then dip the entire cake pop into the chocolate. Hold it over the bowl and gently tap your wrist to let excess chocolate drip off.
Recommended for you : white cake recipe
Add sprinkles or toppings immediately before the chocolate sets. You’ve got maybe 10 seconds before it starts to harden.
Step 8: Let Them Dry
Stick the cake pops upright in a styrofoam block or poke holes in a cardboard box to hold them.
Let the chocolate harden completely at room temperature. This takes about 15-20 minutes.
Don’t put them in the fridge to speed this up. The chocolate will sweat and look terrible.
Substitutions and Variations
Cake Flavors That Work
Classic combinations:
- Chocolate cake + chocolate coating + crushed Oreos
- Vanilla cake + white chocolate + rainbow sprinkles
- Red velvet cake + cream cheese frosting + white chocolate
- Funfetti cake + vanilla frosting + pink chocolate
Next-level combos:
- Lemon cake + white chocolate + crushed graham crackers
- Carrot cake + cream cheese frosting + chopped pecans
- Strawberry cake + white chocolate + freeze-dried strawberries
Make It Boozy 🍷
Add 1-2 tablespoons of liqueur to your cake-frosting mixture:
- Baileys with chocolate cake
- Amaretto with vanilla cake
- Kahlua with coffee cake
- Champagne with funfetti (fancy!)
Cookie Cake Pops
Swap half the cake crumbs for crushed Oreos, graham crackers, or vanilla wafers.
Mix with cream cheese instead of frosting. Roll in crushed cookies instead of dipping in chocolate.
These are dangerous.
Make Ahead Tips
| What to Make Ahead | How to Store | How Long |
|---|---|---|
| Undipped cake balls | Airtight container in fridge | 3 days |
| Undipped cake balls | Freezer bag | 3 months |
| Fully finished pops | Airtight container in fridge | 2 weeks |
| Fully finished pops | Room temperature | 3 days |
These are actually better when made ahead because the flavors have time to blend together.
Make the cake pops up to the dipping stage and store them in the fridge. When you’re ready to serve, just dip and decorate.
Leftovers and Storage
Store finished cake pops in an airtight container at room temperature for up to 3 days.
Layer them between sheets of parchment paper so they don’t stick together. I learned this after finding all my cake pops stuck together in one big chocolate blob.
For longer storage, keep them in the fridge for up to 2 weeks. The chocolate coating might sweat a bit when you take them out, so let them sit for 10 minutes before serving.
Don’t freeze finished cake pops. The chocolate coating gets weird and develops a white film that looks like mold but isn’t mold but still looks gross.
Troubleshooting Common Problems
| Problem | Why It Happened | How to Fix It |
|---|---|---|
| Cake pops falling off sticks | Didn’t seal with chocolate OR mixture too wet | Use the double-dip method; add less frosting next time |
| Cracked chocolate coating | Cake balls too warm | Chill them longer before dipping |
| Lumpy chocolate | Candy melts overheated | Melt in shorter bursts; add more oil |
| Cake mixture too dry | Not enough frosting | Add frosting 1 tbsp at a time |
| Coating too thick | Chocolate too cold | Reheat gently; add more oil |
FAQ
Can I use homemade frosting instead of store-bought?
Yes! Just make sure it’s thick enough to hold the cake together. Buttercream works perfectly. Cream cheese frosting is even better.
How do I prevent cracks in the chocolate coating?
Make sure your cake balls are completely chilled before dipping. Warm cake pops hitting melted chocolate causes the coating to crack as it sets.
It’s a temperature shock thing. Science.
Can I use a different coating besides chocolate?
Try white chocolate, colored candy melts, or even a simple powdered sugar glaze. Just keep the consistency thin enough for easy dipping.
I’ve even used melted peanut butter chips. 10/10 would recommend.
Do I have to use a cake mix?
Nope. Any cake recipe works. Just bake it in a 9×13 pan and follow the same steps.
Homemade cake actually makes even better cake pops because it’s more moist and flavorful.
Why do my cake pops have a flat bottom?
You’re setting them down on the counter to dry instead of standing them upright.
Use a styrofoam block, cardboard with holes, or even stick them in a colander. Keep them vertical while drying.
Can I make these without a cake pop mold?
You don’t need a mold! Rolling them by hand is actually easier and gives you more control over size and shape.
Molds are just extra dishes to wash.
Nutritional Information (Per Cake Pop)
| Nutrient | Amount |
|---|---|
| Calories | 145 |
| Fat | 7g |
| Carbs | 20g |
| Sugar | 15g |
| Protein | 1g |
Based on chocolate cake with vanilla frosting and milk chocolate coating
Wrapping Up
Making cake pops isn’t the complicated bakery secret everyone thinks it is.
You’re literally just crumbling cake, mixing it with frosting, and dipping it in chocolate. The only real skill involved is patience, and even that’s optional if you’re willing to eat slightly messy cake pops.
These are perfect for parties, gifts, or just because you want something sweet that feels a little fancy.
Kids go crazy for them, and adults pretend they’re “just having one” before eating four more when nobody’s looking. I’ve seen it happen at every single party I’ve brought these to.
The flavor combinations are endless. Chocolate with peanut butter frosting. Red velvet with cream cheese. Lemon cake with white chocolate coating. Honestly, you can’t really mess this up unless you completely ignore the frosting ratio.
Make them once and you’ll understand why people charge $3 each for these at bakeries. They’re that good, and that easy.
Drop a comment below and let me know what flavor combo you’re trying first. And if you make these, I want to see pictures of your cake pops before they all disappear 😊


1 thought on “The Cake Pops You’ll Actually Want to Make (Even if You’ve Never Baked Before)”