
You know that cake you see at fancy bakeries with layers of dark chocolate and cherries that looks like it takes professional skills to make?
Turns out, it doesn’t.
Black Forest Cake is one of those desserts that screams “I spent all day on this” when really, the hardest part is not eating all the cherries before they make it onto the cake.
I’m talking rich chocolate layers, sweet cherry filling, and clouds of whipped cream that somehow make everything taste even better. And the secret? It’s way more forgiving than you think.
If you’ve been putting this off because it looks complicated, I’m here to tell you it’s not. You just need the right recipe and a little patience (and maybe some extra cherries for taste-testing).
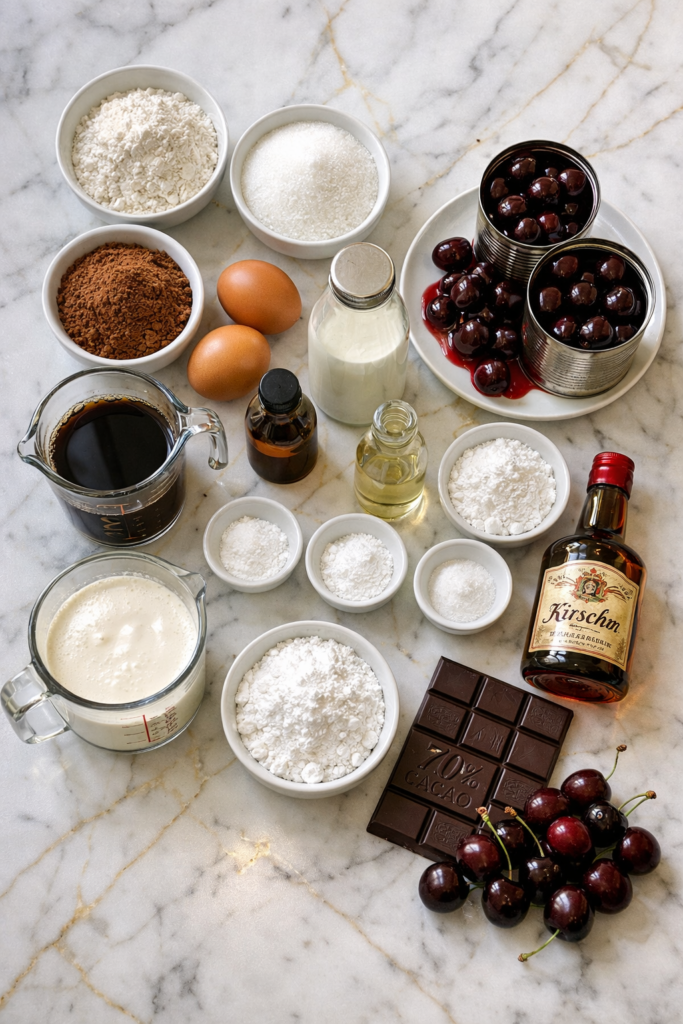
What You’ll Need
For the Chocolate Cake
| Ingredient | Amount | Notes |
|---|---|---|
| All-purpose flour | 1¾ cups | Spoon and level for accuracy |
| Granulated sugar | 2 cups | Don’t reduce this |
| Unsweetened cocoa powder | ¾ cup | Dutch-process makes it darker |
| Baking soda | 2 teaspoons | Fresh is key |
| Baking powder | 1 teaspoon | Check expiration date |
| Salt | 1 teaspoon | Enhances chocolate flavor |
| Large eggs | 2 | Room temperature |
| Strong black coffee | 1 cup | Cooled completely |
| Buttermilk | 1 cup | Room temperature |
| Vegetable oil | ½ cup | Any neutral oil works |
| Vanilla extract | 1 teaspoon | Pure, not imitation |
For the Cherry Filling
| Ingredient | Amount | Notes |
|---|---|---|
| Pitted dark cherries in syrup | 2 cans (14.5 oz each) | Save the syrup! |
| Granulated sugar | ⅓ cup | Adjust to cherry sweetness |
| Cornstarch | 2 tablespoons | For thickening |
| Kirsch (cherry brandy) | ¼ cup | Optional but traditional |
For the Whipped Cream
| Ingredient | Amount | Notes |
|---|---|---|
| Heavy whipping cream | 3 cups | Must be cold |
| Powdered sugar | ⅓ cup | Sifted is smoother |
| Vanilla extract | 1 teaspoon | Pure extract only |
For Garnish
- Dark chocolate shavings (generous amount)
- Fresh cherries with stems (8-12)
- Extra kirsch for brushing layers (optional)
Tools You’ll Need
You may also like : funnel cake recipe
Here’s your shopping list if you don’t already have these:
Essential:
- Three 8-inch round cake pans
- Parchment paper
- Electric mixer (stand or hand)
- Medium saucepan
- Fine-mesh strainer
- Cooling racks
Makes Life Easier:
- Offset spatula (butter knife works in a pinch)
- Vegetable peeler (for chocolate shavings)
- Cake turntable (not necessary but fun)
- Piping bag with star tip (optional decoration)
Pro Tips
“The difference between a good Black Forest Cake and a GREAT one? Temperature control and patience. Rush it, and you’ll have a melty mess.”
1. Room Temperature Ingredients Actually Matter Here
I used to skip this step all the time.
Then I made a cake where everything was cold and it turned out dense and weird.
Room temp eggs and buttermilk mix way better and give you that light, fluffy texture you want. Set them out 30-60 minutes before baking.
2. Don’t Skip the Coffee ☕
I know it sounds strange if you’re not a coffee person, but you won’t taste it in the final cake.
It just makes the chocolate flavor deeper and richer.
Here’s what happens: coffee enhances cocoa compounds and makes chocolate taste more like… well, chocolate. Science is cool like that.
3. Make the Cherry Filling Ahead
This is a game-changer.
The filling needs to cool completely before you use it, so making it the day before means one less thing to stress about when you’re assembling.
Plus, the flavors get better overnight. The sugar has time to meld with the cherry juices and everything just tastes more cohesive.
4. Chill Your Bowl and Beaters for Whipped Cream
Cold equipment = better whipped cream.
Pop your mixing bowl and beaters in the freezer for 15 minutes before you start. Your whipped cream will come together faster and hold its shape better.
On hot days, I even put the whole mixer in the fridge.
5. Use a Serrated Knife to Level Your Cakes
If your cakes dome in the middle (they probably will), just slice off that rounded top with a serrated knife.
It takes like 30 seconds and makes stacking so much easier.
Eat the scraps. Baker’s tax. 😋
Substitutions and Variations
| What You’re Missing | Use This Instead | Taste Difference |
|---|---|---|
| Kirsch | Cherry juice from can | Less complex, still good |
| Kirsch | Dark rum or brandy | Different but delicious |
| Buttermilk | Milk + 1 tbsp vinegar | Nearly identical |
| Coffee | Hot water | Good, just less deep |
| Dutch cocoa | Natural cocoa powder | Lighter color, slightly tangier |
| Canned cherries | Fresh cherries (1½ lbs) | More work, fresher taste |
| Heavy cream | Coconut cream (chilled) | Dairy-free, slight coconut flavor |
Flavor Variations You’ll Love
Chocolate Cherry Liqueur Cake: Brush each cake layer with 2 tablespoons of cherry liqueur before adding cream. Very adult, very delicious.
White Forest Cake: Use white chocolate shavings instead of dark. Swap cocoa powder for extra flour (1¾ cups total flour, no cocoa). You get a vanilla cake with the same cherry-cream situation.
Individual Black Forest Cakes: Use the batter for cupcakes (18-20 minutes baking time). Core out the centers, fill with cherries, top with cream and chocolate.
Berry Medley Version: Mix raspberries and blueberries with the cherries. Gives you a “Dark Forest” vibe with more fruit complexity.
Make-Ahead Tips
One of the best things about this cake? You can prep almost everything ahead.
Timeline for Stress-Free Baking:
| When | What to Do | Storage |
|---|---|---|
| 3 days ahead | Make cherry filling | Airtight container, fridge |
| 2 days ahead | Bake cake layers | Wrapped tightly, room temp |
| 1 day ahead | Assemble entire cake | Loosely covered, fridge |
| 2-3 hours ahead | Make chocolate shavings | Cool, dry place |
| 30 min before serving | Take cake out of fridge | Room temp tastes better |
Freezer Instructions:
Wrap unfrosted cake layers individually in plastic wrap, then aluminum foil. Freeze up to 3 months. Thaw overnight in the fridge, then bring to room temperature before assembling.
Don’t freeze the assembled cake. The whipped cream gets icy and separates when it thaws. Not cute.
You’ll love these too : mug cake recipe
How to Make Black Forest Cake
Step 1: Make the Cherry Filling (20 minutes + cooling time)
Drain your cherries but save that syrup. You’ll need about ½ cup of it.
Toss the drained cherries into a medium saucepan with the sugar and cherry syrup. Bring it to a simmer over medium heat. You’ll see bubbles around the edges.
Mix the cornstarch with 2 tablespoons of cold water until smooth. No lumps. Pour it into the cherry mixture and keep stirring.
It’ll thicken up in about 2 minutes. You’ll know it’s ready when it coats the back of a spoon and doesn’t immediately run off.
Kill the heat and stir in the kirsch if you’re using it.
Pour everything into a bowl and let it cool completely. Seriously, completely. Warm filling + whipped cream = disaster.
Quick Check: Is your filling the consistency of thick jam? Perfect. Too runny? Add more cornstarch slurry (1 tsp cornstarch + 1 tbsp water) and simmer another minute.
Step 2: Bake the Chocolate Cake (35 minutes)
Preheat your oven to 350°F.
Grease three 8-inch round pans and line the bottoms with parchment paper. This is your insurance against stuck cake.
Dry ingredients: In a large bowl, whisk together flour, sugar, cocoa powder, baking soda, baking powder, and salt. Get all those lumps out.
Wet ingredients: In another bowl, whisk eggs, coffee, buttermilk, oil, and vanilla until everything’s combined.
Pour the wet ingredients into the dry and mix until you don’t see any flour streaks.
The batter will be thin. Like really thin. This is normal. Don’t panic. I repeat: this is supposed to be thin.
Divide the batter evenly between your pans. I eyeball it but if you want to be precise, use a kitchen scale (about 490g per pan).
Bake for 25-30 minutes. You’ll know they’re done when:
- A toothpick comes out clean or with just a few moist crumbs
- The edges pull away slightly from the pan
- The top springs back when lightly pressed
Let the cakes cool in the pans for 10 minutes, then turn them out onto cooling racks.
Let them cool completely before you even think about frosting. This usually takes about an hour. Go watch an episode of something.
Step 3: Make the Whipped Cream (5 minutes)
Pour the cold heavy cream into your chilled bowl. Add the powdered sugar and vanilla.
Beat on medium-high speed until you get stiff peaks. This takes about 3-4 minutes with a stand mixer, maybe 5-6 with a hand mixer.
You want it to hold its shape when you lift the beaters, but not so stiff that it looks grainy.
| Stage | What It Looks Like | What to Do |
|---|---|---|
| Soft peaks | Droops when beaters lift | Keep beating |
| Medium peaks | Holds shape but tips curl | Almost there |
| Stiff peaks | Stands straight up | Stop now |
| Overbeaten | Grainy, separating | You’ve gone too far, start over |
Step 4: Assemble the Cake (15 minutes)
Place your first cake layer on a serving plate or cake stand. If it’s domed, level it off with a serrated knife.
Spread about 1 cup of whipped cream on top. Don’t go all the way to the edges.
Make a little well in the center (like a donut) and spoon half the cherry filling into it. The well keeps the cherries from squishing out the sides when you add the next layer.
Top with the second cake layer. Press down gently. Repeat the whipped cream and cherry situation.
Add your final cake layer.
Now frost the top and sides with the remaining whipped cream. Don’t stress about making it perfect. Rustic looks good here. You’re going for “homemade with love” not “bakery sterile.”
Crumb Coat Trick: If you want super clean sides, do a thin first coat of whipped cream (a crumb coat), chill for 20 minutes, then add the final thick layer. Traps all the crumbs underneath.
Recommended for you : lava cake recipe
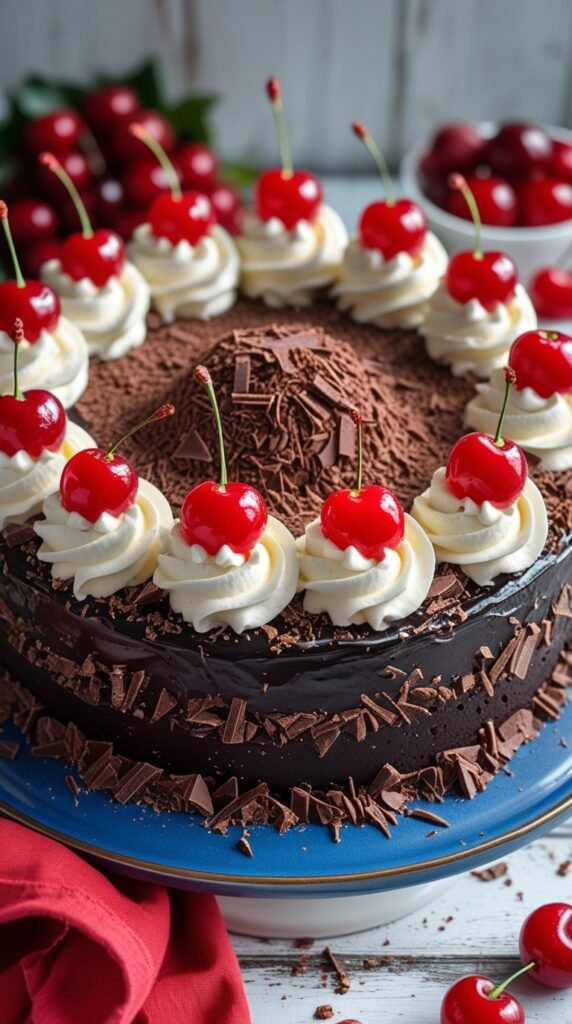
Step 5: Decorate (10 minutes)
Press chocolate shavings onto the sides of the cake. They’ll stick to the whipped cream naturally. Use your hands, it’s fine.
Pile more chocolate shavings on top. Be generous. This is not the time to be stingy with chocolate.
Add fresh cherries around the top edge. Space them evenly or cluster them. Your cake, your rules.
Pop it in the fridge for at least 30 minutes before slicing. This helps everything set and makes cleaner slices.
Leftovers and Storage
Short-term (3-4 days): Keep covered in the fridge. The whipped cream might weep a little after the first day, but it still tastes great. Day one is peak texture though.
Freezing: Don’t freeze assembled cake. The whipped cream gets icy and weird when it thaws. Freeze unfrosted layers instead.
Serving tip: For the cleanest slices, use a sharp knife dipped in hot water and wiped dry between each cut. You’ll get those Instagram-worthy layers every time.
Nutritional Information (Per Slice)
Based on 12 servings
| Nutrient | Amount | % Daily Value |
|---|---|---|
| Calories | 520 | – |
| Total Fat | 28g | 36% |
| Saturated Fat | 16g | 80% |
| Cholesterol | 95mg | 32% |
| Sodium | 380mg | 17% |
| Total Carbohydrates | 65g | 24% |
| Dietary Fiber | 3g | 11% |
| Sugars | 48g | – |
| Protein | 6g | 12% |
This is a celebration cake. Enjoy it without guilt. 🍰
Perfect Pairings
Drinks that complement Black Forest Cake:
- Strong black coffee (the classic)
- Espresso or cappuccino
- Sweet dessert wine (late harvest Riesling)
- Port or cherry liqueur
- Cold milk (for the kids)
When to serve it:
- Birthdays (obviously)
- Valentine’s Day dinner
- Holiday gatherings
- “I survived Monday” celebrations
- Any day ending in Y
FAQ
Why is it called Black Forest Cake?
It comes from the Black Forest region in Germany (Schwarzwald). The cake gets its name from the dark chocolate layers and the kirsch, which is a cherry brandy traditionally made there.
Fun fact: In Germany, it’s actually illegal to call it “Schwarzwälder Kirschtorte” if it doesn’t contain kirsch. They take their cake seriously. 🇩🇪
Can I make this without alcohol?
Yep. Just skip the kirsch in the cherry filling and use extra cherry juice instead.
You’ll lose a tiny bit of that traditional flavor, but it’ll still be really good. The kirsch adds a subtle boozy warmth that plays well with the cherries, but it’s not make-or-break.
Why is my whipped cream runny?
Usually this happens when:
- The cream isn’t cold enough
- You didn’t beat it long enough
- Your kitchen is too warm
Make sure everything’s cold (cream, bowl, beaters) and beat until you see stiff peaks that hold their shape. If your kitchen is really warm, stick the bowl in the fridge for 10 minutes.
Can I use chocolate cake mix instead?
You can, but homemade is better here.
Cake mix tends to be sweeter and the texture isn’t quite as tender. If you’re in a pinch though, use a good quality devil’s food cake mix and follow the package directions.
How do I make chocolate shavings?
Take a chocolate bar (dark chocolate works best) and let it sit at room temperature for like 10 minutes so it’s slightly soft.
Then just run a vegetable peeler down the side. The shavings will curl as they come off.
If the chocolate’s too cold, you’ll get tiny shards instead of curls. Too warm? Melty mess.
Do I have to use three layers?
Nope. Two layers works fine. You’ll just have a slightly shorter cake.
Use 9-inch pans instead of 8-inch and adjust the cherry filling and whipped cream amounts slightly (you won’t need quite as much).
Can I make this as cupcakes?
The chocolate cake recipe works great as cupcakes.
Bake at 350°F for 18-20 minutes. Fill each cooled cupcake with a spoonful of cherry filling (use a cupcake corer or just cut a small cone out of the top). Top with whipped cream and chocolate shavings.
Way easier for parties.
Why did my cake layers crack?
Usually from:
- Overbaking
- Cooling them too fast
- Oven temperature too high
Make sure you’re checking them at 25 minutes and pulling them as soon as a toothpick comes out clean. Let them cool gradually in the pans before turning out.
Cracks aren’t the end of the world though. The whipped cream covers everything.
How far ahead can I make this?
| Component | Make Ahead Window | Storage |
|---|---|---|
| Cherry filling | 3 days | Fridge, airtight |
| Cake layers | 2 days (room temp) or 3 months (frozen) | Wrapped tightly |
| Assembled cake | 1 day | Fridge, loosely covered |
| Whipped cream | Same day only | Fresh is best |
What if I don’t have buttermilk?
Mix 1 cup of regular milk with 1 tablespoon of lemon juice or white vinegar. Let it sit for 5 minutes. You’ve just made buttermilk. Done.
Wrapping Up
Black Forest Cake has this reputation for being fancy and complicated, but now you know the truth.
It’s just chocolate cake, cherries, and whipped cream doing their thing in perfect harmony.
The layers, the filling, the chocolate shavings on top. It all comes together into something that looks way more impressive than the effort you put in.
Make this for your next birthday, celebration, or random Tuesday when you want something that feels special.
And then come back and tell me how it went. Did you add extra cherries? Skip the kirsch? Make it two layers instead of three?
Drop a comment below. I’d love to know.


1 thought on “Black Forest Cake Recipe (That’ll Make You Look Like a Pro)”