You know that one cake recipe your grandma guards like a state secret?
This is mine now. And I’m spilling all the details.
I spent years bouncing between cake mixes and complicated recipes that needed twelve bowls and a degree in chemistry. Nothing hit right. They were either too dry, too dense, or so sweet they made my teeth hurt.
Then I found this yellow cake recipe.
It’s buttery. It’s moist for days. And it’s so simple I actually laughed when I realized I’d been overcomplicating cake my entire life.
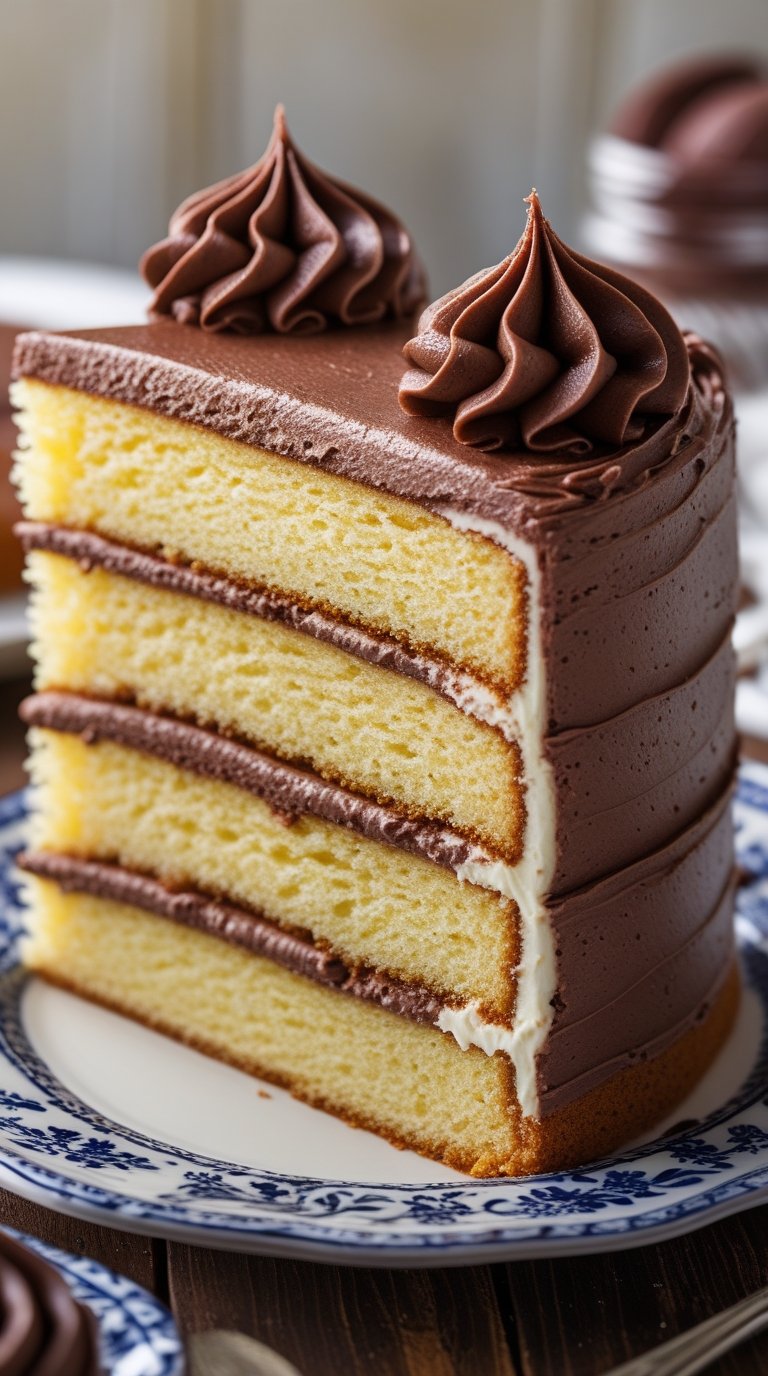
The crumb is tight but tender. The flavor is pure vanilla butter heaven. And the texture? It’s what every store-bought mix wishes it could be.
I made this for my husband’s birthday last month and he ate three slices before dinner. No regrets. Just pure cake joy.
You can frost it, layer it, eat it plain with coffee, or turn it into cupcakes. It works for everything. Birthday parties. Random Tuesday afternoons. That moment when you need cake and you need it now.
Let me show you how ridiculously easy this is.
What You’ll Need
For the Cake
| Ingredient | Amount | Why It Matters |
|---|---|---|
| All-purpose flour | 2 ¾ cups | Creates the structure |
| Baking powder | 2 ½ teaspoons | Makes it rise and fluffy |
| Salt | ½ teaspoon | Balances the sweetness |
| Unsalted butter (softened) | 1 cup (2 sticks) | The star of the flavor show |
| Granulated sugar | 2 cups | Sweetness + helps create texture |
| Large eggs (room temp) | 4 | Binds everything together |
| Pure vanilla extract | 2 teaspoons | The flavor you’ll crave |
| Whole milk (room temp) | 1 cup | Keeps it tender and moist |
For Simple Buttercream Frosting (Optional)
| Ingredient | Amount |
|---|---|
| Unsalted butter (softened) | 1 cup (2 sticks) |
| Powdered sugar | 4 cups |
| Vanilla extract | 2 teaspoons |
| Heavy cream or whole milk | 3-4 tablespoons |
| Salt | Pinch |
Tools You’ll Need

People also like : apple cake recipe
Essential:
- Two 9-inch round cake pans (or one 9×13 pan)
- Electric mixer (stand or hand mixer both work)
- Large mixing bowl
- Medium mixing bowl
- Measuring cups and spoons
- Rubber spatula
- Wire cooling rack
- Parchment paper
- Toothpick for testing doneness
Nice to Have:
- Offset spatula (for frosting)
- Cake turntable (makes frosting way easier)
- Cake leveler (for perfectly flat layers)
Pro Tips
🌡️ Temperature is everything.
Room temperature ingredients aren’t just a suggestion. Cold eggs and milk won’t mix properly with the butter and you’ll end up with a dense cake.
Take everything out 30-60 minutes before you start.
I set a timer on my phone now because I used to forget and end up with cold ingredients anyway.
🥄 Don’t overmix once you add the flour.
Mix just until you can’t see dry flour anymore.
Overmixing develops gluten and makes your cake tough instead of tender. I learned this the hard way after making hockey pucks disguised as cake.
The batter doesn’t need to be perfectly smooth. A few small lumps are totally fine.
🔍 The toothpick test isn’t always accurate.
A few moist crumbs on the toothpick are fine. If you wait until it comes out completely clean, you’ve overbaked it.
The cake keeps cooking in the hot pan for a few minutes after you take it out of the oven.
⏰ Let the cake cool completely before frosting.
I know you’re excited. I get it.
But warm cake + frosting = melted mess.
Give it at least 2 hours. Go watch a show. Take a walk. The wait is worth it.
✨ Use real butter and real vanilla.
Margarine and imitation vanilla will give you imitation flavor.
This cake is simple, so the quality of your ingredients really shows up in the final taste.
Substitutions and Variations
Common Swaps
| If You Need | Use This Instead | Notes |
|---|---|---|
| Dairy-free milk | Any plant-based milk (almond, oat, soy) | All work equally well |
| Dairy-free butter | Plant-based stick butter | Don’t use tub spreads or oil |
| Gluten-free | 1:1 gluten-free flour blend | Bob’s Red Mill or King Arthur brands |
| Chocolate cake | Replace ½ cup flour with ½ cup cocoa powder | Everything else stays the same |
Flavor Variations You’ll Love
🍋 Lemon Cake: Add 2 tablespoons lemon zest and replace vanilla with lemon extract
🌰 Almond Cake: Add ½ teaspoon almond extract along with the vanilla
🎉 Funfetti: Fold in 1 cup of sprinkles at the very end
🍓 Berry Swirl: Swirl ½ cup of jam into the batter before baking
Different Pan Sizes
| Pan Type | Bake Time | Makes |
|---|---|---|
| Two 9-inch rounds | 28-32 minutes | Standard layer cake |
| One 9×13 sheet | 35-40 minutes | Sheet cake |
| Cupcake tin | 18-22 minutes | 24 cupcakes |
| Three 8-inch rounds | 25-28 minutes | Tall layer cake |
Make Ahead Tips
You can bake these layers up to 2 days in advance.
Let them cool completely, wrap them tightly in plastic wrap, and keep them at room temperature. They’ll actually be easier to frost because they firm up a bit.
For longer storage: Freeze the unfrosted layers. Wrap them in plastic wrap, then in foil, and freeze for up to 3 months. Thaw overnight in the fridge before frosting.
Storage Timeline:
| Storage Method | How Long | Best For |
|---|---|---|
| Room temperature (covered) | 2-3 days | Immediate eating |
| Refrigerated (covered) | Up to 1 week | Making ahead |
| Frozen (wrapped tightly) | Up to 3 months | Long-term storage |
| Frosting (refrigerated) | 1 week | Prep work |
The frosted cake keeps at room temperature for 2-3 days (cover it loosely) or in the fridge for up to a week. Just know that refrigeration dries out cake faster, so eat it within a few days for best texture.
You’ll love these too : pumpkin dump cake recipe
How to Make the Perfect Yellow Cake

Step 1: Prep Your Pans First
Preheat your oven to 350°F (175°C).
Butter your cake pans really well, then line the bottoms with parchment paper circles. Butter the parchment too. Dust everything with flour and tap out the excess.
This double insurance policy means your cakes will pop out of the pans without sticking.
Quick Tip: Trace your pan on parchment paper and cut inside the line for a perfect fit.
Step 2: Mix Your Dry Ingredients
In a medium bowl, whisk together the flour, baking powder, and salt.
Set it aside.
This is the boring part but it matters. You want those leaveners evenly distributed so your cake rises evenly.
Step 3: Cream the Butter and Sugar
In your large bowl, beat the softened butter on medium speed for about a minute until it’s smooth and creamy.
Add the sugar and beat on medium-high for 3-4 minutes.
What you’re looking for:
- Pale color (almost white)
- Fluffy texture
- Nearly doubled in volume
This is where the magic happens. Those air bubbles you’re creating? That’s what makes your cake light and tender.
Step 4: Add the Eggs One at a Time
Beat in each egg fully before adding the next one.
The mixture might look curdled after the second egg. Don’t panic. It’ll come together.
Add the vanilla and mix it in.
Why this matters: Adding eggs slowly creates a stable emulsion. Dumping them all at once can cause the batter to break.
Step 5: Alternate the Flour and Milk
Turn your mixer to low.
The pattern:
- Add ⅓ of the flour mixture (mix just until barely combined)
- Add ½ of the milk (mix until incorporated)
- Add another ⅓ of the flour (mix briefly)
- Add the rest of the milk (mix until combined)
- Add the last ⅓ of the flour (mix just until you can’t see it)
Scrape down the sides of the bowl with your spatula to make sure everything’s mixed.
Critical: Mix each addition just until you can’t see it anymore. No more than that.
Step 6: Divide and Bake
Split the batter evenly between your two prepared pans.
A kitchen scale makes this easy, but eyeballing it works fine too.
Smooth the tops with your spatula. Tap the pans gently on the counter a few times to release any big air bubbles.
Bake for 28-32 minutes.
The cake is done when: ✓ It’s golden brown on top ✓ It springs back when you touch the center lightly ✓ A toothpick inserted in the middle comes out with just a few moist crumbs
Recommended for you : strawberry cake recipe
Step 7: Cool Properly
Let the cakes cool in the pans for 10 minutes. This lets them firm up enough to handle.
Run a knife around the edges, then flip them onto a wire rack.
Peel off the parchment paper and flip them right-side up to cool completely.
This takes about 1-2 hours. I usually make the frosting during this time.
Making the Buttercream
Time needed: 10 minutes
Beat the softened butter on medium speed for 2 minutes until it’s creamy and smooth.
Add the powdered sugar one cup at a time, beating on low after each addition.
Add the vanilla and salt.
Start with 3 tablespoons of cream and beat on medium-high for 3-4 minutes.
Consistency check:
| If Your Frosting Is | Do This |
|---|---|
| Too thick to spread | Add cream, 1 tablespoon at a time |
| Too thin or runny | Add powdered sugar, ¼ cup at a time |
| Perfect (light and fluffy) | You’re done! 🎉 |
Assembling Your Cake
The Layer Cake Method
Step 1: Place one cake layer on your serving plate or cake stand. If the top is domed, slice it off with a serrated knife so it’s flat.
Step 2: Spread about 1 cup of frosting on top. Don’t worry about it being perfect. Just get it even-ish.
Step 3: Place the second layer on top, flat side up. Press down gently.
Step 4: Spread a thin layer of frosting all over the cake (top and sides). This is your crumb coat. It seals in all the loose crumbs so your final layer looks clean.
Step 5: Chill the cake for 15-20 minutes so the crumb coat sets.
Step 6: Add your final layer of frosting. Start with the top, then do the sides.
Decoration Ideas
| Style | How To | Vibe |
|---|---|---|
| Rustic | Leave frosting slightly textured | Casual, homemade |
| Smooth | Use offset spatula and bench scraper | Clean, professional |
| Naked | Skip sides, frost only between layers | Modern, minimalist |
| Sprinkles | Cover in sprinkles while frosting is wet | Fun, celebratory |
You can keep it rustic and simple, or smooth it out with an offset spatula for a clean look.
Decorate however you want. Sprinkles. Fresh flowers. Fresh berries. Or just leave it plain because sometimes simple is best.
Leftovers and Storage
This cake stays moist for days, which is one of my favorite things about it.
Storage Guide
🏠 Room Temperature: Keep it covered (a cake dome or overturned bowl works great) for up to 3 days. It’ll stay soft and delicious.
After day three it starts drying out.
❄️ In the Fridge: Store covered for up to a week.
Let slices sit at room temperature for 10-15 minutes before eating because cold cake isn’t as good. The frosting firms up in the fridge and the cake can get a bit dense.
🧊 Freezing: Slice the cake and wrap individual pieces in plastic wrap, then put them in a freezer bag. They’ll keep for 3 months.
Thaw overnight in the fridge or at room temperature for a couple hours.
I actually love having cake slices in the freezer. Random cake emergencies are real and this solves that problem instantly. 😊
Nutritional Information
Per slice (based on 12 slices with frosting):
| Nutrient | Amount |
|---|---|
| Calories | 580 |
| Total Fat | 26g |
| Saturated Fat | 16g |
| Cholesterol | 120mg |
| Sodium | 200mg |
| Total Carbohydrates | 82g |
| Dietary Fiber | 1g |
| Sugars | 64g |
| Protein | 5g |
Keep in mind this is cake. It’s dessert. It’s not health food and that’s okay.
Some things are just meant to be enjoyed without guilt.
FAQ
Why is my cake dry?
You probably overbaked it or didn’t measure your flour correctly.
Too much flour makes dry cake. Spoon your flour into the measuring cup and level it off. Don’t scoop with the cup because you’ll pack in too much.
Also check your oven temperature with an oven thermometer because ovens lie.
Can I use salted butter instead of unsalted?
You can, but reduce the added salt to ¼ teaspoon.
Unsalted butter gives you more control over the flavor, but salted butter won’t ruin the cake.
My butter and sugar won’t cream properly. What’s wrong?
Your butter is probably too cold or too warm.
It should be soft enough that your finger leaves an indent when you press it, but it shouldn’t be greasy or melting.
Leave it on the counter for 30-60 minutes before using.
Can I make this without eggs?
You can try using a commercial egg replacer (follow the package directions for 4 eggs) or make flax eggs.
Flax egg recipe: 4 tablespoons ground flaxseed mixed with 12 tablespoons water. Let sit for 5 minutes.
The texture will be slightly different but it should still work.
My cake stuck to the pan even though I greased it. Help?
This is why the parchment paper is so important.
Always line the bottom of your pans with parchment. Always.
Some pans just have sticking issues and parchment is your insurance policy.
How do I know when it’s done baking?
Look for three signs:
- The cake is golden brown
- It springs back when you gently touch the center
- A toothpick comes out with a few moist crumbs (not wet batter)
If all three are happening, it’s done.
Can I halve this recipe?
Yes. Make it in one 9-inch round pan or an 8×8 square pan.
Bake time will be about the same, maybe 2-3 minutes less.
Why do my cake layers have a dome?
That’s normal. Oven heat rises and creates a dome.
You can use cake strips (wet fabric strips wrapped around the pan) to bake flatter layers, or just slice off the dome before frosting.
I usually slice it off and eat it as a snack while the cake cools. 😋
Help! My frosting is grainy!
Your powdered sugar wasn’t sifted or you didn’t beat it long enough.
Beat the frosting for another 2-3 minutes. If it’s still grainy, push it through a fine-mesh sieve and re-whip.
Can I make this into cupcakes?
Absolutely!
Fill cupcake liners ⅔ full and bake at 350°F for 18-22 minutes.
This recipe makes 24 cupcakes.
Wrapping Up
This yellow cake is the kind of recipe you’ll make over and over until you can do it without looking at the instructions.
It’s simple. It’s reliable. And it’s genuinely delicious.
You don’t need fancy ingredients or special skills. Just decent butter, patience while the ingredients come to room temperature, and the willingness to not overmix.
Make this for your next birthday party. Make it on a random Wednesday. Make it because you want cake and life’s too short to not eat good cake.
And once you’ve made it, come back and leave a comment.
Tell me what you thought. Tell me if you changed anything. Ask questions if something went wrong.
I want to hear about your cake adventures.
Now go preheat that oven. 🎂


1 thought on “The Yellow Cake That Made Me Forget Every Other Cake”