
You know that moment when you bite into a cake and it’s so light it practically dissolves on your tongue?
That’s what a proper sponge cake should do.
Not dense. Not dry. Not crumbly.
Just cloud-like softness that makes you go back for another slice even when you’re already full.
I’ve been making sponge cake for years now, and I can tell you that once you nail this recipe, you’ll be making it on repeat for birthdays, afternoon tea, or just random Tuesday evenings when you want something sweet but not too heavy.
Here’s something wild: sponge cake has been around since the Renaissance.
The earliest versions didn’t even use baking powder (it wasn’t invented yet). Bakers relied purely on beaten eggs to make their cakes rise.
Can you imagine whipping eggs by hand for 30 minutes straight? 😅
And the beauty of sponge cake? It’s simple.
No fancy mixers required (though they help). No weird ingredients you can’t pronounce. Just eggs, sugar, flour, and a little technique.
Let me walk you through exactly how to make the fluffiest sponge cake of your life.
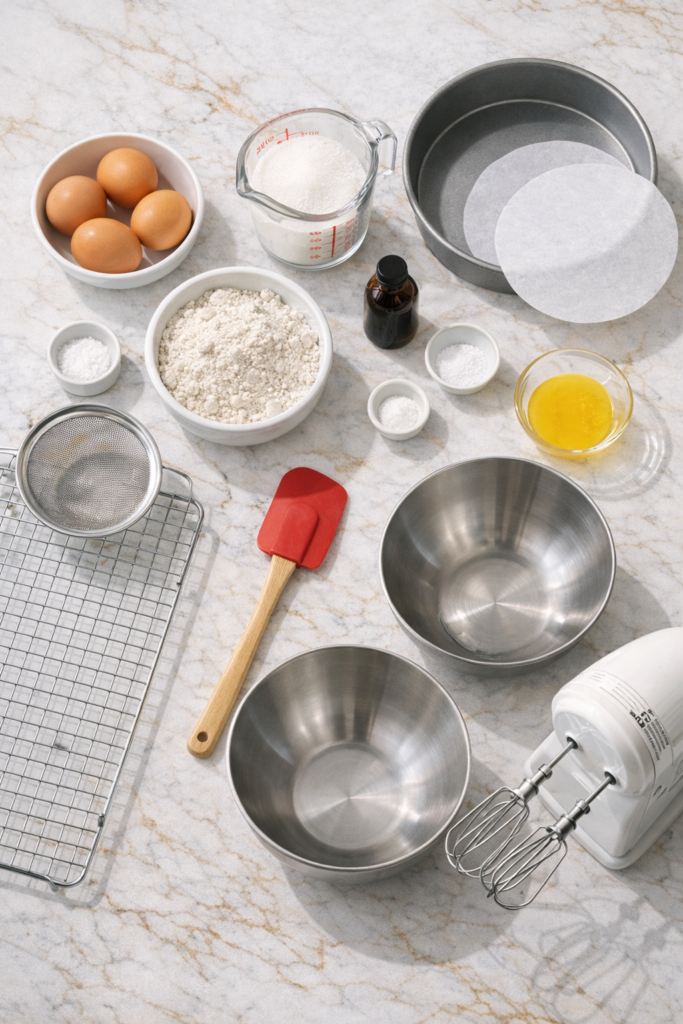
What You’ll Need
For the Cake
| Ingredient | Amount | Notes |
|---|---|---|
| Large eggs (room temp) | 4 | This is crucial for volume |
| Granulated sugar | 3/4 cup | Superfine works even better |
| All-purpose flour | 1 cup | Must be sifted |
| Vanilla extract | 1 tsp | Or almond/lemon |
| Salt | 1/4 tsp | Enhances sweetness |
| Melted butter | 2 tbsp | Must be cooled |
| Baking powder | 1 tsp | Just a touch for insurance |
For Optional Filling & Topping
- 1 cup heavy whipping cream
- 2 tablespoons powdered sugar
- Fresh berries (strawberries, blueberries, raspberries)
- Powdered sugar for dusting
Tools You’ll Need
You may also like : banana cake recipe
Essential:
- 9-inch round cake pan
- Parchment paper
- Stand mixer or hand mixer
- Rubber spatula
Nice to Have:
- Fine mesh sieve (for sifting)
- Cooling rack
- Offset spatula (for frosting)
Pro Tips
Temperature is everything. Room temperature eggs whip up to nearly triple their volume, while cold eggs barely budge. Take them out of the fridge 30 minutes before you start.
Sift your flour. I know, it feels old-fashioned, but sifting makes a massive difference in keeping your cake light. Lumpy flour = dense cake. No one wants that.
Don’t overmix once you add the flour. This is where most people mess up. You want to fold the flour in gently using a rubber spatula, not beat it to death with your mixer. Overmixing develops gluten, which makes your cake tough and chewy.
Cool the melted butter before adding it. Hot butter can deflate your whipped eggs faster than you can say “cake disaster.” Let it cool for 5 minutes.
Use the toothpick test. Insert a toothpick into the center of the cake. If it comes out clean or with just a few moist crumbs, you’re good. If it’s covered in wet batter, give it another 3-5 minutes.
Substitutions and Variations
| Original | Substitute | Result |
|---|---|---|
| All-purpose flour | Cake flour (1 cup + 2 tbsp) | Even lighter texture |
| Granulated sugar | Superfine sugar | Finer, more delicate crumb |
| Butter | Neutral oil (same amount) | Dairy-free version |
| Vanilla extract | Almond extract or citrus zest | Different flavor profile |
Want chocolate sponge? Replace 2 tablespoons of flour with unsweetened cocoa powder.
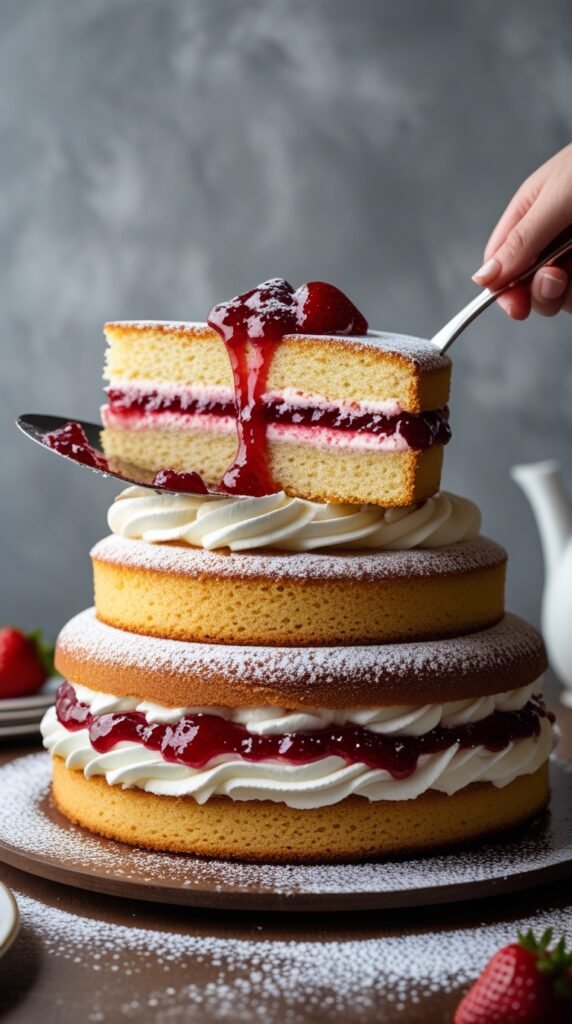
Make it a layer cake: Double the recipe and bake in two 9-inch pans. Layer with jam, whipped cream, or buttercream.
Make Ahead Tips
Here’s something most people don’t know: sponge cake is actually better the next day.
The texture settles and becomes even more tender.
Bake the cake, let it cool completely, then wrap it tightly in plastic wrap.
Storage times:
- Room temperature: up to 2 days
- Refrigerated: up to 5 days
- Frozen (unfilled): up to 3 months
If you’re making it for a party, bake it the day before, then add fillings and toppings the day of.
You’ll love these too : vanilla eggless cake recipe
How to Make the Perfect Sponge Cake
Step 1: Prep Your Pan
Time: 2 minutes
Preheat your oven to 350°F (175°C).
Grease your 9-inch round cake pan with butter or non-stick spray, then line the bottom with parchment paper.
This makes sure your cake doesn’t stick.
Step 2: Whip the Eggs and Sugar
Time: 8-10 minutes
Crack your eggs into the bowl of your stand mixer (or a large bowl if using a hand mixer).
Add the sugar and vanilla extract.
Beat on high speed for 8-10 minutes.
Yes, really. This is where the magic happens.
You’ll know it’s ready when the mixture is pale yellow, thick, and ribbony. When you lift the beaters, the batter should fall in thick ribbons that hold their shape for a few seconds before dissolving back into the bowl.
Visual cue: The mixture should be nearly white and tripled in volume.
This step is crucial. It’s what makes your cake light and fluffy, so don’t rush it.
Step 3: Sift and Fold the Dry Ingredients
Time: 3 minutes
While the eggs are whipping, sift together your flour, baking powder, and salt in a separate bowl.
Once your eggs are ready, turn off the mixer.
Add about a third of the flour mixture to the whipped eggs.
Folding technique:
- Use a rubber spatula in a circular motion
- Cut through the center
- Scrape from the bottom of the bowl
- Bring batter up and over
Add the second third and fold again.
Add the final third and fold until just combined. You should still see a few streaks of flour.
Step 4: Add the Butter
Time: 2 minutes
Take a small amount of the batter (about 1/2 cup) and mix it with your melted, slightly cooled butter in a small bowl.
This tempers the butter so it doesn’t deflate all your whipped eggs.
Pour this butter mixture back into the main batter and fold gently until just combined.
No streaks, but don’t overmix.
Step 5: Bake
Time: 25-30 minutes
Pour the batter into your prepared pan and smooth the top gently with a spatula.
Bake for 25-30 minutes, or until the cake is golden brown on top and springs back when lightly pressed.
Important: Don’t open the oven door for at least 20 minutes, or your cake could collapse.
Recommended for you : tutti frutti cake recipe
Step 6: Cool
Time: 30 minutes
As soon as the cake comes out of the oven, run a knife around the edges to loosen it from the pan.
Let it cool in the pan for 5 minutes, then turn it out onto a cooling rack.
Peel off the parchment paper and let it cool completely before filling or frosting.
If you try to frost a warm cake, everything will melt and slide off. Trust me, I’ve been there. 😅
Total Time Breakdown
| Step | Time |
|---|---|
| Prep | 5 minutes |
| Mixing | 15 minutes |
| Baking | 25-30 minutes |
| Cooling | 30 minutes |
| Total | 1 hour 15 minutes |
Filling Ideas (Optional)
Sponge cake on its own is delicious, but it’s also the perfect canvas for fillings.
Classic whipped cream and berries: Whip 1 cup of heavy cream with 2 tablespoons of powdered sugar until stiff peaks form. Spread on top of the cooled cake and top with fresh berries.
Lemon curd: Spread a layer of store-bought or homemade lemon curd over the cake. The tartness pairs perfectly with the sweetness of the sponge.
Jam and cream: Spread your favorite jam (strawberry, raspberry, apricot) on one half of the cake, top with whipped cream, and sandwich with the other half.
Chocolate ganache: Pour warm ganache over the cooled cake and let it drip down the sides for a showstopper dessert.
Popular Flavor Combinations
| Base Flavor | Filling | Topping | Vibe |
|---|---|---|---|
| Vanilla | Fresh strawberries + whipped cream | Powdered sugar | Classic & elegant |
| Lemon zest | Lemon curd | Meringue | Bright & tangy |
| Almond extract | Raspberry jam | Sliced almonds | Sophisticated |
| Cocoa powder | Chocolate ganache | Fresh raspberries | Rich & decadent |
| Orange zest | Marmalade | Candied orange peel | Citrusy & bold |
Leftovers and Storage
Store any leftover cake in an airtight container at room temperature for up to 2 days, or in the fridge for up to 5 days.
If your cake has whipped cream or fresh fruit, keep it refrigerated and eat within 2-3 days.
Freezing instructions:
- Freeze unfilled cake slices in a single layer on a baking sheet
- Transfer to a freezer-safe bag once solid
- They’ll keep for up to 3 months
- Thaw at room temperature for 1 hour or microwave for 15-20 seconds
Nutritional Information
Per Slice (8 servings, cake only):
| Nutrient | Amount | % Daily Value |
|---|---|---|
| Calories | 185 | – |
| Total Fat | 6g | 8% |
| Saturated Fat | 3g | 15% |
| Cholesterol | 95mg | 32% |
| Sodium | 125mg | 5% |
| Total Carbs | 28g | 9% |
| Sugars | 18g | – |
| Protein | 5g | 10% |
Note: Does not include optional fillings or toppings.
Why Sponge Cake Works So Well
The science behind sponge cake is actually pretty cool.
When you beat eggs and sugar together for a long time, you’re incorporating air into the mixture.
Those tiny air bubbles get trapped in the protein structure of the eggs, and when the cake bakes, the air expands and the proteins set, creating that light, airy texture.
The small amount of butter adds moisture and richness without weighing down the cake.
And because there’s no heavy leavening agent (just a touch of baking powder), the cake relies on those whipped eggs to rise.
That’s why the mixing technique is so important.
Here’s something that blew my mind when I first learned it: a properly whipped sponge cake batter contains millions of tiny air bubbles.
Each one acts like a mini balloon, expanding in the oven heat. That’s why you can’t slam the oven door or the whole structure collapses.
Mind. Blown. 🤯
Common Mistakes to Avoid
| Mistake | Why It Happens | How to Fix |
|---|---|---|
| Flat, dense cake | Eggs not beaten long enough | Beat eggs for full 8-10 minutes until ribbony |
| Cake deflated instantly | Butter too hot | Always cool butter for 5 minutes |
| Tough, chewy texture | Overmixed flour | Fold gently with spatula, don’t beat |
| Sunken center | Opened oven too early | Wait at least 20 minutes before peeking |
| Cake stuck to pan | No parchment paper | Always line pan with parchment |
| Dry cake | Overbaked | Check cake 5 minutes before recommended time |
Troubleshooting Guide
My eggs won’t get thick and fluffy:
- Are they room temperature? Cold eggs don’t whip well.
- Are you beating on high speed? Medium won’t cut it.
- Is your bowl clean and dry? Any grease will prevent eggs from whipping.
My cake has a rubbery texture:
- You overmixed the flour. Next time, fold more gently.
- Your oven might be too hot. Check with an oven thermometer.
My cake rose beautifully then collapsed:
- You opened the oven door too soon.
- The cake was underbaked in the center.
- The pan was too small (batter overflowed).
FAQ
Can I make this cake ahead of time?
Yes! Sponge cake actually tastes better the next day. Bake it, let it cool completely, wrap it tightly in plastic wrap, and store at room temperature for up to 2 days or in the fridge for up to 5 days.
Why did my cake sink in the middle?
This usually happens if the eggs weren’t beaten long enough, the oven door was opened too early, or the cake was underbaked. Make sure you beat the eggs until thick and ribbony, and don’t peek until at least 20 minutes into baking.
Can I use a different pan size?
You can use an 8-inch pan (bake for 30-35 minutes) or a 9×13 pan (bake for 20-25 minutes). Just adjust the baking time accordingly and keep an eye on it.
Do I need to use a stand mixer?
No, a hand mixer works just fine. It might take an extra minute or two to get the eggs to the right consistency, but it will work.
Can I make this without eggs?
Sponge cake is egg-based, so it’s tough to replace them. For an egg-free cake, I’d suggest trying a different recipe designed to be eggless.
How do I know when the cake is done?
The top should be golden brown and spring back when lightly pressed. A toothpick inserted into the center should come out clean or with just a few moist crumbs.
Can I add flavors to the batter?
Absolutely. Vanilla extract is classic, but you can also add almond extract, citrus zest, or even a tablespoon of instant espresso powder for a subtle coffee flavor.
Why is my cake dry?
Overbaking is the most common culprit. Check the cake a few minutes before the recommended baking time. Also, make sure you’re measuring your flour correctly (spoon it into the measuring cup and level it off, don’t scoop directly from the bag).
Can I halve this recipe?
Yes, but use a 6-inch pan and reduce baking time to 20-25 minutes.
What’s the difference between sponge cake and regular cake?
Sponge cake uses whipped eggs for leavening instead of lots of baking powder or baking soda. It has less fat and a lighter, airier texture.
Serving Suggestions
For afternoon tea:
- Cut into small squares
- Dust with powdered sugar
- Serve with fresh berries and clotted cream
For birthdays:
- Layer with buttercream
- Cover with fondant or ganache
- Decorate with fresh flowers or sprinkles
For casual weeknight dessert:
- Slice and serve plain
- Top with a scoop of vanilla ice cream
- Drizzle with chocolate or caramel sauce
For brunch:
- Top with Greek yogurt and honey
- Add fresh fruit compote
- Sprinkle with granola
Wrapping Up
Sponge cake is one of those recipes that seems simple on paper but takes a little practice to perfect.
Once you get the hang of it, you’ll be making it for every occasion.
Birthdays, afternoon tea, dinner parties, or just because you want something sweet and light after dinner.
The beauty of this cake is how versatile it is.
Eat it plain with a cup of tea, layer it with cream and berries, or turn it into a trifle. The possibilities are endless.
So go ahead and give it a try.
And when you do, come back and let me know how it turned out. Did you add any fun fillings? Did your family devour it before it even cooled?
Drop a comment below and share your experience! 💛


1 thought on “The Only Sponge Cake Recipe You’ll Ever Need (Seriously Light & Fluffy)”