
Ever stood in front of your fridge at 6 PM with zero ideas?
Same.
But here’s what changed everything for me: beef tips. Not the sad frozen kind. The kind that makes your whole house smell like a fancy steakhouse.
Here’s the truth most people don’t tell you: beef tips look way harder than they actually are.
You don’t need chef training. You don’t need expensive cuts. You don’t even need that much time.
What you do need is this recipe.
Fun fact: The term “beef tips” doesn’t actually refer to a specific cut of meat. It’s just bite-sized pieces of beef cooked in gravy. Mind blown, right? 🤯
The real magic happens in the gravy. Rich, savory, with just enough depth to make everyone at your table ask for seconds.
Ready to make restaurant-quality beef tips at home?
Let’s go.
Recipe at a Glance
| Detail | Info |
|---|---|
| ⏱️ Prep Time | 15 minutes |
| 🔥 Cook Time | 45 minutes |
| 👥 Serves | 4-6 people |
| 💪 Difficulty | Easy (seriously!) |
| 💰 Cost | Budget-friendly ($20-25) |
| 🍽️ Best Served With | Mashed potatoes, egg noodles, or rice |
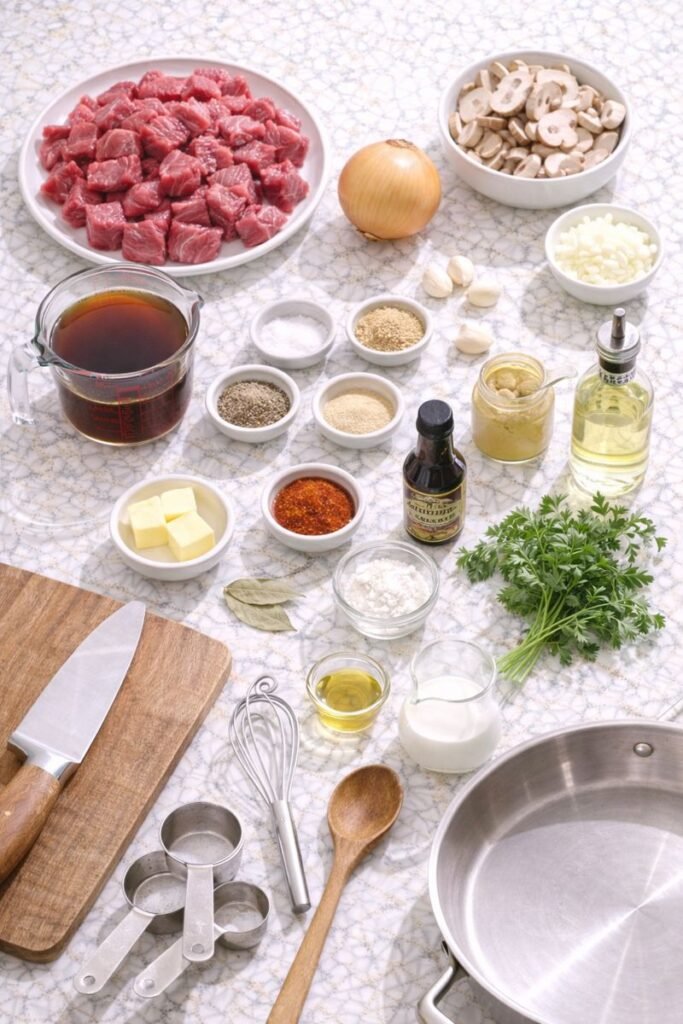
What You’ll Need
🥩 For the Beef
| Ingredient | Amount | Notes |
|---|---|---|
| Sirloin steak | 2 pounds | Cut into 1-inch cubes |
| Olive oil | 2 tablespoons | For searing |
| Salt | 1 teaspoon | |
| Black pepper | 1/2 teaspoon | Freshly ground is best |
| Garlic powder | 1 teaspoon | |
| Onion powder | 1/2 teaspoon | |
| Smoked paprika | 1/4 teaspoon | Adds that chef’s kiss flavor |
🍄 For the Gravy
| Ingredient | Amount | Notes |
|---|---|---|
| Butter | 3 tablespoons | Unsalted preferred |
| Yellow onion | 1 large | Diced |
| Mushrooms | 8 ounces | Baby bella or white button, sliced |
| Garlic | 4 cloves | Minced |
| All-purpose flour | 3 tablespoons | For thickening |
| Beef broth | 2 cups | Low-sodium recommended |
| Worcestershire sauce | 1 tablespoon | Secret weapon! |
| Soy sauce | 1 tablespoon | Trust me on this |
| Dijon mustard | 1 teaspoon | Adds complexity |
| Bay leaf | 1 | Remove before serving |
| Dried thyme | 1/2 teaspoon | |
| Heavy cream | 1/4 cup | Optional but amazing |
| Fresh parsley | 2 tablespoons | Chopped, for garnish |
💡 Quick Shopping Tip: Get pre-sliced mushrooms to save time. Your future self will thank you.
Tools You’ll Need
Listen, you probably already have everything in your kitchen.
✅ Large skillet or Dutch oven (3-4 quarts minimum)
✅ Sharp knife and cutting board
✅ Measuring cups and spoons
✅ Wooden spoon or spatula
✅ Tongs
✅ Small bowl for mixing seasonings
That’s it. No fancy equipment required.
Pro Tips
These are the tricks that separate good beef tips from amazing beef tips.
🔥 Tip #1: Don’t Skip the Searing Step
I know it’s tempting to throw everything in the pan at once.
Don’t.
Searing creates a caramelized crust that’s packed with flavor. Those browned bits? That’s where the magic happens.
The Science: When you sear meat at high heat, a chemical reaction called the Maillard reaction occurs. This creates hundreds of flavor compounds that make your beef taste incredible.
Take the extra five minutes. Your taste buds will thank you.
✂️ Tip #2: Cut Your Beef Against the Grain
This is a total game changer for tenderness.
Here’s how:
- Look at your steak
- See those lines running through it?
- Cut perpendicular to those lines
That’s it. Your beef will be way more tender.
Visual Guide:
| ❌ Wrong Way | ✅ Right Way |
|---|---|
| Cutting parallel to the muscle fibers | Cutting across the muscle fibers |
| Results in chewy, tough beef | Results in tender, easy-to-bite beef |
🌡️ Tip #3: Let the Beef Come to Room Temperature
Pull your meat out of the fridge 20-30 minutes before cooking.
Cold meat = poor searing = steamed beef = sad dinner.
Room temp beef = perfect sear = flavor explosion = happy dinner.
👨🍳 Tip #4: Don’t Crowd the Pan
If you pile all the beef in at once, it’ll steam instead of sear.
The Rule: Leave at least 1/2 inch of space between each piece.
Cook in batches if you need to. Takes longer, but the results are SO worth it.
👅 Tip #5: Taste and Adjust the Gravy
Different beef broths have different salt levels.
Always taste your gravy before serving. Then adjust with:
- More salt
- Extra pepper
- A splash of Worcestershire sauce
- A squeeze of lemon juice for brightness
Pro move: Keep a small dish of kosher salt nearby while cooking. Makes adjusting seasoning way easier.
Substitutions and Variations
Here’s the thing about this recipe: it’s super flexible.
Ingredient Swap Guide
| Original | Swap Options | Notes |
|---|---|---|
| 🥩 Sirloin steak | Chuck roast, stew meat, top sirloin | Chuck is cheaper but needs 45-60 min cooking time |
| 🍄 Mushrooms | Bell peppers, skip entirely, extra onions | No mushrooms? No problem! |
| 🥣 Beef broth | Chicken broth, vegetable broth + soy sauce | Beef gives the richest flavor though |
| 🥛 Heavy cream | Half-and-half, whole milk, skip it | Lighter gravy without cream |
| 🌾 All-purpose flour | Cornstarch, gluten-free flour | Use 2 tbsp cornstarch mixed with cold water |
| 🧈 Butter | Olive oil, ghee | For dairy-free option |
Flavor Variations to Try
🍷 Red Wine Version (my personal favorite)
- Add 1/2 cup Cabernet or Merlot with the broth
- Let it simmer 5 extra minutes to cook off the alcohol
- Results: Richer, more complex flavor that tastes expensive
🌶️ Spicy Kick Version
- Add 1/2 teaspoon red pepper flakes
- Or dice up a jalapeño with the onions
- Perfect if you like a little heat
🧄 Extra Garlic Lover Version
- Double the garlic (8 cloves instead of 4)
- Add 1/2 teaspoon garlic powder to the gravy
- Because there’s no such thing as too much garlic
🥕 Veggie-Loaded Version
- Add diced carrots and celery with the onions
- Throw in some frozen peas at the end
- Makes it feel like a complete meal in one pot
Reader Favorite: “I made the red wine version and my husband literally asked if I ordered takeout. Best compliment ever!” – Sarah M.
Make Ahead Tips
This is actually a perfect meal prep recipe.
Meal Prep Timeline
| When | What to Do | Storage |
|---|---|---|
| 3 days ahead | Make entire dish | Airtight container in fridge |
| 1 day ahead | Cut and season beef | Covered bowl in fridge |
| 3 months ahead | Make and freeze | Freezer-safe container |
The Secret: The gravy actually tastes BETTER the next day. All those flavors have time to meld together and become even more delicious.
Reheating Instructions
From the fridge:
- Transfer to a pot
- Heat over medium-low
- Add a splash of broth if it’s too thick
- Stir occasionally for 10-15 minutes
From frozen:
- Thaw overnight in the fridge
- Follow the same reheating steps as above
Time-Saving Hack: Make a double batch on Sunday. Eat half fresh, freeze half for a busy weeknight. You’ll thank yourself later.
How to Make Beef Tips

Here’s where the magic happens.
Follow these steps and you’ll have restaurant-quality beef tips in about an hour.
Step 1: Prep Your Beef ⏱️ 10 minutes
Take your sirloin steak and cut it into 1-inch cubes.
The trick: Try to keep them roughly the same size so they cook evenly.
Pat the beef dry with paper towels. This is IMPORTANT because wet beef won’t sear properly.
In a small bowl, mix together:
- Salt
- Pepper
- Garlic powder
- Onion powder
- Smoked paprika
Toss the beef cubes with this seasoning mix until they’re evenly coated.
Common Mistake Alert: Skipping the drying step. Moisture is the enemy of a good sear!
Step 2: Sear the Beef ⏱️ 8-10 minutes
Heat the olive oil in your large skillet or Dutch oven over medium-high heat.
You want it hot enough that the beef sizzles when it hits the pan.
The Test: Drop a tiny piece of beef in. If it sizzles immediately, you’re ready.
Working in batches (remember: don’t crowd!), add the beef cubes in a single layer.
Timing per batch:
- Side 1: 2-3 minutes (don’t touch it!)
- Side 2: 2-3 minutes
- Sides 3 & 4: 1-2 minutes each
You’re not trying to cook them through. Just get that gorgeous caramelized crust on the outside.
Transfer the seared beef to a plate and set it aside.
What you should see: Brown, crispy edges on the beef and some delicious browned bits stuck to the bottom of your pan. That’s pure flavor gold.
Step 3: Cook the Vegetables ⏱️ 10-12 minutes
Lower the heat to medium and add the butter to the same pan.
Let it melt and get a little bubbly.
Add the onion: Cook for 5 minutes, stirring occasionally, until soft and starting to turn golden.
Add the mushrooms: Cook for 5-6 minutes. They’ll:
- Release their liquid
- Liquid will evaporate
- They’ll start to brown
That’s when you know they’re perfect.
Add the garlic: Cook for 1 minute until fragrant.
⚠️ Watch the garlic closely. Burned garlic = bitter gravy. Not fun.
Step 4: Make the Gravy ⏱️ 5 minutes
Sprinkle the flour over the vegetables and stir it in.
Cook for 2 minutes, stirring constantly. This:
- Cooks off the raw flour taste
- Creates the base for your gravy
- Makes everything silky smooth
Slowly pour in the beef broth while stirring.
Key word: SLOWLY. This prevents lumps.
The gravy will start to thicken almost immediately. Keep stirring.
Now add:
- Worcestershire sauce
- Soy sauce (yes, really!)
- Dijon mustard
- Bay leaf
- Thyme
Stir everything together until well combined.
Why soy sauce in beef tips? It adds umami (that savory, can’t-quite-put-your-finger-on-it deliciousness). You won’t taste it directly, but your gravy will taste way better.
Step 5: Simmer the Beef Tips ⏱️ 25-30 minutes
Return the seared beef (and any juices on the plate) back to the pan.
Stir everything so the beef is coated in that beautiful gravy.
Bring to a gentle simmer (you should see small bubbles breaking the surface).
Lower heat to medium-low.
Cover the pan and let it cook for 25-30 minutes.
Set a timer and stir every 10 minutes.
Doneness Check
| Test | What to Look For |
|---|---|
| Fork test | Beef should pull apart easily |
| Texture | Tender, not tough or chewy |
| Gravy | Should coat the back of a spoon |
If the beef is still tough after 30 minutes, give it another 10-15 minutes. Some cuts need more time.
Step 6: Finish and Serve ⏱️ 2 minutes
Remove the bay leaf (don’t skip this or someone will get a surprise in their dinner 😅).
If using heavy cream: Stir it in now. Watch the gravy transform into silky perfection.
Taste the gravy and adjust:
- Need more salt? Add a pinch
- Want more depth? Add another splash of Worcestershire
- Too thick? Whisk in a bit more broth
- Too thin? Let it simmer uncovered for 5 more minutes
Garnish with fresh chopped parsley.
Serve immediately while it’s hot and the gravy is at peak deliciousness.
What to Serve With Beef Tips
The gravy is too good not to soak up with something.
Perfect Pairings Guide
| Side Dish | Why It Works | Prep Time |
|---|---|---|
| 🥔 Mashed Potatoes | Creamy texture + savory gravy = heaven | 20 min |
| 🍝 Egg Noodles | Wide noodles catch all that sauce | 10 min |
| 🍚 White Rice | Simple and lets the beef shine | 20 min |
| 🥖 Crusty Bread | For mopping up every last drop | 0 min (store-bought) |
| 🥦 Cauliflower Mash | Low-carb option that’s still creamy | 15 min |
| 🍝 Polenta | Smooth and buttery base | 15 min |
| 🥔 Roasted Potatoes | Crispy on outside, fluffy inside | 30 min |
Complete Meal Ideas
Classic Comfort Meal:
- Beef tips over mashed potatoes
- Roasted green beans
- Dinner rolls
Quick Weeknight Version:
- Beef tips over egg noodles
- Simple side salad
- Store-bought garlic bread
Low-Carb Option:
- Beef tips over cauliflower mash
- Roasted Brussels sprouts
- Sautéed spinach
Fancy Date Night:
- Beef tips over creamy polenta
- Roasted asparagus
- Mixed greens with balsamic vinaigrette
Personal Favorite: I’m team mashed potatoes all the way. Something about that combination just feels like a warm hug.
Leftovers and Storage
Let’s talk about making this recipe work for you all week long.
Storage Guide
| Method | Duration | Best For |
|---|---|---|
| 🔵 Refrigerator | Up to 4 days | This week’s meals |
| 🧊 Freezer | Up to 3 months | Future busy nights |
| 🌡️ Room Temp | 2 hours max | After cooking only |
How to Store Properly
For the fridge:
- Let beef tips cool to room temp (but not longer than 2 hours)
- Transfer to an airtight container
- Press plastic wrap directly on the surface (prevents skin from forming)
- Store in the fridge
For the freezer:
- Cool completely
- Portion into freezer-safe containers or bags
- Leave 1 inch of space at the top (gravy expands when frozen)
- Label with date
- Freeze flat for easy stacking
Reheating Methods Compared
| Method | Time | Results | Best For |
|---|---|---|---|
| Stovetop | 10-15 min | Best texture and flavor | When you have time |
| Microwave | 3-5 min | Quick but can dry out | Single portions |
| Slow cooker | 2-3 hours on low | Super tender | Large batches |
Stovetop Method (recommended):
- Add beef tips to a pot
- Heat over medium-low
- Stir occasionally
- Add splash of broth if too thick
- Heat until warmed through (165°F internal temp)
Microwave Method:
- Transfer to microwave-safe bowl
- Cover with damp paper towel
- Heat 2 minutes
- Stir
- Heat 1-2 more minutes
- Let stand 1 minute before eating
Pro Tip: The gravy might separate after freezing. Don’t panic! Just stir it well while reheating and it’ll come back together perfectly.
Leftover Recipe Ideas
Don’t just reheat. Get creative! 🎨
Beef Tips Shepherd’s Pie:
- Layer beef tips in a baking dish
- Top with mashed potatoes
- Bake at 375°F for 20 minutes
- Boom. New meal.
Beef Tips Pot Pie:
- Add frozen mixed veggies to reheated beef tips
- Pour into pie crust
- Top with second crust
- Bake until golden
Beef Tips Over Baked Potatoes:
- Bake russet potatoes
- Split open
- Top with reheated beef tips
- Add sour cream and chives
Beef Tips Sandwich:
- Toast a hoagie roll
- Add reheated beef tips
- Top with provolone cheese
- Broil until melted
Additional Details
Let’s get into the nitty-gritty details that’ll help you nail this recipe every single time.
Nutrition Information (Per Serving)
Based on 6 servings, with heavy cream included:
| Nutrient | Amount | % Daily Value |
|---|---|---|
| Calories | 385 | |
| Protein | 34g | 68% |
| Total Fat | 22g | 28% |
| Saturated Fat | 9g | 45% |
| Carbohydrates | 12g | 4% |
| Fiber | 1g | 4% |
| Sugar | 3g | |
| Sodium | 780mg | 34% |
| Cholesterol | 115mg | 38% |
| Iron | 3.5mg | 19% |
Note: This doesn’t include any sides like mashed potatoes or rice.
Cooking Time Breakdown
| Phase | Time | What’s Happening |
|---|---|---|
| ⏱️ Prep | 15 min | Cutting, measuring, seasoning |
| 🔥 Searing | 10 min | Building that flavor base |
| 🧅 Vegetables | 12 min | Creating the gravy foundation |
| 🍲 Simmering | 30 min | Tenderizing the beef |
| Total | 67 min | Active time: ~25 min |
The Real Talk: You’ll spend about 25 minutes actively cooking. The rest is just letting it simmer while you do other things.
Pairing Suggestions
This dish is hearty and rich, so you want sides that complement without overwhelming.
🍷 Wine Pairings
| Wine Type | Specific Recommendations | Why It Works |
|---|---|---|
| Red – Bold | Cabernet Sauvignon | Stands up to rich gravy |
| Red – Medium | Merlot | Smooth, not overpowering |
| Red – Fruity | Zinfandel | Balances savory flavors |
| Beer | Porter or Stout | Dark, malty notes complement beef |
🥗 Vegetable Pairings
Keep them simple so they don’t compete with the star of the show.
| Vegetable | Preparation | Why It Works |
|---|---|---|
| Green beans | Roasted with garlic | Light, crispy contrast |
| Brussels sprouts | Roasted with balsamic | Slightly bitter balance |
| Broccoli | Steamed with lemon | Fresh, bright flavor |
| Asparagus | Grilled or roasted | Elegant and simple |
| Carrots | Honey-glazed roasted | Sweet contrast |
🥗 Salad Ideas
A crisp salad cuts through the richness perfectly.
- Classic Garden Salad: Mixed greens, cucumber, tomato with tangy vinaigrette
- Caesar Salad: The creaminess complements the gravy
- Arugula Salad: Peppery greens with lemon and parmesan
- Spinach Salad: With bacon, eggs, and warm bacon dressing
Diet-Friendly Modifications
| Diet Type | Modifications | Notes |
|---|---|---|
| 🥦 Low-Carb/Keto | • Use cornstarch instead of flour<br>• Serve over cauliflower mash<br>• Skip any starchy sides | Net carbs: ~8g per serving |
| 🌾 Gluten-Free | • Use GF flour or cornstarch<br>• Check Worcestershire sauce label<br>• Verify broth is GF | Most beef broths are naturally GF |
| 🥛 Dairy-Free | • Use olive oil instead of butter<br>• Skip the heavy cream<br>• Use dairy-free cream alternative | Gravy will be slightly thinner |
| 🧂 Lower Sodium | • Use low-sodium broth<br>• Reduce or skip soy sauce<br>• Use less salt in seasoning | Final sodium: ~450mg per serving |
| 💪 High Protein | • Add extra beef (3 lbs instead of 2)<br>• Serve over protein pasta<br>• Add a side of beans | Protein: 45g per serving |
Cost Breakdown (Approximate)
Based on average grocery store prices:
| Ingredient | Cost |
|---|---|
| Sirloin steak (2 lbs) | $14-16 |
| Vegetables & aromatics | $3-4 |
| Pantry items | $2-3 |
| Total | $19-23 |
| Per Serving (6 servings) | $3-4 |
Money-Saving Tips:
- Buy beef on sale and freeze it
- Use chuck roast instead of sirloin (save $4-5)
- Skip the mushrooms if needed
- Buy store-brand broth
Common Issues & Quick Fixes
| Problem | Why It Happened | The Fix |
|---|---|---|
| Beef is tough | Not cooked long enough | Simmer 15-20 more minutes |
| Gravy too thin | Not enough flour/not reduced enough | Mix 1 tbsp cornstarch + 2 tbsp water, stir in |
| Gravy too thick | Too much flour/reduced too much | Whisk in more broth gradually |
| Beef is dry | Overcooked or heat too high | Lower temp next time; add cream now |
| Tastes bland | Not enough seasoning | Add more Worcestershire, salt, or soy sauce |
| Gravy is lumpy | Flour not mixed well | Strain through fine mesh sieve |
| Too salty | Over-salted or used regular broth | Add 1 tbsp sugar or 1/4 cup cream to balance |
FAQ
Let’s tackle every question you might have about making beef tips.
Equipment & Ingredients
Q: Can I make this in a slow cooker?
Yes! Here’s how:
| Step | Instructions |
|---|---|
| 1 | Sear the beef first (don’t skip!) |
| 2 | Transfer everything to slow cooker |
| 3 | Cook on LOW for 6-7 hours |
| 4 | Or cook on HIGH for 3-4 hours |
| 5 | Make gravy on stovetop last 20 min |
The slow cooker method makes the beef SUPER tender.
Q: What’s the best cut of beef for this recipe?
| Cut | Price | Tenderness | Cook Time | Best For |
|---|---|---|---|---|
| Sirloin | $$ | Very tender | 30 min | Quick weeknight dinner |
| Chuck roast | $ | Gets tender | 45-60 min | Budget-friendly option |
| Stew meat | $ | Variable | 45 min | Convenience (pre-cut) |
| Top sirloin | $$$ | Very tender | 25 min | Special occasions |
My pick? Sirloin for the best balance of price, flavor, and cook time.
Q: Can I use frozen beef?
No. Thaw it completely first.
Here’s why:
- Frozen beef releases too much water
- Won’t sear properly
- You’ll end up steaming instead of browning
- Results in bland, gray beef
Thawing tips:
- Overnight in fridge: Best method
- Cold water bath: 1-2 hours (change water every 30 min)
- Microwave defrost: Last resort (can partially cook the beef)
Q: Can I make this without mushrooms?
100% yes!
Swap options:
- Extra onions
- Bell peppers (any color)
- Zucchini
- Skip entirely
The mushrooms add an earthy flavor, but the dish is still delicious without them.
Gravy Questions
Q: My gravy is too thick. Help!
This is an easy fix.
| Problem Severity | Solution |
|---|---|
| Slightly thick | Whisk in 1/4 cup broth |
| Pretty thick | Whisk in 1/2 cup broth |
| Way too thick | Whisk in 3/4 cup broth gradually |
Always add liquid slowly while whisking. You can always add more, but you can’t take it out.
Q: My gravy is too thin. What do I do?
Two options:
Quick fix:
- Mix 1 tbsp cornstarch + 2 tbsp cold water
- Stir into gravy
- Simmer 3-5 minutes
- Watch it thicken up
Slow fix:
- Let it simmer uncovered for 10-15 minutes
- The liquid will evaporate and it’ll thicken naturally
- More concentrated flavor too
Q: Why did my gravy turn out lumpy?
Common causes:
| Cause | Prevention |
|---|---|
| Added cold liquid too fast | Pour broth slowly while stirring |
| Flour not mixed in well | Stir constantly when adding flour |
| Pan too hot | Lower heat before adding flour |
The fix: Strain through a fine-mesh sieve. Press the lumps through with a spoon.
Q: Can I make this without heavy cream?
Absolutely!
Alternatives:
| Instead of Heavy Cream | Result |
|---|---|
| Half-and-half | Lighter but still creamy |
| Whole milk | Much lighter gravy |
| Coconut cream | Dairy-free option |
| Skip entirely | Thinner but still tasty |
| Sour cream | Tangy twist |
The cream adds richness but isn’t required for the recipe to work.
Cooking Process Questions
Q: Why is my beef tough?
Let’s troubleshoot:
| Possible Reason | The Fix |
|---|---|
| Cut with the grain | Next time: cut perpendicular to muscle fibers |
| Didn’t cook long enough | Keep simmering until fork-tender |
| Heat was too high | Lower to medium-low and simmer gently |
| Wrong cut of beef | Chuck roast needs longer (60 min) |
Current fix: Keep simmering for another 15-20 minutes. It’ll get there!
Q: How do I know when the beef is done?
Use the fork test:
✅ Perfect: Beef pulls apart easily with a fork
✅ Perfect: No resistance when you pierce it
✅ Perfect: Tender, not chewy
❌ Not done: Fork meets resistance
❌ Not done: Beef is chewy
❌ Not done: Difficult to cut
Target internal temp: 145°F minimum (but for tender beef tips, aim for 190-200°F)
Q: Can I add vegetables to this?
For sure! Here’s when to add them:
| Vegetable | When to Add | Why |
|---|---|---|
| Carrots | With onions | Need time to soften |
| Celery | With onions | Need time to soften |
| Bell peppers | With mushrooms | Soften quickly |
| Peas (frozen) | Last 5 minutes | Just need to heat through |
| Green beans | With mushrooms | Medium cook time |
| Potatoes | With onions | Need longest time |
Q: The beef burned on the bottom. What did I do wrong?
This usually means:
- Pan was too hot – Medium-high for searing, medium for veggies
- Not enough oil – Beef needs fat to prevent sticking
- Didn’t stir enough – Stir every few minutes during simmering
- Heat too high during simmering – Should be gentle bubbles, not rolling boil
Make Ahead & Storage
Q: Can I double this recipe?
You can, but you’ll need:
- A REALLY large pan or Dutch oven (at least 6 quarts)
- To sear beef in multiple batches
- To be patient (don’t crowd the pan!)
Pro tip: It’s easier to make two separate batches than one huge batch.
Q: How long do leftovers last?
| Storage Method | How Long | Quality |
|---|---|---|
| Room temperature | 2 hours max | After cooking only |
| Refrigerator | 4 days | Great |
| Freezer | 3 months | Good (gravy may separate) |
Q: Can I freeze beef tips?
Yes!
Freezing steps:
- Cool completely (never freeze hot food)
- Portion into freezer bags or containers
- Remove as much air as possible
- Label with date
- Freeze flat for easy stacking
Thawing steps:
- Transfer to fridge night before
- Let thaw overnight (8-12 hours)
- Reheat on stovetop gently
Q: Does this recipe reheat well?
It reheats GREAT. Some people say it’s even better the next day.
Best reheating method:
- Stovetop over medium-low heat
- Add a splash of broth if needed
- Stir occasionally
- Heat until 165°F
Substitutions & Variations
Q: Can I use chicken instead of beef?
You could, but then it’s… chicken tips 😄
Adjustments needed:
- Cut chicken into 1-inch pieces
- Cook for only 20 minutes (not 30)
- Use chicken broth instead of beef broth
- Internal temp should reach 165°F
Q: What if I don’t have Worcestershire sauce?
Substitutes ranked:
| Substitute | Amount | Similarity |
|---|---|---|
| Soy sauce + vinegar | 2 tsp soy + 1 tsp vinegar | 85% similar |
| Balsamic vinegar | 1 tablespoon | 70% similar |
| Red wine + soy sauce | 1 tsp wine + 2 tsp soy | 75% similar |
| Steak sauce | 1 tablespoon | 60% similar |
You’ll lose some depth of flavor but it’ll still be good.
Q: Can I make this without wine?
The recipe doesn’t call for wine! But if you want to add it:
- Use 1/2 cup red wine
- Add it with the broth
- Let it simmer an extra 5 minutes
Q: Is there a way to make this in the Instant Pot?
Yes!
Instant Pot Method:
| Step | Instructions |
|---|---|
| 1 | Sear beef using “sauté” mode |
| 2 | Remove beef, sauté vegetables |
| 3 | Add beef back with all liquids |
| 4 | Pressure cook HIGH for 15 minutes |
| 5 | Natural release 10 minutes |
| 6 | Quick release remaining pressure |
The beef comes out super tender this way.
Wrapping Up
Here’s what you need to remember: beef tips aren’t complicated.
You’re basically just:
- Searing some beef (10 minutes)
- Making a simple gravy (5 minutes)
- Letting everything simmer together (30 minutes)
That’s it.
The result? A restaurant-quality meal that costs way less and tastes way better than anything you’d order out.
This is comfort food at its finest.
It’s warm. It’s hearty. And it’s the kind of meal that makes everyone at the table actually put their phones down and just… eat.
Here’s your action plan:
✅ Screenshot this recipe
✅ Add ingredients to your shopping list
✅ Pick a night this week to make it
✅ Actually make it (this is the important part)
And here’s what I want to know:
👉 Did you make any tweaks? More garlic? Different sides?
👉 What did you serve it over? Team mashed potatoes or team egg noodles?
👉 Did your family ask for seconds? (They probably did)
👉 Any questions while you were cooking? Drop them below!
Leave a comment and let me know how it went.
I read every single one and I love hearing about your cooking adventures. Plus, if something didn’t work out quite right, I’m here to help troubleshoot.
The best part about this recipe? Once you nail it, you’ll have it memorized. No recipe needed.
You’ll just know.
Now go make those beef tips. Your dinner table is waiting. 🍽️


1 thought on “Beef Tips Recipe That’ll Make You Want to Cancel Your Dinner Plans”