Ever walked past the dessert table and done a double-take at what looked like a potted plant?
That’s dirt cake for you.
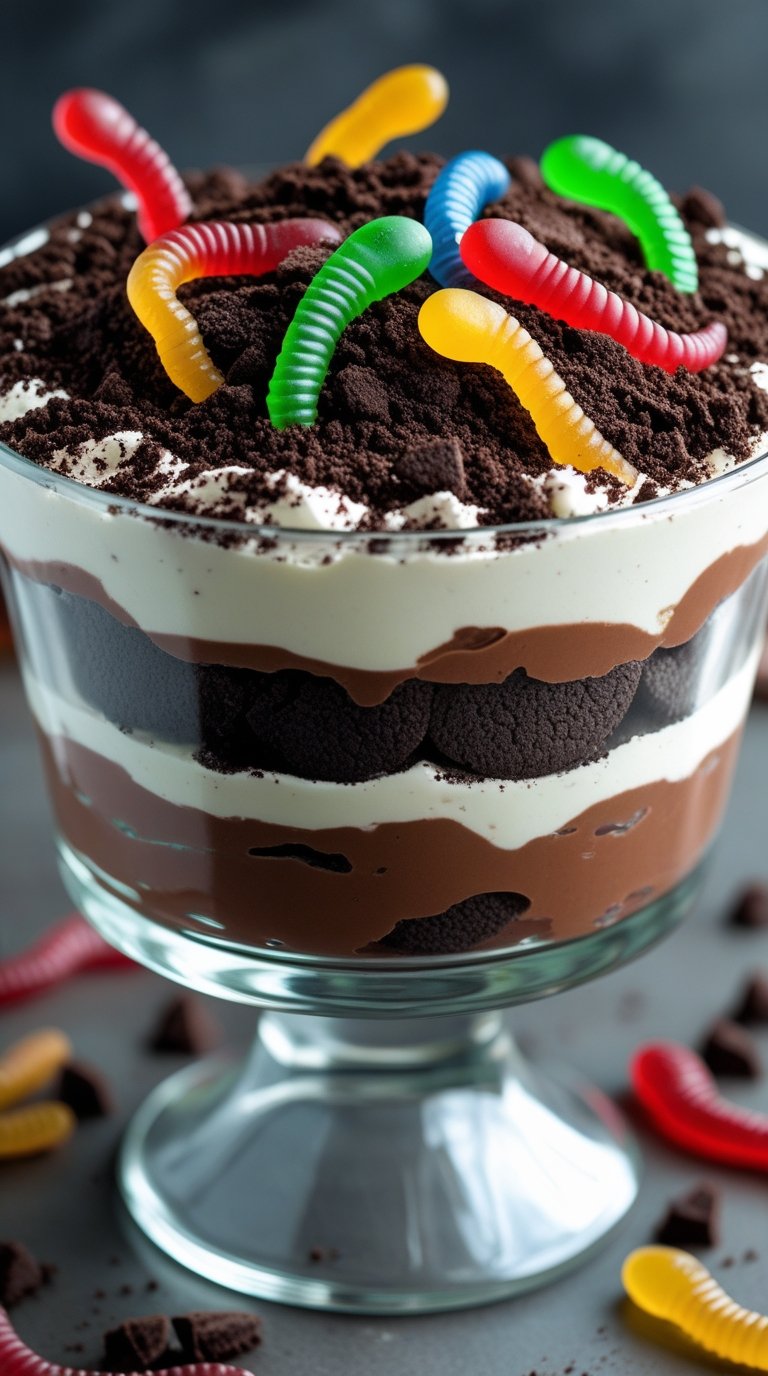
This no-bake dessert is pure childhood nostalgia wrapped up in crushed Oreos and pudding. It looks like you just dug it out of your backyard, but it tastes like heaven mixed with cookies and cream.
My first dirt cake experience was at a friend’s birthday party when I was eight. Her mom brought it out in an actual terracotta pot with gummy worms crawling out, and I thought she’d lost her mind.
Then I took a bite and suddenly understood why everyone was fighting over the “dirt.”
The texture is what gets you. You’ve got that crumbly cookie “soil” on top, then you hit the creamy pudding layer, and just when you think it can’t get better, there’s whipped cream hiding underneath.
It’s like a cookies and cream trifle decided to play dress-up as garden soil.
I make this every year for my nephew’s birthday because he thinks it’s the funniest thing ever. Last year, he convinced his friends they were eating actual dirt for a solid three minutes before they tried it. 😂
Quick Recipe Overview
| Prep Time | Chill Time | Total Time | Servings | Difficulty |
|---|---|---|---|---|
| 20 minutes | 4 hours | 4 hours 20 min | 12-15 | Easy |
Skill Level: If you can crush cookies and mix things in a bowl, you’ve got this.
What You’ll Need
For the “Dirt” Layer
- 1 package (14.3 oz) Oreo cookies (about 36 cookies)
- 4 tablespoons unsalted butter, melted
For the Cream Layer
- 8 oz cream cheese, softened to room temperature
- ½ cup powdered sugar
- 16 oz whipped topping (Cool Whip), divided
- 3 ½ cups whole milk
- 2 packages (3.4 oz each) instant vanilla pudding mix
For Decoration (Optional but Fun)
- Gummy worms
- Fresh mint leaves
- Fake flowers (clean ones!)
- Toy shovel or garden tools
Tools You’ll Need

You may also like : tres leches cake recipe
✓ Food processor or rolling pin + sealed plastic bag
✓ Large mixing bowl
✓ Electric mixer (hand mixer works fine)
✓ Medium mixing bowl
✓ Whisk
✓ 9×13 inch baking dish or large trifle bowl
✓ Rubber spatula
✓ Plastic wrap
Pro Tips
🔥 The Room Temperature Rule
Cold cream cheese = lumpy disaster. Soft cream cheese = silky perfection. Take it out of the fridge 30 minutes early. If you forgot, microwave in 10-second bursts.
💡 The Texture Secret
Don’t crush all your Oreos the same way. Fine dust sells the “dirt” illusion. Bigger chunks add crunch. Mix both for the ultimate texture experience.
⏰ The Overnight Advantage
This tastes better the next day. The Oreos soften into this cookie-cake hybrid that’s somehow even better than fresh. Make it the night before and thank yourself later.
👀 The Clear Container Hack
Layer this in something transparent. Trifle bowls, glass casserole dishes, even clear plastic cups. Half the fun is seeing those gorgeous layers.
🎯 The Last-Minute Crunch
Save some whole Oreos to crush right before serving. Fresh crushed cookies = maximum crunch. Nobody wants soggy “dirt.”
Ingredient Substitutions
| Instead of This | Use This | What Changes |
|---|---|---|
| Regular Oreos | Gluten-free chocolate cookies | Texture stays the same |
| Vanilla pudding | Chocolate pudding | Richer, more intense chocolate flavor |
| Cool Whip | Homemade whipped cream | Lighter but won’t hold as long |
| Whole milk | 2% milk | Slightly less creamy |
| Cream cheese | Mascarpone | More expensive but incredibly smooth |
| Gummy worms | Crushed candy rocks | Different vibe, still fun |
Flavor Variations to Try
Peanut Butter Dirt Cake: Add ½ cup peanut butter to the cream cheese layer. Tastes like Reese’s met Oreos.
Mint Chocolate Dirt: Use mint Oreos and add a few drops of peppermint extract to the pudding.
Cookies & Caramel: Drizzle caramel sauce between each layer. Game changer.
Birthday Cake Dirt: Use Golden Oreos, vanilla pudding, and add rainbow sprinkles to each layer.
Coffee Lover’s Dirt: Add 2 tablespoons instant espresso powder to the pudding mix.
You’ll love these too : white cake recipe
How to Make Dirt Cake

Step 1: Crush the Oreos
Separate your Oreos into two batches. You’ll crush them differently, trust me on this.
Take about 25 cookies and pulse them in a food processor until they’re mostly fine crumbs with a few chunks. This is your middle “dirt” layer.
Take the remaining cookies and crush them coarser. Either pulse them for less time or just smash them in a sealed bag with a rolling pin. These bigger pieces go on top for texture.
Mix the melted butter into the finer Oreo crumbs. This helps them stick together slightly and adds richness. Set both batches aside.
Time-Saving Tip: Buy pre-crushed Oreo crumbs in the baking aisle if you’re in a rush. Mix half with butter for the base, leave half plain for topping.
Step 2: Make the Cream Cheese Layer
Beat the softened cream cheese and powdered sugar together until it’s completely smooth. No lumps allowed here.
This should take about 2 minutes with an electric mixer on medium speed. You’ll know it’s ready when it looks fluffy and there’s not a single cream cheese chunk in sight.
Fold in half of the whipped topping (8 oz). Be gentle here. You want to keep that airiness.
Mix until just combined. Overmixing deflates it and you lose that light, mousse-like texture.
⚠️ Common Mistake Alert
Don’t dump all the whipped topping in at once. Fold it in two separate additions or it’ll deflate and get dense.
Step 3: Prepare the Pudding
Pour the milk into a medium bowl. Add both pudding mix packets.
Whisk for about 2 minutes until it starts to thicken. It won’t be fully set yet, and that’s fine.
Let it sit for 5 minutes while you prep your dish. It’ll firm up to the perfect consistency.
The 2-Minute Rule: Instant pudding needs a full 2 minutes of whisking to activate properly. Don’t rush this step.
Step 4: Combine Everything
Gently fold the pudding into your cream cheese mixture. Use a rubber spatula and work in large, sweeping motions.
You want these two completely incorporated but still fluffy. It should look like cookies and cream mousse.
Fold in the remaining 8 oz of whipped topping. Same gentle technique.
Step 5: Layer Your “Dirt”
The Perfect Layering Order:
- Bottom layer: Half of the buttered Oreo crumbs (press down lightly)
- Middle layer: Entire cream mixture (spread evenly into corners)
- Second dirt layer: Remaining buttered crumbs (cover the whole surface)
- Top layer (add before serving): Coarsely crushed Oreos for maximum crunch
🎨 Pro Presentation Move
Use the back of a spoon to spread each layer smoothly. Start from the center and work outward to avoid pulling up the layer underneath.
Recommended for you : coconut cake recipe
Step 6: Add the Finishing Touches
If you’re using gummy worms, poke them into the top so they look like they’re crawling out. Kids absolutely lose it over this. 🪱
Some people add fake flowers or a small toy shovel. I once stuck a “Keep Off the Grass” sign in mine for a party and people thought it was hilarious.
Refrigerate for at least 4 hours before serving, but overnight is even better.
Decoration Ideas:
✓ Gummy worms “crawling” out
✓ Fake flowers in one corner
✓ Toy gardening tools
✓ “Plant markers” with guests’ names
✓ Crushed green candy for “grass”
✓ Chocolate rocks around the edge
Make Ahead Timeline
| When | What to Do | Why |
|---|---|---|
| 2 days before | Make entire dessert except top Oreo layer | Flavors meld, Oreos soften perfectly |
| 2 hours before serving | Add final crushed Oreo topping | Keeps the crunch |
| Right before serving | Add gummy worms and decorations | They won’t dissolve or look sad |
Storage Hack: Keep covered tightly with plastic wrap in the fridge. It’ll stay good for up to 5 days, though it never lasts that long in my house.
Nutritional Breakdown
| Per Serving | Amount | % Daily Value |
|---|---|---|
| Calories | 385 | |
| Total Fat | 19g | 24% |
| Saturated Fat | 11g | 55% |
| Carbohydrates | 51g | 17% |
| Sugar | 38g | |
| Protein | 4g | 8% |
| Sodium | 445mg | 19% |
| Fiber | 1g | 4% |
Based on 12 servings
Lighter Version Stats
Using sugar-free pudding and reduced-fat cream cheese:
- Calories: 305 (saves 80 calories)
- Sugar: 22g (saves 16g)
- Fat: 14g (saves 5g)
Serving Suggestions & Pairings
What to Serve Before Dirt Cake
Light Mains (so you have room for dessert):
- Grilled chicken with salad
- Fish tacos
- Veggie kabobs
- Caprese sandwiches
Skip the dirt cake after:
- Heavy pasta dishes
- Rich casseroles
- Anything already dessert-like
Drink Pairings
| Drink | Why It Works |
|---|---|
| Cold milk | Classic combo, cuts the sweetness |
| Coffee | Bitterness balances the sugar |
| Iced tea | Refreshing contrast |
| Hot chocolate | If you want pure dessert overload |
Perfect Occasions for Dirt Cake
✓ Kids’ birthday parties (they go WILD for this)
✓ Spring or summer BBQs
✓ Garden-themed showers
✓ Potlucks (travels well, serves a crowd)
✓ Easter dessert table
✓ April Fool’s Day (the ultimate prank dessert)
✓ Casual family dinners
✓ Office parties
Troubleshooting Guide
| Problem | Cause | Fix |
|---|---|---|
| Lumpy cream cheese layer | Cream cheese was too cold | Beat longer or microwave in short bursts next time |
| Runny pudding | Not enough whisking or too much milk | Whisk for full 2 minutes, let sit 10 minutes in fridge |
| Soggy top layer | Added crushed Oreos too early | Only add final topping 1-2 hours before serving |
| Layers mixing together | Spread too aggressively | Use gentle spreading motions from center outward |
| Too sweet | That’s just dirt cake! | Serve smaller portions or use sugar-free pudding |
| Watery after freezing | Frozen and thawed | Don’t freeze this dessert, refrigerate only |
Leftovers and Storage
Keep any leftover dirt cake covered tightly with plastic wrap or in an airtight container in the fridge. It’ll stay good for up to 5 days.
The top layer of Oreos will soften over time, but honestly, some people prefer it that way. It becomes more cake-like.
Don’t freeze this. The pudding and whipped topping separate when thawed and you’ll end up with a watery mess.
Scoop it out with a big spoon and serve it in bowls. Some people try to cut clean slices and it just doesn’t work. This is a dig-in-and-enjoy kind of dessert.
Leftover Hacks
Day 2: Still perfect, Oreos have softened into cake texture
Day 3: Sweet spot for flavor, maximum creaminess
Day 4: Still good, top might be very soft
Day 5: Eat it or toss it
FAQ
Can I use homemade whipped cream instead of Cool Whip?
You can, but it won’t hold up as well. Homemade whipped cream tends to separate and get watery after a day.
If you’re making it the same day you’re serving it, go for it. Just stabilize it with a tablespoon of powdered sugar per cup of heavy cream.
Why is my cream cheese layer lumpy?
Your cream cheese wasn’t soft enough. Next time, leave it out longer or microwave it in short bursts.
You can also try pushing the mixture through a fine-mesh strainer to remove lumps, but that’s annoying and time-consuming.
Can I make this in individual cups?
Absolutely. Small clear cups or mason jars work great. Layer the same way and they make perfect party servings.
Kids especially love having their own personal dirt cup. Plus, portion control is built in.
Do I have to use Oreos?
Oreos work best because of their color and flavor, but any chocolate sandwich cookie will do.
Newman-Os, Hydrox, or store brand all work. I’ve even used chocolate graham crackers in a pinch.
How do I get clean layers?
Use the back of a spoon or a small offset spatula to spread each layer gently. Don’t press too hard or the layers will mix.
Also, spread from the center outward to avoid pulling up the layer underneath.
Can kids help make this?
This is actually a great recipe for kids. Crushing cookies is fun, mixing is easy, and there’s no oven involved.
Just supervise the electric mixer part and you’re good to go.
What if I don’t have a food processor?
Put your Oreos in a gallon zip-top bag, seal it, and go to town with a rolling pin.
Works just as well and is actually more fun. Great for stress relief too. 😄
Why is my pudding runny?
You might have added too much milk or not whisked long enough. Instant pudding needs a full 2 minutes of whisking to activate.
Let it sit for 5 minutes and it should thicken up. If it’s still runny, stick it in the fridge for 15 minutes.
Can I make this dairy-free?
Yes! Use dairy-free cream cheese (Kite Hill works well), coconut whipped topping, and any plant-based milk.
The texture will be slightly different but still delicious.
How far in advance can I make this?
Up to 2 days ahead is perfect. Any longer and the Oreos get too soft.
Just remember to add the final crushed Oreo topping right before serving.
Fun Facts About Dirt Cake
Did you know dirt cake became popular in the 1980s? It was THE dessert at kids’ parties across America.
The original recipes actually called for serving it in brand new flower pots with a plastic flower stuck in the middle. Some people still do this today.
There’s a savory version called “kitty litter cake” that uses the same concept but different flavors. It’s… interesting.
Dirt cake is one of the few desserts that actually looks more appetizing when it’s messy.
Wrapping Up
Dirt cake is one of those desserts that makes people smile before they even taste it. There’s something about the playful presentation that just works for any gathering.
The best part is how easy it actually is. No oven, no complicated techniques, just layering ingredients and letting the fridge do the work.
I’d love to hear how your dirt cake turns out. Did you go full terracotta pot? Did your kids actually think it was dirt? Drop a comment below and let me know what you think.
Also, if you have any questions I didn’t cover, ask away. I’m here to help you make the best dirt cake possible.


