
You know that crispy, juicy chicken tender from your favorite fast food spot? The one you think about at 2 PM on a random Tuesday?
This recipe is better. And you’re making it at home.
I’m not talking about some fancy chef version with ingredients you can’t pronounce. This is real, crunchy, can’t-stop-eating-them chicken tenders that happen to be stupidly easy to make.
My husband and I used to order chicken tenders every Friday night. Then one day I decided to try making them myself, and I kid you not, we haven’t ordered them since.
These are that good.
The secret? A double coating technique and the right oil temperature. That’s it. No complicated steps, no weird ingredients, just perfectly crispy chicken every single time.
You’re about to become the person everyone asks to bring chicken to the party.
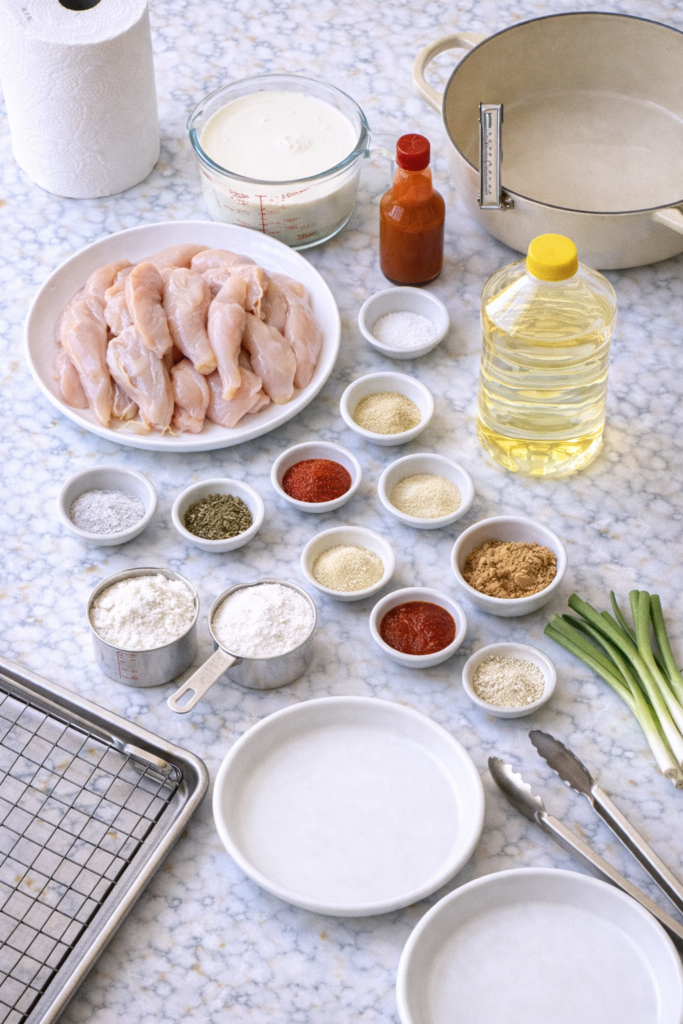
What You’ll Need
The Chicken Base
| Ingredient | Amount | Why It Matters |
|---|---|---|
| Chicken tenderloins (or breast strips) | 1.5 lbs | The star of the show |
| Buttermilk | 2 cups | Makes them ridiculously tender |
| Hot sauce | 1 tablespoon | Adds flavor depth |
| Salt | 2 teaspoons | Seasons from the inside out |
| Black pepper | 1 teaspoon | Classic flavor |
| Garlic powder | 1 teaspoon | Savory goodness |
| Paprika | 1 teaspoon | Subtle smokiness |
The Magic Coating
| Ingredient | Amount | The Secret Job |
|---|---|---|
| All-purpose flour | 2 cups | The base layer |
| Cornstarch | 1 cup | This is what makes it EXTRA crispy ✨ |
| Salt | 2 teaspoons | Flavor on the outside too |
| Black pepper | 1.5 teaspoons | More is more |
| Garlic powder | 1.5 teaspoons | Double the garlic = double the good |
| Onion powder | 1.5 teaspoons | Sweet and savory |
| Paprika | 1 teaspoon | Color and flavor |
| Cayenne pepper | 1 teaspoon | Optional heat 🌶️ |
| Dried oregano | 1/2 teaspoon | Herby notes |
| Dried thyme | 1/2 teaspoon | Subtle earthiness |
For Frying
Vegetable oil or peanut oil: 6-8 cups (enough to fill your pot 3 inches deep)
Quick Math: You need about 3 inches of oil in your pot. That’s usually 6-8 cups depending on pot size. Don’t eyeball this one.
Tools You’ll Need
Recommended for you : fried chicken recipe
You probably have most of this stuff already:
- Large mixing bowl (for the buttermilk marinade)
- Two shallow dishes or pie plates (for the coating stations)
- Deep heavy-bottomed pot or Dutch oven (for frying)
- Cooking thermometer (trust me, you NEED this 🌡️)
- Tongs or spider strainer (for safe handling)
- Wire cooling rack set over a baking sheet
- Paper towels (for any cleanup)
Pro Tips
1. Temperature is Everything
Get yourself a cooking thermometer if you don’t have one.
Oil that’s too cool makes soggy chicken. Oil that’s too hot burns the outside before the inside cooks.
350°F is your magic number.
2. Don’t Skip the Buttermilk Soak
This isn’t just for flavor (though it adds tons).
The acid in buttermilk breaks down the chicken proteins, making each bite ridiculously tender. Even 30 minutes makes a difference, but if you can swing 2-4 hours, do it.
Real talk: I once forgot chicken in buttermilk overnight. It was the most tender chicken I’ve ever made. Happy accidents are the best.
3. Let the Coating Rest Before Frying
After you coat each piece, let them sit on a rack for 10 minutes.
This helps the coating stick better and prevents it from falling off in the oil. I learned this the hard way after fishing out coating bits from my oil one too many times.
4. Fry in Batches
I know you’re hungry and want to cook everything at once. Don’t.
Overcrowding drops the oil temperature and you end up with sad, greasy chicken. Give each piece space to get properly crispy.
Here’s what happens:
| Scenario | Oil Temp | Result |
|---|---|---|
| Perfect batch (3-4 pieces) | Stays at 350°F | Crispy, golden perfection 🏆 |
| Overcrowded (7+ pieces) | Drops to 310°F | Soggy, greasy mess |
5. The Second Dip is Optional But Amazing
After the first coating, some people like to dip the chicken back in buttermilk and coat again.
This creates an extra craggy, super crunchy exterior. Try it once and see if you’re into it.
You may also like : korean fried chicken
How to Make the Best Fried Chicken Tenders
Step 1: Marinate the Chicken (5 minutes active, 30 minutes-4 hours passive)
Mix the buttermilk, hot sauce, salt, black pepper, garlic powder, and paprika in a large bowl.
Add your chicken tenders and make sure they’re completely covered. Cover the bowl with plastic wrap and stick it in the fridge.
Marinating Time Guide:
- Minimum: 30 minutes
- Sweet spot: 2-4 hours
- Maximum: 24 hours
This is when I usually prep everything else or, you know, scroll through my phone for way too long.
Step 2: Set Up Your Coating Station (5 minutes)
In one shallow dish, whisk together the flour, cornstarch, salt, pepper, garlic powder, onion powder, paprika, cayenne (if using), oregano, and thyme.
The cornstarch is what makes these tenders extra crispy. Don’t skip it.
In another dish, pour about 1/4 cup of the buttermilk marinade. This creates little clumps in the flour coating that turn into those crunchy bits everyone fights over.
Pro move: I like to use pie plates for this. They’re shallow enough to coat easily but deep enough that you’re not making a flour mess everywhere.
Step 3: Heat Your Oil (10-15 minutes)
Pour oil into your heavy-bottomed pot until it’s about 3 inches deep. Heat it over medium-high heat to 350°F.
This takes about 10-15 minutes. Don’t rush it.
Use this time to set up your cooling rack over a baking sheet.
Oil Temperature Cheat Sheet:
| Temperature | What’s Happening |
|---|---|
| Below 325°F | Too cold = greasy chicken |
| 325-350°F | Perfect zone = crispy heaven |
| Above 375°F | Too hot = burnt outside, raw inside |
Step 4: Coat the Chicken (10 minutes)
Take a chicken tender from the marinade and let the excess drip off.
Dredge it in the flour mixture, pressing gently so the coating really sticks. Make sure every inch is covered.
Place it on your wire rack and repeat with the remaining chicken.
Let them sit for 10 minutes while the oil finishes heating. This waiting game is annoying but worth it.
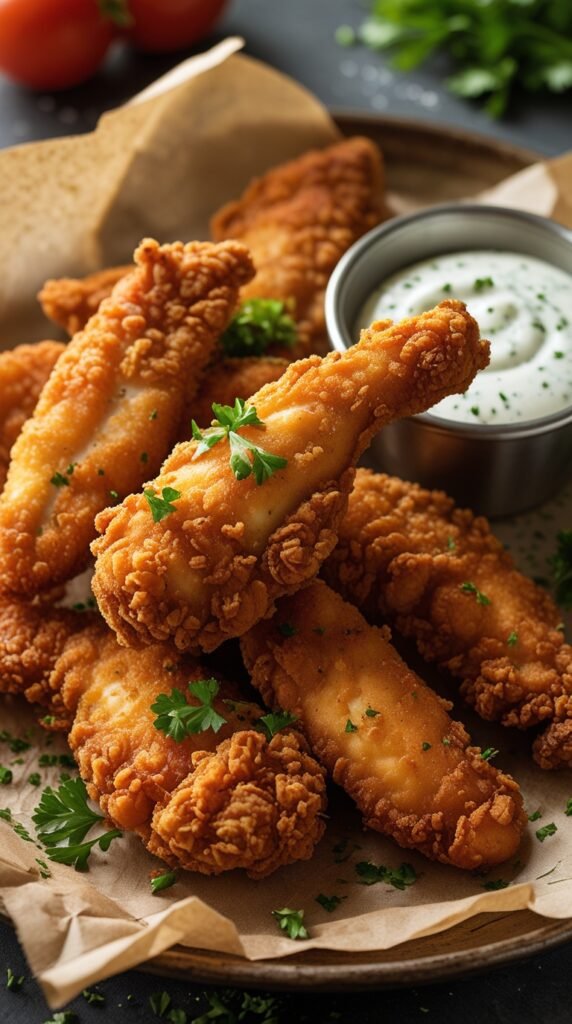
Step 5: Fry Until Golden (6-8 minutes per batch)
Once your oil hits 350°F, gently lower 3-4 pieces into the oil using tongs.
Don’t drop them in or you’ll splash hot oil everywhere (been there, not fun).
Fry for 6-8 minutes, flipping halfway through, until they’re deep golden brown and the internal temperature hits 165°F.
Visual Cues You’re Done:
✓ Deep golden brown color
✓ Coating looks crispy and bubbly
✓ They float to the surface
✓ Sound crispy when tapped with tongs
✓ Internal temp reads 165°F
You’ll love these too : chicken fried rice recipe
Step 6: Drain and Season (2-3 minutes)
Transfer the cooked tenders to your wire rack. The rack is better than paper towels because it keeps the bottom from getting soggy.
Sprinkle with a little extra salt while they’re still hot.
This is when I usually burn my mouth because I can’t wait to try one. 🔥
Let them cool for 2-3 minutes (if you have that kind of patience) before eating.
Substitutions and Variations
Ingredient Swaps
| Instead of This | Use This | The Difference |
|---|---|---|
| Buttermilk | 2 cups milk + 2 tbsp lemon juice | Slightly less tangy but still tender |
| All-purpose flour | 1:1 gluten-free flour blend | Great for gluten-free friends |
| Chicken tenderloins | Chicken breasts (cut into strips) | Same result, different shape |
| Vegetable oil | Peanut oil or canola oil | Peanut oil adds nutty flavor |
Flavor Variations
Nashville Hot Chicken Tenders
Add 2 tablespoons cayenne to the coating. After frying, brush with a mix of 1/4 cup hot oil and 2 tablespoons cayenne.
Garlic Parmesan Tenders
Add 1/2 cup grated Parmesan to the coating. Toss finished tenders with melted butter, minced garlic, and more Parmesan.
Lemon Pepper Style
Add 2 tablespoons lemon pepper seasoning to the coating. Squeeze fresh lemon over the hot tenders.
Ranch-Flavored Coating
Add 2 tablespoons dry ranch seasoning mix to the flour coating. Seriously good.
Honey BBQ Tenders
Toss the cooked tenders in a mix of 1/2 cup BBQ sauce and 2 tablespoons honey.
Cooking Method Alternatives
| Method | Temperature | Time | Crispiness Level |
|---|---|---|---|
| Deep fry | 350°F | 6-8 min | ⭐⭐⭐⭐⭐ |
| Air fryer | 400°F | 12-15 min | ⭐⭐⭐⭐ |
| Oven baked | 425°F | 20-25 min | ⭐⭐⭐ |
Air fryer tip: Spray the coated tenders with cooking spray and flip halfway through. They won’t be quite as crispy as deep-fried, but they’re still really good.
Make Ahead Tips
Want to prep everything in advance? Here’s your game plan:
The Night Before:
Marinate the chicken in buttermilk. Keep it covered in the fridge for up to 24 hours.
The Week Before:
Coat the chicken, place the pieces on a parchment-lined baking sheet, and freeze for 2 hours until solid. Transfer to a freezer bag and freeze for up to 3 months.
Cooking from Frozen:
Fry from frozen, adding 2-3 extra minutes to the cooking time. No need to thaw.
Already Cooked:
Cooked tenders can be refrigerated for up to 3 days, but they’re definitely best fresh.
| Storage Method | How Long | Best For |
|---|---|---|
| Room temperature | 2 hours max | Serving at a party |
| Refrigerated | 3-4 days | Meal prep |
| Frozen (uncooked, coated) | 3 months | Future easy dinners |
| Frozen (cooked) | 2 months | Quick reheating |
Dipping Sauce Ideas
These tenders are good on their own, but dipping sauces take them to another level:
Quick 2-Ingredient Sauces
| Sauce | Mix This | With This |
|---|---|---|
| Honey Mustard | Equal parts honey | Dijon mustard + lemon squeeze |
| Spicy Mayo | 1/2 cup mayo | 2 tbsp sriracha |
| Sweet Chili | 1/2 cup sweet chili sauce | 1 tbsp lime juice |
Classic Favorites
Ranch: Classic for a reason. Make it homemade if you’re feeling fancy.
Buffalo Sauce: Mix 1/2 cup Frank’s RedHot with 1/4 cup melted butter.
BBQ Sauce: Use your favorite brand or make your own.
Comeback Sauce: Equal parts mayo and ketchup, plus a splash of Worcestershire sauce and hot sauce. Southern perfection. 🎯
My go-to: Honey mustard mixed with a little hot sauce. Sweet, tangy, spicy. Can’t beat it.
Serving Suggestions
These chicken tenders go with basically everything, but here are my favorites:
Classic Combos
🍟 Fast Food Style
Crispy fries or tater tots + coleslaw + pickles
🥗 Lighter Option
Caesar salad topped with sliced tenders + garlic bread
🌮 Taco Night Twist
Shredded cabbage + pico de gallo + avocado crema in soft tortillas
🍽️ Full Southern Spread
Mac and cheese + coleslaw + cornbread + baked beans
Meal Prep Ideas
| Day | How to Use Them |
|---|---|
| Monday | Chicken tender bowl with rice and veggies |
| Tuesday | Sliced on top of Caesar salad |
| Wednesday | Chicken tender sandwich with pickles |
| Thursday | Cut up in pasta with Alfredo sauce |
Nutritional Information
Per serving (about 4 tenders):
| Nutrient | Amount | % Daily Value* |
|---|---|---|
| Calories | 520 | – |
| Protein | 42g | 84% |
| Carbohydrates | 38g | 13% |
| Fat | 22g | 28% |
| Saturated Fat | 4g | 20% |
| Fiber | 2g | 7% |
| Sodium | 980mg | 43% |
| Cholesterol | 125mg | 42% |
*Percent Daily Values are based on a 2,000 calorie diet.
Note: Nutritional values are approximate and will vary based on exact ingredients used, portion sizes, and how much oil the chicken absorbs during frying.
Leftovers and Storage
Storing Properly
Store leftover chicken tenders in an airtight container in the fridge for 3-4 days.
Layer them between paper towels to absorb any excess moisture. This keeps them from getting too soggy.
You can freeze cooked tenders for up to 2 months. Just make sure they’re completely cool before freezing.
Reheating for Maximum Crispiness
| Method | Temp | Time | Crispy Factor |
|---|---|---|---|
| Oven (best) | 375°F | 8-10 min | ⭐⭐⭐⭐⭐ |
| Air fryer | 375°F | 5-7 min | ⭐⭐⭐⭐⭐ |
| Toaster oven | 375°F | 8-10 min | ⭐⭐⭐⭐ |
| Microwave | High | 1-2 min | ⭐ (soggy) |
The oven method: Put them on a wire rack over a baking sheet and heat at 375°F for 8-10 minutes. The microwave makes them soggy (sadly, I’ve tried).
From frozen: Reheat at 375°F for 15-20 minutes straight from the freezer.
Creative Leftover Ideas
Don’t just reheat and eat. Transform them:
Chicken Tender Sandwich
Toasted bun + tenders + pickles + mayo + lettuce = perfection
Buffalo Chicken Salad
Chop them up, toss in buffalo sauce, serve over greens with ranch
Chicken Tender Wrap
Tortilla + tenders + shredded cheese + lettuce + ranch dressing
Loaded Fries
Top fries with chopped tenders, cheese sauce, bacon bits, and green onions
FAQ
Why is my coating falling off?
This usually happens when the chicken is too wet when it goes into the coating, or you didn’t let it rest before frying.
The fix: Let excess buttermilk drip off and give the coating 10 minutes to set before frying.
Can I use chicken breasts instead of tenderloins?
Absolutely. Just cut them into strips about 1 inch wide and 4 inches long.
They might need an extra minute or two in the oil since they’re thicker. Use your thermometer to check.
What oil is best for frying?
Best choices:
- Vegetable oil (neutral flavor, high smoke point)
- Peanut oil (adds nutty flavor, very high smoke point)
- Canola oil (affordable, neutral)
Avoid: Olive oil as it can’t handle the high heat and will smoke like crazy.
How do I know when the chicken is done?
The internal temperature should hit 165°F. This is non-negotiable for food safety.
Visual cues: Cut into the thickest part. The meat should be white all the way through with no pink, and the juices should run clear.
Can I reuse the frying oil?
Yes! Let it cool completely, strain it through a fine-mesh sieve or cheesecloth to remove any bits, and store it in a sealed container.
You can reuse it 2-3 times for frying. After that, it starts to break down and can taste off.
Safety note: If the oil smells rancid, looks super dark, or smokes at lower temps than before, toss it.
My chicken is burning on the outside but raw inside. What am I doing wrong?
Your oil is too hot. Lower the heat and check the temperature with a thermometer.
It should stay between 325-350°F for the entire cooking time. If it creeps above 375°F, pull the pot off the heat for a minute.
How can I make the coating extra crispy?
Try these tricks:
✓ Add more cornstarch to the flour mixture (try a 1:1 ratio)
✓ Do a double dip: coat, dip back in buttermilk, coat again
✓ Let the coating rest for 15 minutes instead of 10
✓ Make sure your oil temperature stays consistent
✓ Don’t overcrowd the pot
Why do some of my tenders cook faster than others?
Size matters. Thicker pieces take longer to cook than thinner ones.
Try to cut your chicken into similar-sized pieces so they cook evenly. If you have a mix of sizes, pull the smaller ones out first.
Can I make these ahead for a party?
Yes! Here’s the best method:
- Fry them 1-2 hours before the party
- Keep them warm in a 200°F oven on a wire rack
- Don’t cover them or they’ll get soggy
- Serve them within 2 hours
They’re still crispy and delicious this way.
What if I don’t have a thermometer?
Get one. Seriously, they’re like $10 and will change your cooking game.
But if you absolutely can’t, test the oil by dropping a small piece of bread in it. If it browns in 60 seconds, you’re around 350°F.
Wrapping Up
Once you make these chicken tenders at home, there’s no going back to frozen or fast food versions.
They’re crispier, juicier, and taste way better than anything you’d get from a drive-thru window.
The best part? You control exactly what goes into them. No weird preservatives, no mystery ingredients, just real food that happens to be ridiculously delicious.
Make these on a random weeknight and watch everyone’s face light up. Or make a double batch for meal prep. Or fry them up for game day.
They work for literally any occasion.
Drop a comment below and tell me how yours turned out! Did you try any fun variations? What dipping sauce did you go with?
I love hearing about your cooking wins (and fails, because we all have them).


1 thought on “Fried Chicken Tenders That’ll Make You Ditch the Drive-Thru Forever”