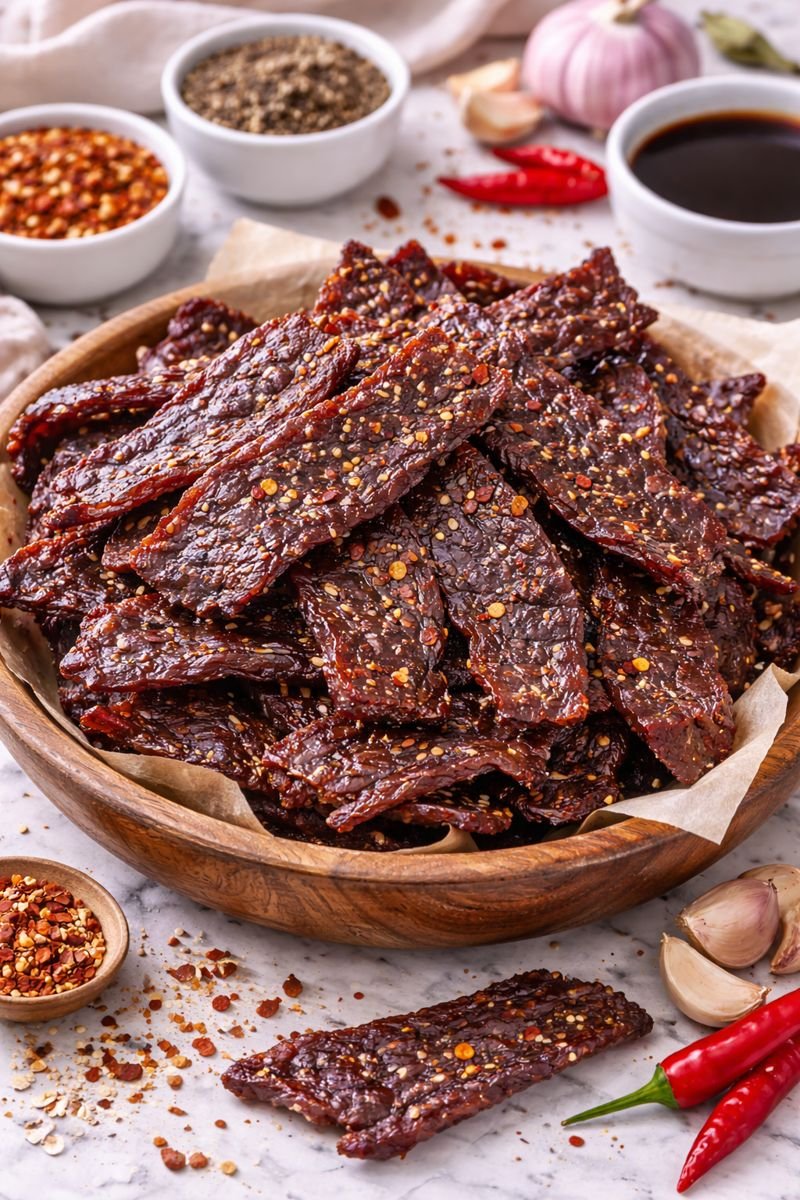
Think beef jerky has to come in a crinkly plastic bag with a price tag that makes you wince?
I’m about to change your mind on that.
Homemade beef jerky is one of those things that sounds way harder than it actually is. You don’t need a fancy dehydrator (though it helps), you don’t need to be a butcher, and you definitely don’t need to spend $8 on a tiny pouch of the store-bought stuff ever again.
The first time I made jerky at home, I was shocked at how simple it was. And the taste? Completely different league.
Here’s the truth: You control the flavor, the texture, the salt level, everything.
I’ve been making batches of this for road trips, hiking snacks, and just because I want something savory and protein-packed around the house. My husband actually hides his favorite batches in the back of the pantry because they disappear that fast.
So if you’ve ever wondered how to make beef jerky that’s actually good, you’re in the right place.
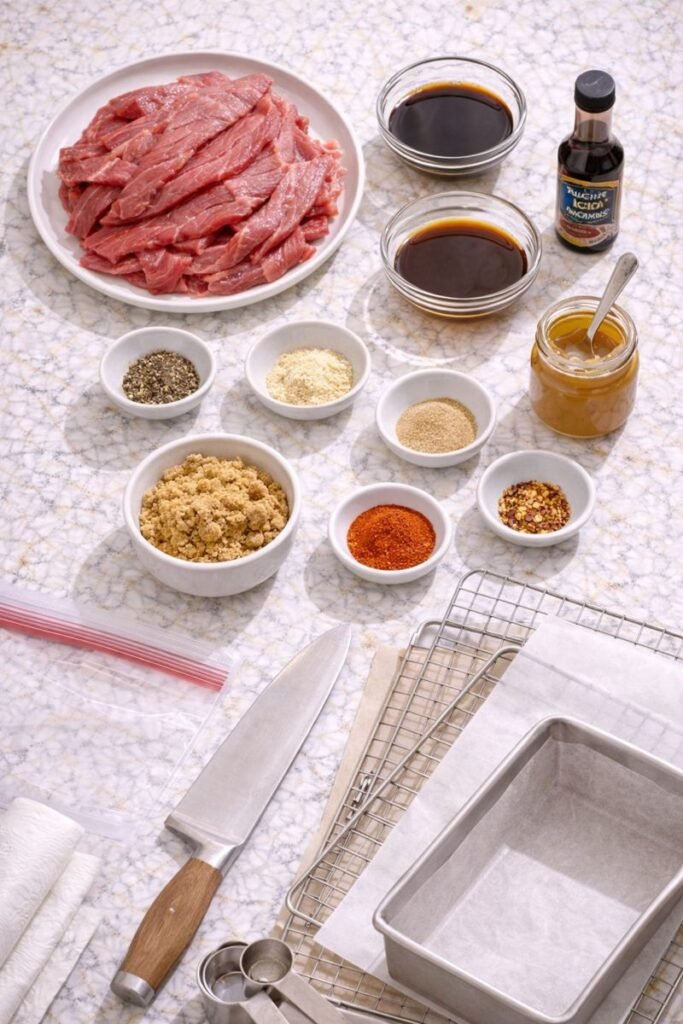
What You’ll Need
For the Beef:
- 2 pounds flank steak or top round (the leaner, the better)
- Paper towels for patting dry
For the Marinade:
- ⅓ cup soy sauce (or tamari for gluten-free)
- ⅓ cup Worcestershire sauce
- 2 tablespoons brown sugar
- 2 teaspoons black pepper (freshly ground if you have it)
- 2 teaspoons garlic powder
- 2 teaspoons onion powder
- 1 teaspoon smoked paprika
- 1 teaspoon red pepper flakes (optional, but I love the kick)
- ½ teaspoon liquid smoke (trust me on this one)
Equipment You’ll Need:
You may also like : mongolian beef recipe
- Sharp knife (this is key!)
- Cutting board
- Large ziplock bag or shallow dish
- Dehydrator, oven, or air fryer
- Wire cooling racks (if using oven)
- Baking sheets
- Kitchen towel or paper towels
Pro Tips
💡 FREEZE YOUR MEAT FIRST
This isn’t just some fancy chef trick. Pop that beef in the freezer for 1-2 hours before slicing. It firms up just enough to make slicing those thin, even strips so much easier. I learned this the hard way after wrestling with floppy meat for 20 minutes.
🔪 SLICE AGAINST THE GRAIN
Look at your meat and find the lines running through it (that’s the grain). Cut perpendicular to those lines. If you slice with the grain, you’ll end up with jerky that’s harder to chew and not in a good way.
⏰ DON’T SKIP THE MARINADE TIME
I know it’s tempting to rush this, but those flavors need at least 4 hours to really soak in. Overnight is even better. The longer it sits, the more flavor you get.
🧻 PAT YOUR STRIPS DRY
Excess marinade = sticky, slower-drying jerky. Give each strip a good pat with a paper towel before you lay them out. It makes a real difference in the final texture.
👀 CHECK AT THE 3-HOUR MARK
Ovens and dehydrators vary like crazy. Start checking at 3 hours and keep an eye on it. You want it to bend without breaking, but not be so soft it’s still wet.
Substitutions and Variations
| Want to Swap… | Use This Instead | What Changes |
|---|---|---|
| Flank steak | Venison, turkey breast, or bison | Leaner = longer shelf life. Keep fat under 10% |
| Soy sauce | Coconut aminos | Slightly sweeter, soy-free |
| Brown sugar | Honey or maple syrup | May make jerky stickier, use same amount |
| Mild flavor | Add 1 tsp cayenne pepper | Serious heat kick 🌶️ |
| Savory only | Add 1 tbsp maple syrup + ½ tsp cinnamon | Sweet-savory combo |
Flavor Variations to Try:
Teriyaki Style: Replace half the soy sauce with pineapple juice and add 1 tablespoon grated fresh ginger.
Peppered Jerky: Double the black pepper and add 1 teaspoon of coarsely cracked peppercorns for texture.
BBQ Jerky: Add 2 tablespoons tomato paste and 1 teaspoon cumin to the marinade.
Make Ahead Tips
| When | What to Do | Storage |
|---|---|---|
| 24 hours ahead | Slice and marinate beef | Fridge in ziplock bag |
| 1 week ahead | Slice beef, freeze in single layer | Freezer bag, thaw overnight before marinating |
| After making | Store finished jerky | Airtight container, cool dark place, 1-2 months |
Pro move: Make a double batch on Sunday. You’ll have snacks for weeks.
You’ll love these too : tatertot casserole recipe beef
How to Make Beef Jerky
Step 1: Prep Your Beef
Start by trimming any visible fat off your meat.
Fat doesn’t dehydrate well and can make your jerky go rancid faster.
Pop the trimmed beef in the freezer for 1-2 hours. You want it firm but not frozen solid.
Step 2: Slice It Thin
Take your partially frozen beef and slice it into strips about ⅛ to ¼ inch thick.
I aim for ⅛ inch because it dries faster and gets crispier.
Remember: Cut against the grain. This makes each piece easier to chew.
Try to keep your slices as uniform as possible so they dry at the same rate.
Step 3: Mix Your Marinade
In a bowl, whisk together:
- Soy sauce
- Worcestershire sauce
- Brown sugar
- Black pepper
- Garlic powder
- Onion powder
- Smoked paprika
- Red pepper flakes
- Liquid smoke
Taste it. It should be salty and bold because the drying process mellows everything out.
Step 4: Marinate the Beef
Drop your beef strips into a large ziplock bag or shallow dish.
Pour the marinade over top.
Seal the bag and massage it around so every piece gets coated.
Refrigerate for at least 4 hours. Overnight is better.
I usually start this before bed and dehydrate the next day.
Recommended for you : ground beef recipe
Step 5: Dry Those Strips
Pull your beef out of the fridge.
Lay out some paper towels and pat each strip dry. Don’t rinse them, just remove the excess liquid.
Drying Methods Compared:
| Method | Temperature | Time | Pros | Cons |
|---|---|---|---|---|
| Dehydrator | 160°F | 4-6 hours | Even drying, set it and forget it | Need to buy equipment |
| Oven | 160-175°F | 4-6 hours | Most people have one | Must prop door open, uses more energy |
| Air Fryer | 180°F | 2-3 hours | Fastest method, small batches | Limited space, need to flip halfway |
If Using a Dehydrator:
Arrange strips in a single layer on dehydrator trays.
Make sure they don’t overlap.
Set temperature to 160°F and let them dry for 4-6 hours.
Start checking at the 3-hour mark.
If Using an Oven:
Line baking sheets with foil and place wire racks on top.
Lay beef strips on the racks in a single layer.
Set your oven to the lowest temperature (ideally 160-175°F).
Important: Prop the door open slightly with a wooden spoon to let moisture escape.
Dehydrate for 4-6 hours, checking every hour after the 3-hour point.
If Using an Air Fryer:
This is my secret weapon when I only want a small batch.
Lay strips in a single layer in the basket.
Set to 180°F and dehydrate for 2-3 hours.
Check every 30 minutes and flip halfway through.
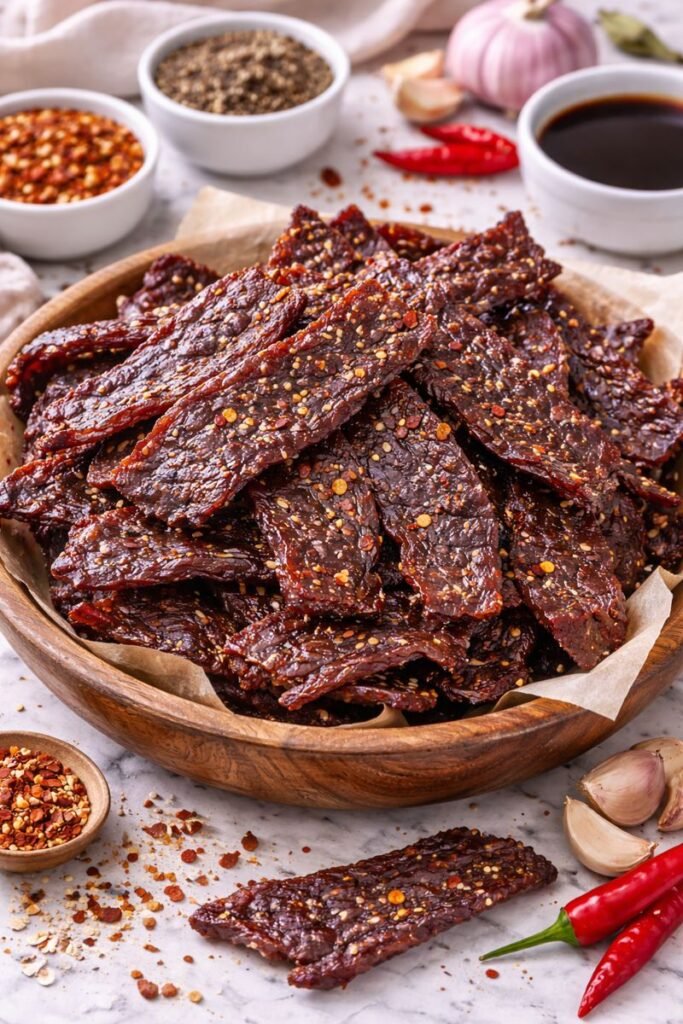
Step 6: Test for Doneness
✅ PERFECT JERKY LOOKS LIKE THIS:
- Bends without snapping immediately
- Doesn’t feel wet or spongy
- Has a leathery texture
- White fibers appear when bent (that’s good!)
- Doesn’t crack in half right away
Let it cool completely before storing.
It actually firms up a bit more as it cools.
Nutrition Breakdown (Per 1 oz serving)
| Nutrient | Amount |
|---|---|
| Calories | 80-90 |
| Protein | 15-17g |
| Fat | 1-2g |
| Carbs | 3-4g |
| Sugar | 2g |
| Sodium | 420mg |
Why it’s good for you:
- High protein, low carb
- Perfect post-workout snack
- No preservatives or weird additives
- You know exactly what’s in it
Leftovers and Storage
| Storage Method | Location | Shelf Life |
|---|---|---|
| Airtight container | Cool, dark pantry | 1-2 months |
| Mason jar | Countertop or pantry | 1-2 months |
| Ziplock bag | Refrigerator | 2-3 months |
| Vacuum sealed | Freezer | 6 months |
Storage Rules:
Let it cool completely before storing. Any warmth = trapped moisture = potential for mold.
Check for these signs it’s gone bad:
- Off smell
- Sliminess
- Visible mold
- Sticky texture that wasn’t there before
Honestly though, it rarely lasts long enough for that to be an issue. 😅
Meal Pairing Suggestions
Pack it with:
- Trail mix and dried fruit for hiking
- Cheese and crackers for a protein-packed snack board
- Fresh veggies and hummus for a balanced lunch
Add it to:
- Ramen for extra protein and flavor
- Salads for a smoky, savory crunch
- Scrambled eggs for a breakfast twist
Pair it with:
- Ice-cold beer after a long day
- Sparkling water with lime on road trips
- Your favorite energy drink for pre-workout fuel
Cooking Time Efficiency Tips
Want to make this even faster? Here’s how:
Prep everything the night before. Slice, marinate, and go to bed. Wake up and just start dehydrating.
Use an air fryer for small batches. It’s literally half the time of other methods.
Double batch it. If you’re already setting up, why not make twice as much? Future you will thank you.
Freeze extras. Vacuum seal and freeze finished jerky. It thaws in minutes and tastes just as good.
FAQ
Do I really need a dehydrator?
Nope! Your oven works just fine. It takes about the same amount of time, you just need to prop the door open to let moisture escape. I made jerky in my regular oven for years before getting a dehydrator.
How thin should I slice the beef?
Aim for ⅛ to ¼ inch.
Thinner = crispier and faster drying.
Thicker = chewier and longer drying time.
I prefer ⅛ inch because I like my jerky on the crispier side.
Can I use ground beef?
You can, but it’s a different process.
You’ll need a jerky gun to form strips and the texture is more like Slim Jims.
Whole muscle meat gives you that traditional jerky texture.
Why is my jerky tough and hard to chew?
You probably sliced with the grain instead of against it.
Or you may have over-dried it.
Jerky should bend before it breaks.
Is homemade jerky safe to eat?
Yes, as long as you use the right temperature.
Heating to 160°F kills any harmful bacteria.
That’s why we dehydrate at that temperature or higher.
My jerky came out too salty. What happened?
The marinade was probably too salty, or you didn’t pat the strips dry before dehydrating.
Next time, reduce the soy sauce slightly or make sure to remove excess marinade.
Can I add heat to this recipe?
Absolutely.
Add cayenne pepper, extra red pepper flakes, or even some hot sauce to the marinade.
Start small and adjust to your preference.
How do I know when it’s done?
Bend a piece.
It should flex without breaking but not feel wet.
If it snaps immediately, it’s over-dried.
If it feels spongy or leaves moisture on your fingers, it needs more time.
Can I make this without liquid smoke?
Yes! The liquid smoke adds that classic jerky flavor, but you can skip it.
Your jerky will still taste great, just a little less smoky.
What’s the best cut of beef for jerky?
Flank steak or top round are my go-tos.
They’re lean, affordable, and have great texture.
Eye of round and sirloin tip also work well.
Wrapping Up
Making your own beef jerky is one of those kitchen wins that feels way more impressive than the effort you put in.
You get to control everything: the flavor, the texture, the quality of meat, and you save money in the process.
Plus, there’s something satisfying about pulling out a bag of homemade jerky on a road trip or hike and watching people’s faces when you tell them you made it yourself.
The first batch might not be perfect (mine was a little too salty), but that’s the fun part. You get to tweak it until it’s exactly what you want.
So grab some beef, mix up that marinade, and give it a shot.
I think you’ll be surprised at how good homemade jerky can be.
And when you make it, I’d love to hear how it turned out. Drop a comment below and let me know what flavors you tried or if you have any questions!


1 thought on “Homemade Beef Jerky That’ll Make You Forget Store-Bought Exists”