You know that feeling when you crack open a perfectly crusty bread bowl and steam rises from the warm, soft center?
That’s what we’re making today.
I started making bread bowls on a random Tuesday because I was craving soup but wanted something more exciting than just a regular bowl.
Turns out, making your own bread bowls is kind of addictive.
The smell alone makes your kitchen feel like a cozy bakery, and the taste? So much better than anything you’d get at a chain restaurant.
The crust gets this gorgeous golden color and makes the most satisfying crunch when you tear into it.
Plus, there’s something about eating your bowl that just feels right. No dishes to wash afterward (well, almost).
Quick Recipe Overview
| Prep Time | Rising Time | Baking Time | Total Time | Servings |
|---|---|---|---|---|
| 20 minutes | 2 hours | 30 minutes | 2 hours 50 min | 4 large bowls |
Difficulty Level: Beginner-friendly (seriously!)
Cost: Under $3 to make all 4 bowls
Active Work: About 30 minutes total
What You’ll Need
Ingredient Checklist
| Ingredient | Amount | Notes |
|---|---|---|
| Active dry yeast | 2¼ teaspoons | One standard packet |
| Warm water | 1½ cups | Must be 105-110°F |
| Granulated sugar | 1 tablespoon | Feeds the yeast |
| Salt | 2 teaspoons | Don’t skip this! |
| Olive oil | 2 tablespoons | Any neutral oil works |
| All-purpose flour | 4 cups + extra | May need ½ cup more |
| Egg | 1 large | For that shiny crust |
| Water (egg wash) | 1 tablespoon | Mix with egg |
Optional Toppings: Sesame seeds, poppy seeds, everything bagel seasoning, or coarse sea salt
💡 Pro Tip: Keep your yeast in the fridge or freezer. It stays fresh way longer and you won’t end up with sad, flat bread.
Tools You’ll Need
Getting your setup right makes everything smoother.
Essential Equipment
- ✓ Large mixing bowl (glass or ceramic works great)
- ✓ Wooden spoon or Danish dough whisk
- ✓ Kitchen towel or plastic wrap for covering
- ✓ 2 baking sheets (line with parchment)
- ✓ Parchment paper (prevents sticking)
- ✓ Sharp knife or bread lame for scoring
- ✓ Small bowl for mixing egg wash
- ✓ Pastry brush (silicone or natural bristle)
- ✓ Cooling rack (wire works best)
Nice to Have (But Not Required)
- Kitchen thermometer for water temp
- Stand mixer with dough hook (saves your arms)
- Bench scraper for dividing dough
- Oven thermometer (most ovens lie about temp)
Pro Tips From My Kitchen
Tip #1: Let the yeast actually bloom.
You’ll know it’s ready when it gets foamy and bubbly on top, like a tiny science experiment.
If nothing happens after 10 minutes, your yeast might be dead. Start over with fresh yeast or you’ll end up with hockey pucks instead of bread bowls.
Tip #2: Don’t rush the rising time.
I know it’s tempting to speed things up, but bread needs time to develop flavor.
That first rise should double the dough, and the second rise gives you those beautiful air pockets inside.
If your kitchen is cold, try putting the bowl in your oven (turned off) with just the light on for warmth.
Tip #3: Score the tops right before baking.
Those slashes aren’t just for looks (though they do look pretty cool).
They let steam escape and control where the bread expands. Use a really sharp knife or a bread lame and make quick, confident cuts about ¼ inch deep.
Tip #4: Use an oven thermometer.
Most home ovens lie about their temperature by 25-50 degrees.
A $10 thermometer will save you from sad, pale bread or burnt bottoms. Trust me on this one.
Tip #5: The tap test is your friend.
When you think they’re done, flip a bread bowl over and tap the bottom.
If it sounds hollow, you’re golden. If it sounds dull or soft, give it another 5 minutes.
🔥 Real Talk: The biggest mistake people make? Adding too much flour. Your dough should be slightly sticky and soft, not stiff like Play-Doh. When in doubt, keep it wetter.
How to Make Bread Bowls (Step by Step)

Phase 1: Prep the Dough (15 minutes)
| Step | What to Do | Why It Matters |
|---|---|---|
| 1 | Pour warm water into bowl, add yeast & sugar, stir gently | Sugar feeds the yeast |
| 2 | Wait 5-10 minutes until foamy | Proves yeast is alive |
| 3 | Add salt & olive oil, stir to combine | Oil makes it tender |
| 4 | Add flour 1 cup at a time, mixing between | Prevents lumps |
| 5 | Switch to hands after 3 cups | Better control |
| 6 | Keep adding flour until dough pulls from bowl sides | Should be slightly tacky |
Temperature Check: Water should feel like a warm bath (105-110°F). Too hot = dead yeast. Too cold = no action.
Texture Goal: Soft, slightly sticky, springs back when poked
Phase 2: Knead & First Rise (1.5 hours)
Kneading (8-10 minutes by hand):
- Dump dough on floured surface
- Push away with heel of hand
- Fold back toward you
- Give it a quarter turn
- Repeat until smooth and elastic
What “Ready” Looks Like:
- Smooth, not shaggy
- Springs back when you poke it
- Feels like a baby’s bottom (weird but true)
First Rise:
Put dough in oiled bowl, turn once to coat, cover with damp towel.
Let rise 1-1.5 hours in warm spot until doubled in size.
⏰ Time-Saver: Cold kitchen? Microwave a cup of water for 2 minutes, then put your covered bowl in the warm microwave (turned off). Perfect rising spot.
Phase 3: Shape & Second Rise (45 minutes)
| Action | Details |
|---|---|
| Punch down | Satisfying but necessary |
| Divide | 4 equal pieces (or 3 for bigger bowls) |
| Shape | Pull edges down and under, pinch at bottom |
| Place | Seam-side down on parchment, spaced 4 inches apart |
| Cover | Loose towel, not touching tops |
| Rise | 30-45 minutes until puffy |
While Rising: Preheat oven to 400°F
Phase 4: Bake to Golden Perfection (30 minutes)
Pre-Bake Prep:
- Beat egg with 1 tablespoon water
- Brush all over tops and sides
- Sprinkle with seeds or salt (optional)
- Score tops with sharp knife (¼ inch deep)
Baking Schedule:
| Time | What’s Happening | What to Look For |
|---|---|---|
| 0-10 min | Oven spring (they puff up) | Cuts opening up |
| 10-20 min | Browning begins | Light golden color |
| 20-25 min | Deep color developing | Rich golden brown |
| 25-30 min | Final crisping | Hollow sound when tapped |
Done Check: Deep golden brown + hollow sound when bottom is tapped + internal temp 190°F
Cool Down: Transfer to rack, wait 15 minutes minimum before cutting
Phase 5: Hollow Out Your Bowls
The Right Way:
- Cut circle around top (1 inch from edge)
- Lift off the lid (save it!)
- Gently pull out soft bread inside
- Leave ½ inch border all around
- Don’t go too thin or you’ll have leaks
What to Do With the Insides:
- Tear into chunks for dipping
- Make breadcrumbs
- Feed the birds
- Eat them warm with butter (my favorite)
Substitutions and Variations
Dietary Swaps
| Instead of… | Try This | Notes |
|---|---|---|
| All-purpose flour | Half whole wheat | Add 2-3 tablespoons more water |
| Egg wash | Olive oil or plant milk | Won’t be as shiny but still good |
| Sugar | Honey or maple syrup | Use same amount |
| Olive oil | Melted butter or avocado oil | Any fat works |
Flavor Upgrades
Italian Herb Bowls: Add 2 tablespoons Italian seasoning to dough
Garlic Lovers: Brush with garlic butter right out of oven
Everything Bagel: Top with everything bagel seasoning before baking
Cheese Bomb: Add ½ cup grated parmesan to dough
Jalapeño Cheddar: Mix in diced jalapeños and shredded cheddar
Sourdough Style: Replace yeast with ½ cup active starter (adjust flour/water, expect longer rises)
🌶️ Spice Level: Adding fresh herbs? Use double the amount compared to dried. Fresh = more flavor but less potent.
Make-Ahead Game Plan
Timing Options Table
| Method | When to Do It | Day of Serving | Best For |
|---|---|---|---|
| Same Day | Morning | Bake by evening | Maximum freshness |
| Overnight Dough | Night before | 1 hour rise + bake | Busy mornings |
| Freeze Dough | Weeks ahead | Thaw overnight + rise + bake | Meal planning |
| Freeze Baked | Anytime | Reheat 10 minutes | Last-minute meals |
Refrigerator Method (My Favorite):
After first rise, shape balls and place on baking sheet.
Cover tightly with plastic wrap.
Refrigerate overnight (up to 24 hours).
Next day: Let come to room temp (1 hour), do second rise, bake.
Freezer Method (Unbaked):
Shape balls, freeze on sheet until solid.
Transfer to freezer bags (keeps 3 months).
To use: Thaw in fridge overnight, room temp 1 hour, rise, bake.
Freezer Method (Baked):
Cool completely, wrap each bowl in plastic then foil.
Freeze up to 1 month.
Reheat from frozen at 350°F for 15 minutes.
Leftovers and Storage
Freshness Timeline
| Storage Method | How Long | Texture | Best Use |
|---|---|---|---|
| Counter (paper bag) | 1-2 days | Crusty outside, soft inside | Serve as-is |
| Counter (plastic) | 2-3 days | Softer all around | Avoid if possible |
| Fridge | 3-4 days | Gets stale faster | Not recommended |
| Freezer (wrapped well) | 1 month | Great after reheating | Best long-term option |
Reheating Tricks:
- Oven Method: 350°F for 5-7 minutes (best texture)
- Microwave: 20-30 seconds (softer but fast)
- Toaster Oven: 5 minutes at 325°F (perfect for one)
Already Filled Bowls:
Store in fridge, eat within 24 hours.
Bread will be soggy but still tasty.
Microwave 1-2 minutes to reheat.
♻️ Zero Waste Tip: Stale bread bowls make incredible croutons. Cut into cubes, toss with olive oil and garlic, bake at 375°F for 10 minutes.
What to Serve in Your Bread Bowls
Soup Pairings (The Classics)
| Soup Type | Why It Works | Prep Difficulty |
|---|---|---|
| Clam chowder | Thick, creamy, soaks in slowly | Medium |
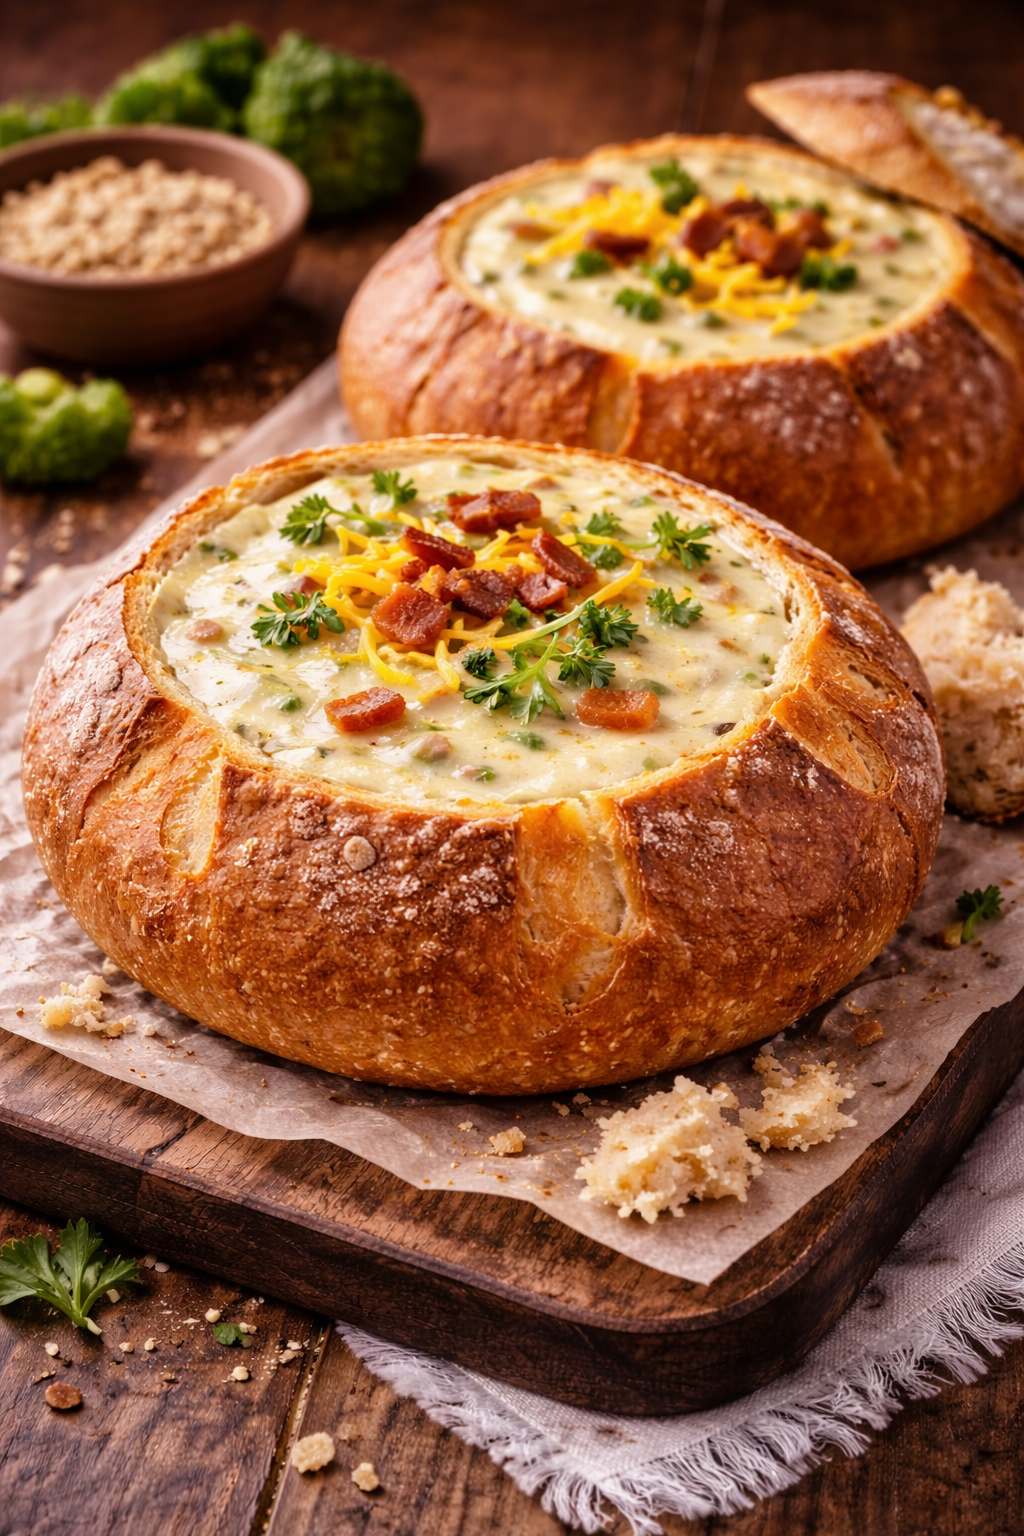
| Broccoli cheddar | Perfect consistency, crowd favorite | Easy |
| Tomato bisque | Classic combo, lighter option | Easy |
| Chicken noodle | Comfort food x2 | Easy |
| Chili | Hearty, feeds a crowd | Medium |
| Beef stew | Super filling, great for cold days | Hard |
| French onion | Skip the ceramic, use bread instead | Medium |
| Loaded baked potato | Cheesy, bacon-y goodness | Easy |
Beyond Soup (Get Creative)
Hot Dips:
- Spinach artichoke dip
- Buffalo chicken dip
- Queso fundido
- Crab dip
- Beer cheese
Pasta Dishes:
- Mac and cheese
- Fettuccine alfredo
- Pasta primavera
- Vodka sauce pasta
Salads:
- Caesar salad
- Greek salad
- Cobb salad
- Caprese (lighter option)
Breakfast Ideas:
- Scrambled eggs with cheese
- Sausage gravy
- Breakfast casserole filling
🍲 Serving Tip: Make sure your filling is warm and ready the moment your bread bowls come out. Cold filling makes the bread soggy faster.
Nutritional Information
Per Bread Bowl (Plain, No Filling)
| Nutrient | Amount | % Daily Value |
|---|---|---|
| Calories | 380 | 19% |
| Total Fat | 5g | 6% |
| Saturated Fat | 1g | 5% |
| Sodium | 585mg | 25% |
| Carbohydrates | 71g | 24% |
| Fiber | 3g | 12% |
| Sugar | 3g | – |
| Protein | 12g | 24% |
Based on: Recipe makes 4 bowls, calculation per single bowl
Note: This doesn’t include whatever you fill them with. Add your soup/dip calories separately.
Diet Compatibility
| Diet Type | Compatible? | Modifications Needed |
|---|---|---|
| Vegetarian | ✓ Yes | Already vegetarian |
| Vegan | ✗ Needs changes | Skip egg wash, use plant milk |
| Gluten-free | ✗ No | Would need complete recipe overhaul |
| Dairy-free | ✓ Yes | Already dairy-free |
| Low-carb | ✗ No | It’s literally bread |
| Nut-free | ✓ Yes | No nuts in recipe |
FAQ
Troubleshooting Common Issues
Q: Why didn’t my dough rise?
Three main culprits:
- Dead yeast (check expiration date)
- Wrong water temp (too hot kills it, too cold does nothing)
- Cold kitchen (find a warmer spot)
Test your yeast: If it doesn’t foam after 10 minutes in warm water with sugar, toss it and get fresh.
Q: Can I make these without a stand mixer?
100% yes. I actually prefer making them by hand.
You get better control over texture and it’s only 10 minutes of kneading.
Plus, there’s something satisfying about working the dough with your hands.
Q: How do I know when they’re fully baked?
Look for all three signs:
- Deep golden brown color
- Hollow sound when tapped on bottom
- Internal temp around 190°F (if using thermometer)
Q: My bread bowls are too dense. What happened?
You probably added too much flour or didn’t knead long enough.
The dough should be soft and slightly tacky, not stiff.
Kneading for the full 8-10 minutes develops the gluten that makes bread light and airy.
Q: Can I use instant yeast instead of active dry?
Yep! Skip the blooming step and mix it right in with the flour.
Use the same amount. Everything else stays the same.
Q: Do I need to use bread flour?
Nope. All-purpose flour works perfectly.
Bread flour has more protein and will give you slightly chewier results, but it’s not necessary for good bread bowls.
Q: Can I make mini bread bowls?
Absolutely! Divide the dough into 8 pieces instead of 4.
Reduce baking time to 18-22 minutes.
Perfect for kids or appetizer portions.
Q: What if I don’t have an oven thermometer?
You can still make them, just watch closely.
If they’re browning too fast, your oven runs hot (lower temp by 25°F).
If they’re taking forever and staying pale, it runs cool (raise temp by 25°F).
Q: Can I add cheese to the dough?
Yes! Mix in ½ to 1 cup of shredded cheese during the last minute of kneading.
Sharp cheddar, parmesan, or asiago work great.
Q: Why did my bread bowls collapse?
Usually means:
- Over-proofed (rose too long)
- Oven temp too low
- Scored too deep
- Opened oven door too much during baking
Q: Can I use whole wheat flour?
You can replace up to half the all-purpose flour with whole wheat.
You’ll need to add 2-3 tablespoons more water since whole wheat absorbs more liquid.
The texture will be denser but still good.
Wrapping Up
There’s something really satisfying about pulling homemade bread bowls out of your own oven.
The smell. The sound of that crust cracking as you cut into it. The way they turn a simple Tuesday night soup into something special.
It’s not complicated, and you definitely don’t need to be a professional baker to nail these.
Make a batch this weekend and fill them with your favorite soup or chili.
Or skip the soup entirely and use them for dips during game day.
Once you’ve tried them, come back and tell me what you filled yours with.
Did you go classic with clam chowder? Get wild with buffalo chicken dip?
I want to hear about it.


