
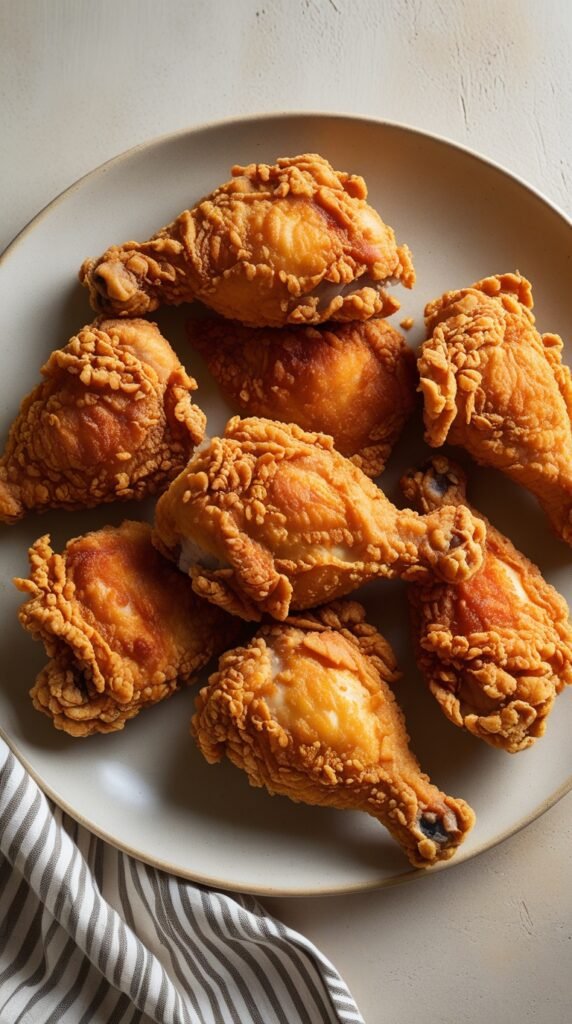
You know that crispy, juicy fried chicken you’ve been craving?
The kind with a shatteringly crunchy crust that stays crispy even after it cools down. The kind where you bite in and the meat is so tender and flavorful that you close your eyes for a second.
I’m about to show you how to make it at home.
And no, you don’t need a deep fryer or any special equipment. Just a heavy pot, some everyday ingredients, and about 90 minutes from start to finish.
The secret? A buttermilk brine that makes the chicken insanely tender, and a double-dredge technique that creates the crispiest coating you’ve ever tasted. I learned this method from my Southern friend’s grandmother, and it’s never let me down.
Trust me when I say this recipe will change your weeknight dinner game forever.
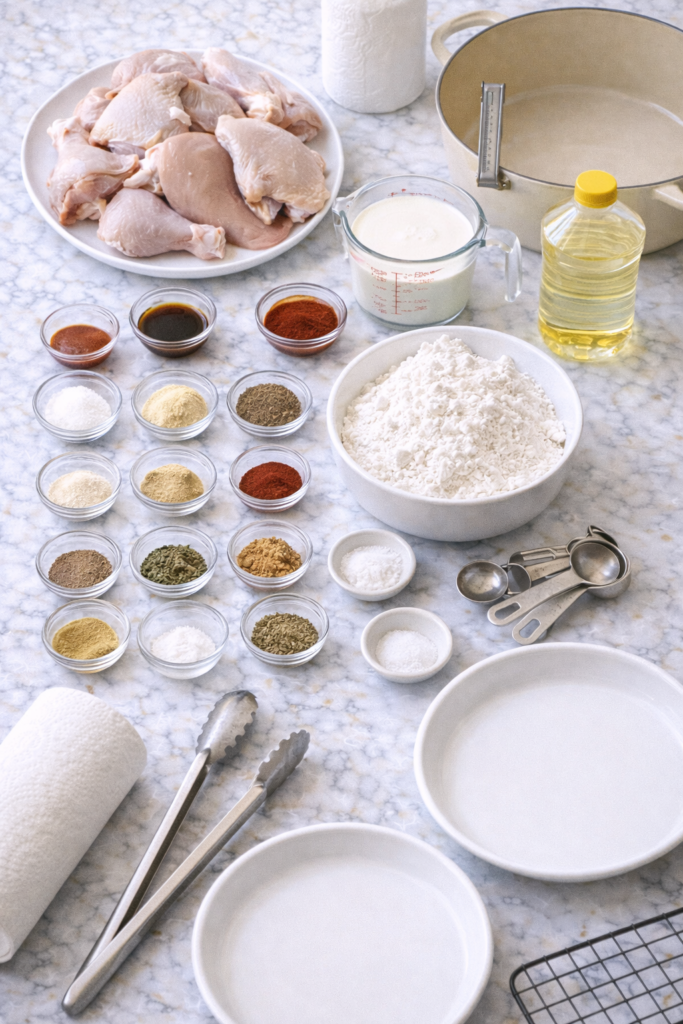
What You’ll Need
For the Buttermilk Brine
| Ingredient | Amount | Why It Matters |
|---|---|---|
| Chicken pieces | 3 lbs | Mix of drumsticks, thighs, breasts, wings |
| Buttermilk | 2 cups | Tenderizes and flavors the meat |
| Hot sauce | 2 tbsp | Adds depth and a subtle kick |
| Kosher salt | 1 tbsp | Seasons deep into the meat |
| Black pepper | 1 tsp | Classic flavor base |
| Garlic powder | 1 tsp | Savory backbone |
| Paprika | 1 tsp | Subtle sweetness and color |
For the Coating
| Ingredient | Amount | Purpose |
|---|---|---|
| All-purpose flour | 3 cups | The crispy base |
| Cornstarch | 2 tbsp | Extra crunch factor 🔥 |
| Garlic powder | 1 tbsp | Flavor layer 1 |
| Onion powder | 1 tbsp | Flavor layer 2 |
| Paprika | 1 tbsp | Color and mild sweetness |
| Cayenne pepper | 2 tsp | Heat (adjust to taste) |
| Dried thyme | 2 tsp | Herbal notes |
| Dried oregano | 2 tsp | Earthy depth |
| Kosher salt | 1 tbsp | Essential seasoning |
| Black pepper | 2 tsp | More peppery kick |
| Baking powder | 1 tsp | Secret to ultra-crispy coating |
For Frying
- 6-8 cups vegetable oil or peanut oil (enough for 2 inches in your pot)
💡 Quick Note: The amount of oil depends on your pot size. You want at least 2 inches depth so the chicken can float and cook evenly.
Tools You’ll Need
You’ll love these too : chicken fried rice recipe
Here’s your complete toolkit:
Essential:
- Large mixing bowl (for the brine)
- Large heavy-bottomed pot or Dutch oven (at least 5-quart)
- Deep-fry thermometer or instant-read thermometer
- Wire cooling rack + baking sheet
- Tongs
- Large shallow dishes or pie plates (for dredging)
Nice to Have:
- Splatter screen (keeps your stovetop cleaner)
- Kitchen timer
- Apron (trust me, oil splatters)
Pro Tips
🌙 Brine Overnight If You Can
I know the recipe says 4 hours minimum, but overnight really is where the magic happens.
The chicken gets so tender it almost falls off the bone, and the flavors go deep into the meat. Plan ahead and you’ll thank yourself later.
🌡️ Keep Your Oil Temperature Steady
This is the difference between soggy chicken and perfectly crispy chicken.
| Temperature Zone | What Happens |
|---|---|
| Below 300°F | Chicken absorbs oil, gets greasy and soggy |
| 325-350°F | Perfect zone – crispy outside, juicy inside ✨ |
| Above 375°F | Coating burns before chicken cooks through |
When you add the chicken, the temperature will drop – that’s normal. Just adjust your heat to bring it back up slowly.
⏰ Don’t Skip the Resting Time After Coating
Let those coated pieces sit for 15-20 minutes before frying.
This helps the coating stick better and creates an extra crispy crust. I learned this the hard way after my first batch had half the coating fall off in the oil.
🥢 Use a Wire Rack, Not Paper Towels
Why this matters:
| Method | Result |
|---|---|
| Paper towels only | Bottom gets soggy from sitting in oil 😢 |
| Wire rack | Air circulates = crispy all around 🎉 |
Put paper towels underneath the rack to catch drips, but keep that chicken elevated.
🧂 Season Immediately After Frying
Hit that chicken with a little extra salt the second it comes out of the oil.
The coating is still slightly wet from the oil, so the salt sticks perfectly and the flavor is incredible.
👨🍳 Chef’s Secret: I keep a small bowl of finishing salt mixed with a tiny bit of garlic powder next to my frying station. One quick sprinkle and you’re done.
Recommended for you : kfc fried chicken recipe
Step-by-Step Instructions
Step 1: Make the Buttermilk Brine
Mix the buttermilk, hot sauce, salt, pepper, garlic powder, and paprika in a large bowl. Whisk it until everything’s combined.
Add your chicken pieces and make sure they’re completely covered in the brine.
Cover the bowl with plastic wrap and stick it in the fridge.
Brining Time Guide:
| Duration | Result |
|---|---|
| 2 hours | Okay, but not amazing |
| 4 hours | Good – minimum recommended |
| 8-12 hours | Excellent – my go-to ⭐ |
| 24 hours | Maximum time before texture gets mushy |
Step 2: Prepare Your Coating
In a large shallow dish, whisk together the flour, cornstarch, garlic powder, onion powder, paprika, cayenne, thyme, oregano, salt, pepper, and baking powder.
Here’s a trick: take about 3 tablespoons of the buttermilk brine and drizzle it into your flour mixture.
Use a fork to work it in until you get little clumps throughout the flour. These create extra crispy bits on your chicken that are absolutely addictive.
🔥 Game Changer: Those little clumps of wet flour? They fry up into the most incredible crispy nuggets. Don’t skip this step!
Step 3: Set Up Your Dredging Station
Your assembly line should look like this:
- Bowl of chicken in buttermilk brine
- Seasoned flour mixture in a shallow dish
- Clean wire rack for coated pieces
- Your frying pot ready to go
Work with one piece at a time. This keeps things organized and prevents your flour from getting too wet.
Step 4: Double-Dredge the Chicken
The Perfect Coating Process:
| Step | Action | Why |
|---|---|---|
| 1 | Lift chicken from brine, let excess drip off | Prevents flour from getting too wet |
| 2 | Press into flour mixture, coat completely | First layer of crunch |
| 3 | Quick dip back in buttermilk (just 1 second) | Glue for second coat |
| 4 | Second flour coating, press FIRMLY | Double the crispy goodness |
| 5 | Place on wire rack | Keeps coating intact |
Let everything sit for 15-20 minutes while you heat the oil. This resting time helps the coating stick.
Step 5: Heat Your Oil
Pour about 2 inches of oil into your heavy pot or Dutch oven.
You may also like : korean fried chicken
Clip a thermometer to the side so you can monitor the temperature.
Heat the oil over medium-high heat until it reaches 350°F. This usually takes about 10-15 minutes.
Temperature Checkpoints:
- Starting: Room temp or cold
- After 5 min: Around 200°F
- After 10 min: Around 300°F
- Ready to fry: 350°F
Step 6: Fry the Chicken
Carefully lower 3-4 pieces of chicken into the hot oil, depending on the size of your pot.
Don’t crowd it – the chicken needs space for the oil to circulate.
Cooking Times by Piece:
| Chicken Piece | Frying Time | Internal Temp |
|---|---|---|
| Wings | 12-14 minutes | 165°F |
| Drumsticks | 12-14 minutes | 175°F |
| Thighs | 14-16 minutes | 175°F |
| Breasts | 16-18 minutes | 165°F |
You’ll know it’s done when the coating is deep golden brown and the internal temperature is right.
⚠️ Safety First: Always use tongs or a spider strainer to add and remove chicken. Never drop it in from high up – that causes dangerous splatter.
Step 7: Drain and Season
Use tongs to carefully transfer the fried chicken to your wire rack.
Let the excess oil drip off.
Hit it with a pinch of salt right away while it’s still hot. The seasoning sticks better and tastes better this way.
Let the chicken rest for about 5 minutes before serving. I know it’s hard to wait, but this lets the juices redistribute and keeps everything moist.
Repeat the frying process with the remaining chicken, making sure the oil comes back to 350°F between batches.
Substitutions and Variations
Common Swaps
| Instead of… | Use this… | Notes |
|---|---|---|
| Buttermilk | 2 cups milk + 2 tbsp vinegar | Let sit 10 min before using |
| Hot sauce | Extra cayenne in brine | Start with 1 tsp, adjust to taste |
| All-purpose flour | Gluten-free flour blend | Bob’s Red Mill works great |
| Vegetable oil | Peanut, canola, or avian oil | All have high smoke points |
| Bone-in chicken | Boneless pieces | Reduce cooking time to 8-10 min |
Flavor Variations
🌶️ Extra Spicy Version:
- Double the cayenne in the flour
- Add 1 tbsp hot sauce to the flour mixture
- Mix 2 tbsp of your favorite hot sauce with melted butter and brush on after frying
🌿 Herb-Crusted Version:
- Replace thyme and oregano with 2 tbsp Italian seasoning
- Add 1 tbsp dried rosemary to the flour
- Finish with fresh chopped parsley
🧄 Garlic Lover’s Version:
- Triple the garlic powder
- Add 4 minced garlic cloves to the brine
- Mix garlic salt with regular salt for finishing
🍯 Sweet & Spicy Version:
- Add 2 tbsp brown sugar to the flour
- Drizzle with honey right after frying
- Sprinkle with red pepper flakes
Cooking Method Alternatives
| Method | Temp | Time | Result |
|---|---|---|---|
| Deep fry (this recipe) | 325-350°F | 12-18 min | Crispiest, most authentic ⭐⭐⭐⭐⭐ |
| Air fryer | 375°F | 20-25 min | Very crispy, healthier ⭐⭐⭐⭐ |
| Oven baked | 425°F | 35-45 min | Crispy outside, less oil ⭐⭐⭐ |
| Pan fried | Medium-high | 15-20 min per side | Good if you don’t have deep pot ⭐⭐⭐ |
Make-Ahead Tips
What You Can Prep in Advance:
| Task | How Far Ahead | Storage |
|---|---|---|
| Mix dry coating | 3 days | Airtight container, room temp |
| Brine chicken | Up to 24 hours | Covered bowl in fridge |
| Coat chicken | 4 hours | Wire rack in fridge |
| Fully cook chicken | 3 days | Airtight container in fridge |
💡 Meal Prep Tip: I often coat 2-3 batches of chicken on Sunday and keep them in the fridge. Then I can fry fresh chicken any night of the week in just 20 minutes.
Reheating for Maximum Crisp:
- Preheat oven to 375°F
- Place chicken on wire rack over baking sheet
- Heat for 15-20 minutes
- Check that internal temp reaches 165°F
Don’t microwave unless you want sad, soggy chicken.
Leftovers and Storage
Short-Term Storage (1-4 Days)
Do this:
- Let chicken cool completely
- Store in airtight container
- Keep in fridge for up to 4 days
- Reheat in oven on wire rack at 375°F for 15-20 min
Don’t do this:
- Store while still hot (creates condensation = soggy coating)
- Pile pieces on top of each other (bottom pieces get mushy)
- Use plastic wrap directly on chicken (traps moisture)
Long-Term Storage (Up to 3 Months)
Freezing Process:
| Step | How To |
|---|---|
| 1. Cool | Let chicken reach room temp |
| 2. Wrap | Wrap each piece individually in plastic wrap |
| 3. Bag | Place all wrapped pieces in freezer bag |
| 4. Label | Write date on bag |
| 5. Freeze | Store up to 3 months |
Reheating from Frozen:
- Thaw overnight in fridge
- Reheat in 375°F oven for 20-25 minutes
- Or go straight from freezer (add 10 extra minutes)
The Cold Chicken Life 🧊
Here’s a controversial take: cold fried chicken straight from the fridge is actually incredible.
Some people (including me) prefer it this way for:
- Picnics
- Road trips
- Lunch the next day
- Late-night snacks
The coating firms up in the cold and gets this different kind of crispy that’s just as good as hot.
Nutritional Information
Per Serving (1 piece, approximately 4 oz):
| Nutrient | Amount | % Daily Value* |
|---|---|---|
| Calories | 420 | 21% |
| Total Fat | 24g | 31% |
| Saturated Fat | 4g | 20% |
| Cholesterol | 95mg | 32% |
| Sodium | 680mg | 30% |
| Total Carbs | 18g | 7% |
| Dietary Fiber | 1g | 4% |
| Sugars | 2g | – |
| Protein | 32g | 64% |
*Based on a 2,000 calorie diet
📊 Keep in Mind: These numbers vary based on chicken piece size and how much oil is absorbed during frying. Dark meat has more calories than white meat.
Healthier Modifications:
- Use an air fryer (saves about 150 calories per piece)
- Remove skin before brining (saves about 80 calories)
- Use boneless skinless chicken breast (lowest calorie option)
- Serve with lighter sides like salad instead of mashed potatoes
What to Serve With This
Classic Soul Food Pairings 🍽️
| Main Side | Supporting Cast | Beverage |
|---|---|---|
| Mashed potatoes & gravy | Buttermilk biscuits | Sweet tea |
| Mac and cheese | Collard greens | Lemonade |
| Coleslaw | Cornbread | Iced tea |
| Potato salad | Baked beans | Sweet iced tea |
Lighter Summer Sides ☀️
Perfect for picnics and outdoor eating:
- Watermelon slices (the sweet/savory combo is perfect)
- Cucumber tomato salad with vinaigrette
- Grilled corn on the cob
- Simple green salad with ranch
- Pasta salad with veggies
The Sauce Situation
Top 5 Dipping Sauces:
- Honey – Classic Southern pairing 🍯
- Hot sauce – Frank’s or Louisiana style
- Ranch dressing – Creamy and cooling
- Comeback sauce – Spicy mayo-based (SO good)
- Honey mustard – Sweet and tangy
🔥 My Go-To Combo: I mix equal parts honey and hot sauce for a sweet-spicy drizzle that’s absolutely addictive.
Frequently Asked Questions
Why is my coating falling off?
Common causes:
| Problem | Solution |
|---|---|
| Skipped resting time | Let coated chicken sit 15-20 min before frying |
| Oil too cool | Heat to 350°F before adding chicken |
| Chicken too wet | Pat dry before first flour dredge |
| Didn’t press flour in | Really press and pack that coating on |
Can I use a different type of oil?
Oil Comparison Chart:
| Oil Type | Smoke Point | Best For | Cost |
|---|---|---|---|
| Peanut | 450°F | Perfect for frying ⭐ | $$$ |
| Vegetable | 400°F | Great all-purpose | $ |
| Canola | 400°F | Good budget option | $ |
| Avocado | 520°F | Healthier choice | $$$$ |
| Olive | 375°F | ❌ Too low for frying | $$ |
How do I know when the chicken is done?
The Temperature Test (Most Accurate):
- White meat: 165°F internal temp
- Dark meat: 175°F internal temp
- Always test the thickest part without touching bone
Visual Cues:
- Deep golden brown coating all over
- Juices run clear when pierced
- Meat pulls away from bone slightly
⚠️ Don’t Rely On: Color alone, cooking time alone, or “it looks done.” Always use a thermometer for food safety.
My chicken is burning outside but raw inside. Help!
Your oil is too hot. Here’s the fix:
Problem: Oil at 375°F+ = burnt coating, raw center
Solution: Lower temp to 325-330°F and cook longer
Prevention Tips:
- Use a thermometer (don’t guess)
- Adjust heat between batches
- Let oil recover to temp before adding more chicken
- Start with smaller pieces to practice
Can I reuse the frying oil?
Yes, but follow these rules:
| Reuse # | Oil Quality | What To Do |
|---|---|---|
| 1st use | Fresh and clean | Use for frying |
| 2nd use | Slightly darker | Strain well before using |
| 3rd use | Getting dark | Strain, smell test first |
| 4th+ use | ❌ Too degraded | Discard safely |
How to store used oil:
- Let cool completely (never hot oil!)
- Strain through fine mesh strainer or cheesecloth
- Store in airtight container in cool, dark place
- Smell before each use – if it smells off, toss it
What’s the cornstarch for?
The Cornstarch Secret:
Without cornstarch:
- Good crispy coating
- Traditional fried chicken texture
- Standard crunch ⭐⭐⭐
With cornstarch:
- Extra crispy coating
- Lighter, crunchier texture
- Next-level crunch ⭐⭐⭐⭐⭐
It absorbs moisture better than flour alone, which means a crispier crust that stays crispy longer.
Can I make this with chicken tenders?
Absolutely! Just adjust the timing.
Chicken Tender Modifications:
| What Changes | Original | For Tenders |
|---|---|---|
| Brining time | 4-24 hours | 2-4 hours is plenty |
| Frying time | 12-18 min | 6-8 min |
| Oil temp | 325-350°F | Same |
| Internal temp | 165°F | 165°F |
Tenders are perfect for:
- Kids who want smaller pieces
- Faster cooking when you’re in a rush
- Making chicken sandwiches
- Meal prep (they reheat great)
Why do I need to brine the chicken?
Brined vs. Not Brined:
| Aspect | Without Brine | With Buttermilk Brine |
|---|---|---|
| Tenderness | Okay, can be dry | Incredibly juicy ✨ |
| Flavor depth | Surface only | All the way through |
| Moisture retention | Loses moisture when cooked | Stays moist even if slightly overcooked |
| Overall taste | Good | Amazing 🔥 |
The buttermilk acid breaks down proteins, making the meat tender. Plus, all those spices penetrate deep into the chicken, not just the coating.
Can I bake this instead of frying?
You can, but it won’t be quite the same.
Baking Instructions:
- Preheat oven to 425°F
- Place coated chicken on wire rack over baking sheet
- Spray chicken lightly with cooking spray
- Bake 35-45 minutes, flipping once
- Finish under broiler for 2-3 min for extra crisp
Honest comparison:
- Fried: Super crispy, rich flavor, authentic texture ⭐⭐⭐⭐⭐
- Baked: Crispy outside, less oil, easier cleanup ⭐⭐⭐⭐
Both are delicious. Frying is just more authentic Southern fried chicken.
Wrapping Up
There’s something about making fried chicken from scratch that just feels right.
Maybe it’s the smell that fills your kitchen. Maybe it’s knowing exactly what went into it.
Or maybe it’s just how much better it tastes than anything you can buy.
This recipe is worth every minute. The crispy coating, the juicy meat, the way it stays good even when it’s cold – this is fried chicken done right.
So grab your chicken, fire up that stove, and get ready to make something seriously delicious.
Once you’ve tried it, come back and drop a comment. I want to hear how it turned out for you, what you served it with, and if you made any tweaks to the recipe.
And if you’ve got questions, ask away. I’m here to help you make the fried chicken of your life 🍗


I just made this using huge drumsticks. I had my oil at 350 but it climbed to almost 360 then dropped to 320 if I put three pieces in. First time, outside was darker than I like but will definitely try again. Maybe with regular sized chicken pieces and not trex size
I just made this using huge drumsticks. I had my oil at 350 but it climbed to almost 360 then dropped to 320 if I put three pieces in. First time, outside was darker than I like but will definitely try again. Maybe with regular sized chicken pieces and not trex size