
Ever take a bite of something and think, “Where has this been all my life?”
That’s honey butter chicken.
Crispy. Juicy. Dripping with a sweet-savory sauce that’ll have you licking your fingers when no one’s looking.
The wild part? It takes 30 minutes. Less time than deciding what to order for dinner.
I made this during one of those 6 PM panic moments when everyone’s asking “what’s for dinner?” and the fridge looks sad. Now it’s the recipe I pull out when I want to look like I tried way harder than I did.
Here’s what makes it addictive:
The chicken gets this shattering golden crust. Then you bite through to tender, juicy meat. Then BAM—buttery sweetness with garlic and just enough heat to keep things interesting.
It’s comfort food that doesn’t sit like a brick in your stomach.
“This is restaurant-quality chicken that costs $8 to make at home.”
If you think chicken breast is boring, this recipe will change everything. No more dry, flavorless sadness. Just crispy, saucy perfection that’ll have people fighting over the last piece.
Let’s make it happen.
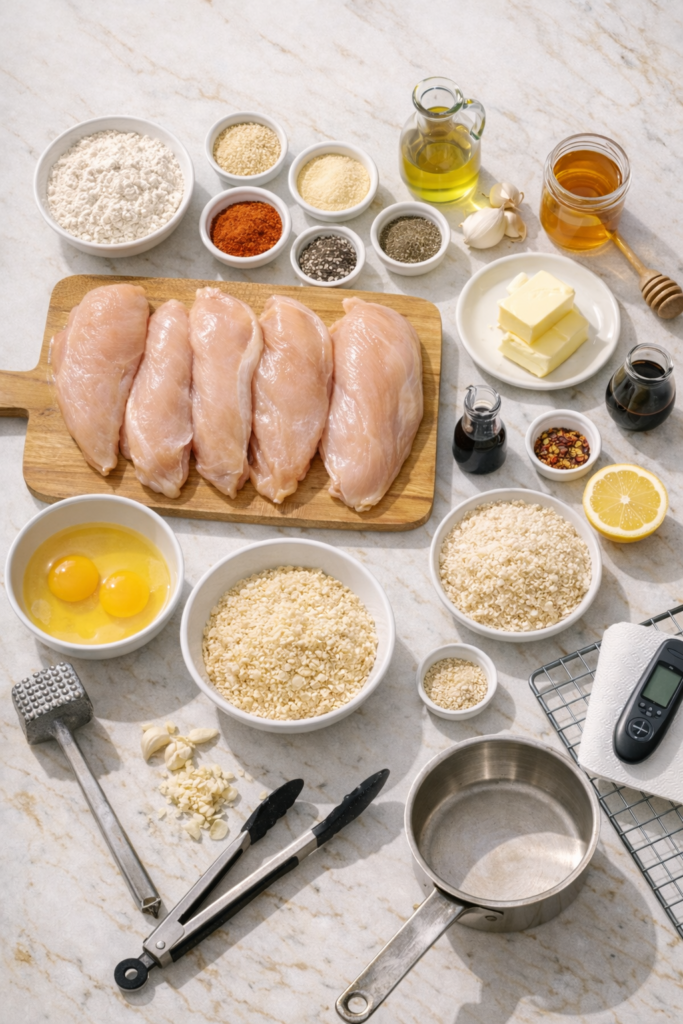
What You’ll Need
| Category | Ingredient | Amount | Notes |
|---|---|---|---|
| Chicken | Boneless, skinless chicken breasts | 1.5 lbs (3 medium) | Slice into strips |
| Coating | All-purpose flour | 1 cup | For first layer |
| Large eggs | 2 | Beaten smooth | |
| Panko breadcrumbs | 1 cup | Creates extra crunch | |
| Garlic powder | 1 tsp | ||
| Onion powder | 1 tsp | ||
| Smoked paprika | 1 tsp | Adds color + flavor | |
| Salt | 1/2 tsp | ||
| Black pepper | 1/2 tsp | ||
| Frying | Vegetable oil | 1/2 cup | For pan frying |
| Sauce | Unsalted butter | 4 tbsp | Can use salted, reduce salt |
| Honey | 1/3 cup | The star ingredient ✨ | |
| Fresh garlic | 2 cloves, minced | Don’t skip this | |
| Soy sauce | 1 tbsp | Adds umami depth | |
| Red pepper flakes | 1/2 tsp | Optional but recommended | |
| Fresh lemon juice | 1 tbsp | Cuts the sweetness | |
| Garnish | Fresh parsley | 2 tbsp, chopped | Makes it look fancy |
| Sesame seeds | Optional | Extra texture |
Pro Tips
🔨 Pound Your Chicken to Even Thickness
This isn’t just chef talk.
Thick chicken on one end, thin on the other = dry edges and raw centers. Not cute.
Use a meat mallet or rolling pin to get everything to 1/2 inch thick. Your chicken will cook evenly, and you won’t be playing the “is this done?” guessing game.
Pro move: Place chicken between plastic wrap before pounding. Prevents raw chicken from flying everywhere. Trust me on this.
🍞 Double Coating = Restaurant-Level Crunch
After your first egg and breadcrumb dip, do it again.
I know it seems extra. It is. That’s the point.
That second layer creates a crispy shell that stays crunchy even after you drown it in sauce. Single coating gets soggy. Double coating stays perfect.
⏰ Rest Before Saucing (This Is Critical)
Pull the chicken out of the pan. Set it on a wire rack for 2-3 minutes.
Don’t skip this.
I know you’re hungry. I know the sauce is ready. But if you sauce it immediately, steam gets trapped and your crispy coating turns limp.
Two minutes of patience = crispy heaven instead of soggy sadness.
🌡️ Use a Meat Thermometer (Seriously)
Stop cutting into your chicken 47 times to check if it’s done.
165°F = perfectly cooked.
One quick poke with a thermometer and you know. No guessing. No dry chicken. No undercooked surprises.
I bought a $12 instant-read thermometer and it changed my chicken game forever.
🍯 Make Double the Sauce
You’re going to want extra.
For drizzling on rice. For dipping leftover chicken. For putting on vegetables. For, you know, drinking straight from the pan at midnight. (No judgment.)
The recipe makes enough, but barely. Double it and thank me later.
Tools You’ll Need
People also like : butter chicken indisch
The Essentials:
- ✅ Large skillet or frying pan
- ✅ 3 shallow bowls (for your breading station)
- ✅ Meat mallet or rolling pin
- ✅ Tongs (don’t use your hands, please)
- ✅ Wire cooling rack
- ✅ Small saucepan
- ✅ Meat thermometer
Nice to Have:
- Paper towels (lots of them)
- Cutting board
- Plastic wrap (for pounding chicken)
- Measuring cups and spoons
Don’t have a wire rack? Use a plate lined with paper towels. It’s not ideal (bottom gets a bit soggy), but it works in a pinch.
Substitutions and Variations
| Instead of… | Try this… | What changes |
|---|---|---|
| Chicken breasts | Chicken thighs | More flavor, harder to overcook, slightly longer cook time |
| Panko breadcrumbs | Regular breadcrumbs | Less crispy but still good |
| Crushed cornflakes | Extra crunchy, slightly sweet | |
| Crushed Rice Krispies | Super light and crispy | |
| Butter | Vegan butter | Same recipe, dairy-free |
| Coconut oil | Adds subtle sweetness | |
| Honey | Maple syrup | Different flavor profile, still delicious |
| Agave nectar | Less sweet, thinner consistency | |
| All-purpose flour | Gluten-free flour | Works exactly the same |
🌶️ Want It Spicier?
Add to the sauce:
- More red pepper flakes (start with 1 tsp)
- Sriracha (1-2 tbsp for real heat)
- Cayenne to the flour mixture (1/4 tsp)
- Fresh ginger with the garlic (adds warmth)
🍗 Different Proteins?
This sauce works on:
- Pork chops (same cooking method)
- Shrimp (cook 2-3 minutes per side)
- Tofu (press it first, then bread and fry)
- Salmon (skip the breading, just pan-sear and sauce)
Make Ahead Tips
4 Hours Before:
Bread the chicken and refrigerate.
Place breaded pieces on a plate, cover with plastic wrap, pop in the fridge. When you’re ready to cook, they go straight from fridge to pan. Easy.
1 Day Before:
Make the sauce and store it in the fridge.
Reheat gently on the stove when you’re ready to use it. Don’t microwave—it can separate and get weird.
Up to 1 Month Before:
Freeze the breaded (uncooked) chicken.
Lay pieces flat on a baking sheet, freeze until solid, then transfer to a freezer bag. Fry from frozen, just add 3-4 extra minutes to the cook time.
Meal prep hack: Make a triple batch on Sunday. Freeze in portions. Pull out and fry whenever you need dinner fast. You’re welcome.
You’ll love these too : lemon butter chicken
How to Make Honey Butter Chicken
Step 1: Prep Your Chicken (5 minutes)
Pat chicken breasts dry with paper towels.
Any moisture = breading slides off. Nobody wants naked chicken.
Place each breast between two sheets of plastic wrap. Pound to an even 1/2-inch thickness.
Cut each breast into 3-4 strips. Keep them roughly the same size.
Why cut into strips? Cooks faster, more surface area for crispy coating, easier to eat. Win-win-win.
Step 2: Set Up Your Breading Station (3 minutes)
Grab three shallow bowls. Line them up like an assembly line.
Bowl 1: Flour + all the spices
- 1 cup flour
- 1 tsp garlic powder
- 1 tsp onion powder
- 1 tsp smoked paprika
- 1/2 tsp salt
- 1/2 tsp pepper
Whisk it together.
Bowl 2: Beaten eggs
- 2 eggs
- Beat until smooth
Bowl 3: Panko breadcrumbs
- 1 cup panko
- Just pour it in
Your station is ready. Now the fun part.
Step 3: Bread the Chicken (5 minutes)
This is where the magic happens.
For each chicken strip:
1️⃣ Dredge in flour mixture. Coat completely. Shake off excess.
2️⃣ Dip in beaten eggs. Make sure every spot is covered.
3️⃣ Press into panko breadcrumbs. Really press down so they stick.
4️⃣ Do it again. Back in the egg, back in the breadcrumbs. Double coating = double crunch.
5️⃣ Set on a clean plate.
Repeat until all strips are breaded.
Your hands will get messy. Use one hand for wet ingredients, one for dry. Keeps the chaos manageable.
Step 4: Fry the Chicken (12-15 minutes)
Heat 1/2 cup vegetable oil in a large skillet over medium-high heat.
Oil temp test: Drop in a breadcrumb. If it sizzles immediately, you’re ready. If it just sits there, wait longer. If it’s smoking, turn down the heat.
Place 3-4 chicken strips in the pan. Don’t overcrowd. They need space to crisp up.
First side: 3-4 minutes. Don’t touch them. Let that crust develop.
Flip. Cook another 3-4 minutes.
Temp check: Stick your thermometer in the thickest part. 165°F = done.
Transfer to a wire rack. The bottom stays crispy this way.
Repeat with remaining chicken.
| Common Frying Mistakes | The Fix |
|---|---|
| Chicken burning on outside, raw inside | Oil too hot. Lower heat to medium. |
| Breading falling off | Chicken was wet OR didn’t press breadcrumbs in enough |
| Not crispy enough | Oil not hot enough OR overcrowded the pan |
| Sticking to pan | Not enough oil OR moved chicken too soon |
Step 5: Make the Honey Butter Sauce (5 minutes)
While chicken rests, melt 4 tbsp butter in a small saucepan over medium heat.
Add minced garlic. Cook 30 seconds until fragrant.
Don’t burn the garlic. It goes from perfect to bitter in 10 seconds. Watch it.
Stir in:
- 1/3 cup honey
- 1 tbsp soy sauce
- 1/2 tsp red pepper flakes
- 1 tbsp lemon juice
Simmer 2-3 minutes, stirring occasionally. It’ll thicken slightly.
Remove from heat.
The sauce should coat the back of a spoon. If it’s too thick, add a splash of water.
Recommended for you : indian butter chicken
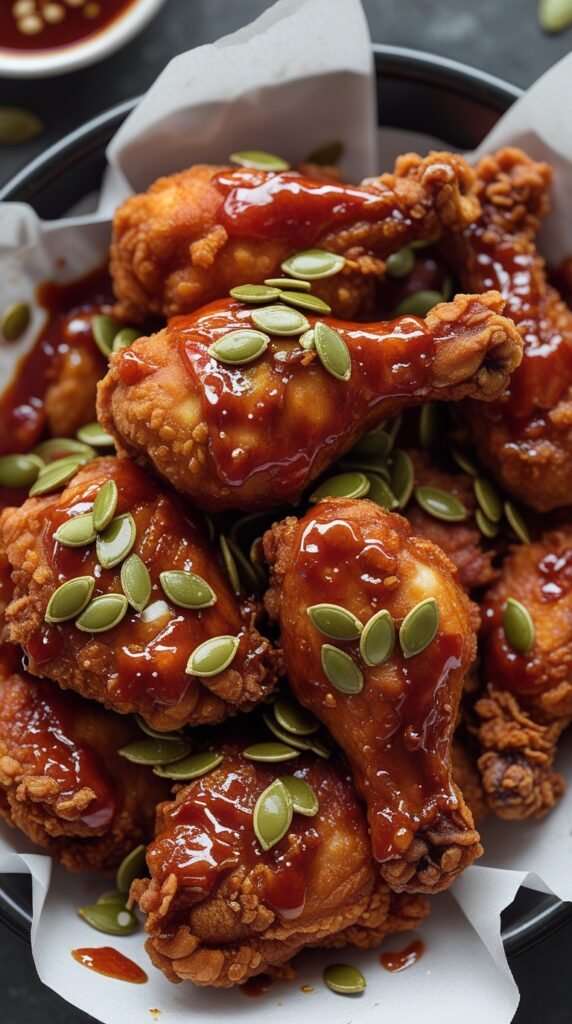
Step 6: Toss and Serve (2 minutes)
Put your crispy chicken strips in a large bowl.
Pour that warm, golden, gorgeous sauce over them.
Toss gently. You want every piece coated but not drowning.
Transfer to a serving plate.
Sprinkle with fresh parsley and sesame seeds.
Serve immediately while it’s hot and crispy.
Total time: About 30 minutes from start to finish.
“I’ve made this 6 times in two weeks. My family thinks I’m a cooking genius now.” – Every person who’s tried this recipe
What to Serve With Honey Butter Chicken
| Side Dish | Why It Works |
|---|---|
| Steamed jasmine rice | Soaks up all that extra sauce. Pure heaven. |
| Fried rice | Adds texture, makes it a complete meal |
| Roasted broccoli | The charred edges + sweet sauce = chef’s kiss |
| Green beans | Light, crispy, balances the richness |
| Cucumber salad | Rice vinegar adds refreshing contrast |
| Mashed potatoes | Full comfort mode activated |
| Asian slaw | Crunchy, tangy, perfect pairing |
My go-to combo: Jasmine rice + cucumber salad + roasted Brussels sprouts. The crunch from the sprouts, the freshness from the cucumbers, and rice to soak everything up. Perfection.
Leftovers and Storage
In the fridge: Up to 3 days in an airtight container.
The reheating truth: Microwaves make it soggy. Just don’t.
Best Reheating Methods:
Option 1: Oven
375°F for 10 minutes. Not as crispy as fresh, but way better than nuked.
Option 2: Air Fryer (Winner!)
350°F for 5-6 minutes. Gets it closest to fresh-fried crispy.
Option 3: Stovetop
Quick sear in a hot pan, 2 minutes per side. Add a tiny bit of oil.
Store extra sauce separately. Warm it up before drizzling over reheated chicken.
Real talk: I’ve eaten this cold straight from the fridge at midnight and it was still good. Not as good as fresh, but good enough that I didn’t heat it up.
Frequently Asked Questions
Can I bake this instead of frying it?
You can, but it won’t be quite as crispy.
Preheat oven to 425°F. Place breaded chicken on a wire rack over a baking sheet. Spray with cooking spray. Bake 20-25 minutes, flipping halfway through.
It’ll be healthier and less messy. Just not as addictively crunchy.
Why is my breading falling off?
Two main reasons:
- Chicken was too wet when you started. Pat it DRY with paper towels first.
- You didn’t press the breadcrumbs in firmly enough. Really push them in there.
Can I use chicken tenderloins?
Absolutely! They’re already the perfect size and thickness.
Just reduce cooking time to 2-3 minutes per side since they’re smaller.
Is there a way to make this less sweet?
Cut the honey down to 1/4 cup. Add a bit more soy sauce to balance it out.
You can also add a splash of rice vinegar for some tang.
Can I make this in an air fryer?
Yes! Spray breaded chicken with cooking spray.
Air fry at 400°F for 10-12 minutes, flipping halfway through.
The coating will be crispy and you’ll use way less oil. Win-win.
What if I don’t have panko breadcrumbs?
Regular breadcrumbs work fine, just not as crunchy.
You can also use crushed cornflakes (amazing crispy texture) or crushed crackers.
How do I know when the oil is hot enough?
Drop a breadcrumb into the oil.
If it sizzles immediately = perfect.
If it just sits there = wait longer.
If it’s smoking = too hot, turn down the heat.
Can I use bone-in chicken?
The recipe works best with boneless. Bone-in takes way longer to cook and might burn the coating before the meat is done.
Stick with boneless for this one.
Why does my chicken taste bland?
You probably under-seasoned the flour mixture.
Don’t be shy with the spices. Taste the flour mixture before you start breading. It should taste well-seasoned on its own.
Also, make sure you’re using enough sauce. Coat every piece generously.
Nutrition Facts (Per Serving)
Based on 4 servings
| Nutrient | Amount |
|---|---|
| Calories | 420 |
| Protein | 38g |
| Carbohydrates | 32g |
| Fat | 16g |
| Fiber | 1g |
| Sugar | 18g |
| Sodium | 540mg |
Note: These are estimates. Actual nutrition will vary based on exact ingredients used and portion sizes.
Wrapping Up
Honey butter chicken is one of those recipes you’ll make over and over because it’s just that good and just that easy.
Perfect for busy weeknights when you want something better than takeout.
Great for meal prep.
Impressive enough to serve to guests without spending hours in the kitchen.
The crispy coating. The sticky-sweet sauce. The juicy chicken. Everything about this dish just works.
So grab your ingredients and give it a try.
Your taste buds will thank you. Your family will ask you to make it again. And you’ll wonder why you ever ordered fried chicken when you can make something this good at home.
Drop a comment below and let me know how it turned out. Did you make any swaps? Add extra spice? Serve it with something amazing I haven’t thought of?
I want to hear all about it. 💛


1 thought on “Honey Butter Chicken That’ll Make You Rethink Weeknight Dinners”