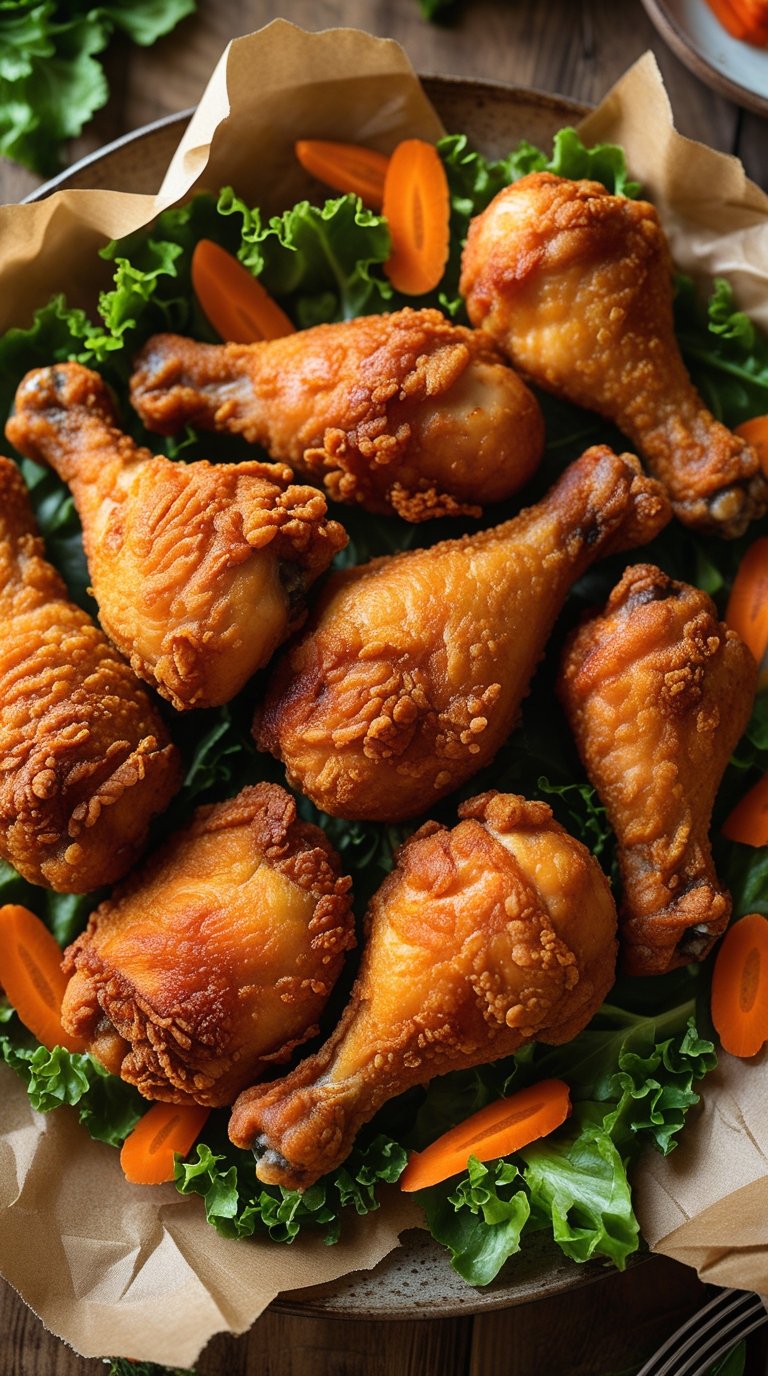
Can you really recreate that craveable KFC crunch in your own kitchen?
I’m here to tell you: yes, you absolutely can.
And once you taste this homemade version, you might never look at the drive-through the same way again.
The secret isn’t just about throwing some chicken in hot oil and calling it a day.
It’s about the brine, the spice blend, and the double-dip technique that gives you that insane crunchy coating that stays crispy for hours.
I’ve tested this recipe about fifteen times (my family wasn’t complaining) and I’ve finally cracked the code.
The chicken is juicy, the coating is shatteringly crisp, and the flavor is spot-on.
Let me show you how to make it.
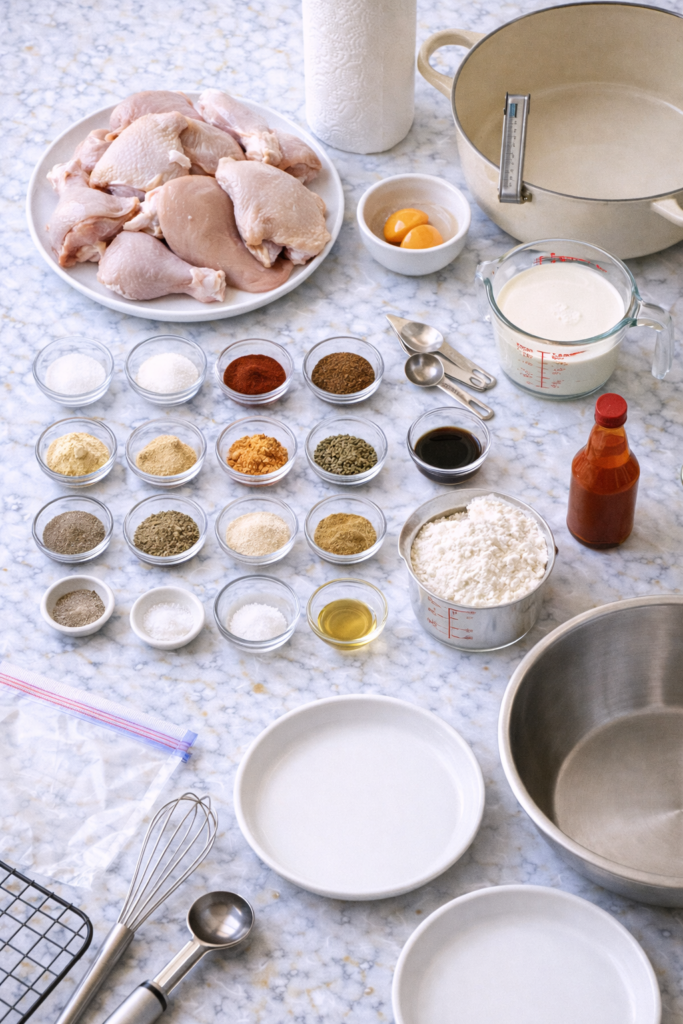
What You’ll Need
For the Brine:
- 8 cups cold water
- ½ cup kosher salt
- ¼ cup granulated sugar
- 2 tablespoons paprika
- 1 tablespoon garlic powder
- 1 tablespoon onion powder
For the Chicken:
- 3-4 pounds chicken pieces (drumsticks, thighs, breasts, wings)
For the Coating:
- 2 cups all-purpose flour
- 2 tablespoons paprika
- 2 tablespoons garlic powder
- 2 tablespoons onion powder
- 1 tablespoon dried oregano
- 1 tablespoon dried basil
- 1 tablespoon ground white pepper
- 1 tablespoon ground black pepper
- 1 tablespoon celery salt
- 1 tablespoon ground ginger
- 1 tablespoon dry mustard powder
- 2 teaspoons dried thyme
- 1 teaspoon cayenne pepper (optional, for heat)
For the Wet Dip:
- 2 cups buttermilk
- 2 large eggs
- 1 tablespoon hot sauce
For Frying:
- Vegetable oil or peanut oil (enough to fill your pot 3-4 inches deep)
Tools You’ll Need
You may also like : korean fried chicken
| Tool | Why You Need It |
|---|---|
| Large mixing bowl | For brining the chicken |
| Dutch oven or large pot | For deep frying |
| Candy/deep-fry thermometer | To maintain perfect oil temperature (325-350°F) |
| Wire cooling rack + baking sheet | Keeps fried chicken crispy, not soggy |
| Tongs | For safely flipping and removing chicken |
| Two shallow bowls | Your breading station |
| Gallon zip-top bag | For mixing and storing the flour blend |
| Whisk | For combining wet ingredients |
Pro Tips
🔥 Brine overnight if you can.
The longer your chicken sits in that seasoned brine, the juicier and more flavorful it’ll be.
I’ve done as little as 2 hours and as long as 24 hours. The 24-hour version wins every time.
🌡️ Keep your oil temperature steady.
This is the difference between soggy, greasy chicken and perfectly crispy skin.
Your oil should stay between 325-350°F. When you add the chicken, the temp will drop, so bump the heat up slightly and let it recover before adding more pieces.
💦 Don’t skip the double-dip.
Dipping your chicken in the buttermilk mixture twice creates those crazy craggy bits that get extra crispy.
It’s what makes this taste like the real deal.
⏱️ Let the coated chicken rest.
After you’ve breaded all your pieces, let them sit for 10-15 minutes before frying.
This helps the coating stick better and creates an even crispier crust.
👥 Fry in batches.
I know it’s tempting to throw everything in at once, but overcrowding drops the oil temperature and you’ll end up with sad, soggy chicken.
Give each piece room to breathe.
The Secret Spice Breakdown
Ever wonder what makes KFC taste like KFC? It’s all in the spice ratio.
| Spice | What It Does |
|---|---|
| Paprika | Adds color and mild sweetness |
| Garlic powder | Savory depth that hits in the back |
| Onion powder | Rounds out the savory notes |
| White pepper | Sharp heat without visible black specks |
| Black pepper | Classic peppery kick |
| Oregano & Basil | Herby freshness that balances the richness |
| Celery salt | That subtle “something” you can’t quite place |
| Ginger | Warm, slightly spicy undertone |
| Dry mustard | Tangy bite that cuts through the fat |
| Thyme | Earthy, aromatic layer |
| Cayenne | Optional heat (but I always add it) |
Each one plays a role. Skip one and you’ll notice.
You’ll love these too : Fried chicken tenders
How to Make KFC Fried Chicken

Step 1: Brine the Chicken
Mix your water, salt, sugar, and spices in a large bowl until the salt and sugar dissolve completely.
Add your chicken pieces and make sure they’re fully submerged.
Cover and refrigerate for at least 2 hours, but overnight is even better.
This step is what keeps your chicken ridiculously juicy even after frying.
Quick Tip: Use a gallon zip-top bag for brining if you don’t have a big enough bowl. It saves fridge space and ensures even coverage.
Step 2: Make the Coating
While your chicken is brining, mix all your coating ingredients in a gallon-size zip-top bag.
Shake it up until everything’s combined.
The spice blend might seem over the top, but trust me on this. Every single spice plays a role in getting that signature flavor.
Step 3: Prep the Wet Mixture
Whisk together the buttermilk, eggs, and hot sauce in a shallow bowl.
The buttermilk tenderizes the chicken even more and helps create that thick, craggy coating we’re after.
Step 4: Set Up Your Breading Station
This is where things get messy (in the best way).
Drain your chicken and pat it dry with paper towels.
Set up your station with the buttermilk mixture in one bowl and pour about a third of your flour mixture into another shallow bowl.
Keep the rest of the flour mixture in the bag for round two.
Step 5: First Dip
Take a piece of chicken and dip it in the buttermilk mixture, making sure it’s completely coated.
Let the excess drip off, then drop it into the flour mixture.
Press the flour into the chicken on all sides until it’s completely covered.
Shake off the excess and set it on a plate.
Step 6: Second Dip (This Is Key)
Here’s the secret: dip that floured chicken back into the buttermilk mixture again.
Then dredge it through fresh flour mixture from your zip-top bag.
Really press it in and make sure you’re getting all those nooks and crannies covered.
This double-dip creates those signature crunchy bits that make KFC so addictive.
Step 7: Rest the Chicken
Let all your breaded pieces sit on a wire rack for 10-15 minutes.
I know you want to fry immediately, but this resting time lets the coating set up and stick to the chicken better.
It’s worth the wait.
Step 8: Heat the Oil
Fill your Dutch oven or large pot with about 3-4 inches of oil.
Heat it to 325-350°F.
Use a thermometer for this. Seriously.
Guessing the temperature is how you end up with burnt-outside-raw-inside chicken.
Recommended for you : fried chicken recipe
Step 9: Fry the Chicken
Carefully lower 3-4 pieces of chicken into the hot oil (don’t overcrowd).
| Chicken Piece | Frying Time | Internal Temp |
|---|---|---|
| Wings | 12-14 minutes | 165°F |
| Drumsticks | 13-15 minutes | 165°F |
| Thighs | 15-17 minutes | 165°F |
| Breasts | 16-18 minutes | 165°F |
The chicken is done when it’s deep golden brown and reaches an internal temperature of 165°F.
Step 10: Drain and Serve
Transfer the fried chicken to a wire rack set over a baking sheet.
Let it rest for 5 minutes before serving.
This lets the juices redistribute and keeps the coating crispy instead of soggy.
Substitutions and Variations
Don’t Have Buttermilk?
Mix 2 cups of whole milk with 2 tablespoons of lemon juice or white vinegar.
Let it sit for 5 minutes and you’ve got a buttermilk substitute.
Want More Heat? 🌶️
Add an extra teaspoon of cayenne pepper to the flour mixture for a spicier version.
Or mix in some chipotle powder for a smoky kick.
Air Fryer Version
Spray your breaded chicken with cooking oil and air fry at 375°F for 20-25 minutes, flipping halfway through.
It won’t be quite as crispy as deep-fried, but it’s still really good.
Gluten-Free Option
Swap the all-purpose flour for a gluten-free flour blend.
Rice flour also works great for extra crunch.
White Meat Only
If you’re a breast and wing person, go for it.
Just adjust your cooking time since white meat cooks faster than dark meat.
Make Ahead Tips
Brining: You can brine the chicken up to 24 hours in advance. In fact, I recommend it.
Breading: The breaded chicken can sit in the fridge for up to 4 hours before frying. Just let it come to room temperature for about 20 minutes before you start cooking.
Frying: I don’t recommend frying ahead and reheating. The coating just doesn’t stay as crispy.
Leftovers and Storage
Refrigerator: Store leftover fried chicken in an airtight container in the fridge for up to 3 days.
Reheating: Pop it in a 375°F oven for about 10-12 minutes to restore some of that crispiness. Don’t use the microwave unless you want sad, soggy chicken.
Freezer: You can freeze fried chicken for up to 3 months. Let it thaw in the fridge overnight, then reheat in the oven.
Nutritional Breakdown
| Nutrient | Per Serving (based on 8 servings) |
|---|---|
| Calories | 520 |
| Protein | 42g |
| Fat | 28g |
| Carbohydrates | 22g |
| Fiber | 1g |
| Sodium | 890mg |
Keep in mind this is an estimate and will vary based on which chicken pieces you use and how much coating sticks to each piece.
Perfect Pairings
This chicken pairs incredibly well with:
Classic Sides:
- Creamy coleslaw
- Mac and cheese
- Mashed potatoes and gravy
- Buttermilk biscuits
Lighter Options:
- Corn on the cob
- Green beans
- Garden salad
- Cucumber salad
Comfort Food Heaven:
- Potato salad
- Cornbread
- Collard greens
- Baked beans
For a true KFC experience, serve it with coleslaw, mashed potatoes, and biscuits.
It’s comfort food heaven.
Comparison: Homemade vs. Store-Bought
| Factor | Homemade | KFC |
|---|---|---|
| Cost | ~$12 for 8 pieces | ~$20 for 8 pieces |
| Freshness | Made to order | Can sit under heat lamps |
| Customization | Control spice level, cuts, everything | What you see is what you get |
| Time | ~3 hours (mostly passive) | 10 minutes drive-through |
| Crispiness | Stays crispy for hours | Gets soggy fast |
| Flavor Control | Adjust salt, spices, heat | One flavor option |
FAQ
Can I make this without a thermometer?
I really don’t recommend it.
Oil temperature is crucial for perfectly fried chicken. A good thermometer costs less than $15 and makes all the difference.
If you absolutely must wing it, drop a small piece of bread into the oil. If it browns in about 60 seconds, your oil is ready.
Why is my coating falling off?
This usually happens for one of three reasons:
- Your chicken was too wet when you started breading
- You didn’t let the coated chicken rest before frying
- Your oil wasn’t hot enough
Make sure to pat the chicken dry after brining, let it rest for 10-15 minutes after breading, and keep that oil temperature steady.
Can I bake this instead of frying?
You can, but it won’t taste quite the same.
If you want to bake it, place the breaded chicken on a wire rack over a baking sheet, spray it generously with cooking oil, and bake at 425°F for 35-45 minutes until golden and cooked through.
My chicken is burning on the outside but raw inside. What am I doing wrong?
Your oil is too hot.
Drop the temperature to 325°F and be patient. Lower and slower is better than high and fast when it comes to fried chicken.
How do I know when the chicken is done?
Use an instant-read thermometer. The internal temperature should reach 165°F in the thickest part of the meat.
If you don’t have a thermometer, the juices should run clear when you pierce the thickest part with a knife.
Can I use this recipe for chicken tenders?
Absolutely!
Just cut chicken breasts into strips and reduce the frying time to about 8-10 minutes.
What’s the best oil for frying?
| Oil Type | Smoke Point | Recommended? |
|---|---|---|
| Peanut oil | 450°F | ✅ Yes |
| Vegetable oil | 400-450°F | ✅ Yes |
| Canola oil | 400°F | ✅ Yes |
| Olive oil | 375°F | ❌ No (too low) |
| Coconut oil | 350°F | ❌ No (strong flavor) |
Peanut oil and vegetable oil both work great. They have high smoke points and neutral flavors.
Can I reuse the frying oil?
Yes, you can strain it through a fine-mesh sieve or cheesecloth, store it in an airtight container, and reuse it 2-3 times for frying.
Just make sure it doesn’t smell rancid before using it again.
Common Mistakes to Avoid
| Mistake | Why It’s a Problem | The Fix |
|---|---|---|
| Skipping the brine | Dry, flavorless chicken | Always brine for at least 2 hours |
| Wet chicken before breading | Coating slides right off | Pat completely dry with paper towels |
| Oil too hot | Burnt outside, raw inside | Keep steady at 325-350°F |
| Overcrowding the pot | Temperature drops, soggy coating | Fry in batches of 3-4 pieces |
| No resting time | Coating doesn’t adhere well | Rest 10-15 minutes after breading |
| Using a microwave to reheat | Soggy, sad chicken | Always reheat in the oven |
Wrapping Up
There’s nothing quite like biting into a piece of homemade fried chicken with that perfect crispy coating and juicy, flavorful meat inside.
This recipe takes a little time and effort, but every single bite is worth it.
The brine keeps everything moist, the spice blend gives you that familiar flavor, and the double-dip technique creates that signature crunch.
Make a batch this weekend and watch it disappear.
Have you tried making fried chicken at home before? Drop a comment below and let me know how this recipe turns out for you. I’d love to hear about any tweaks you make or what you serve alongside it!


1 thought on “How to Make KFC Fried Chicken at Home (It’s Ridiculously Good)”