Is your go-to Friday night order getting boring?
I get it. Sometimes you just want that sweet-savory, sticky, tender beef without leaving your couch.
But here’s the thing: making Mongolian beef at home is easier than you think, tastes way better than takeout, and you probably already have most of the ingredients.
I’m talking restaurant-quality beef that’s crispy on the outside, melt-in-your-mouth tender, and coated in the most addictive sauce you’ve ever tasted.
And it takes less time than waiting for delivery.
Let me show you how to make it.
What You’ll Need
For the Beef:
- 1 lb flank steak, sliced thin against the grain
- 1/4 cup cornstarch
- 2 tablespoons vegetable oil (or any neutral oil)
For the Sauce:
- 1/2 cup low-sodium soy sauce
- 1/2 cup water
- 1/2 cup packed brown sugar
- 1 teaspoon fresh ginger, minced (or 1/2 teaspoon ground ginger)
- 3 cloves garlic, minced
- 1/4 teaspoon red pepper flakes (adjust to taste)
For the Finish:
- 2 tablespoons vegetable oil
- 4-5 green onions, cut into 2-inch pieces
- Sesame seeds for garnish (optional)
To Serve:
- Steamed white rice or fried rice
Tools You’ll Need

You may also like : tatertot casserole recipe beef
| Tool | Why You Need It |
|---|---|
| Large skillet or wok | High heat searing for that crispy crust |
| Mixing bowl | Tossing beef with cornstarch |
| Sharp knife | Thin, even slices = tender beef |
| Cutting board | Safety first! |
| Measuring cups/spoons | Accurate sauce = perfect flavor |
| Tongs or spatula | Flipping without destroying that crust |
Pro Tips
1. Freeze your steak for 15-20 minutes before slicing.
This makes it so much easier to get those thin, even slices. The beef should be firm but not frozen solid.
Trust me, trying to slice room-temperature flank steak is like trying to cut jello with a butter knife.
2. Don’t skip the cornstarch coating.
This is what gives you that crispy exterior that soaks up all the sauce.
No cornstarch = soggy beef = sad dinner. 💔
3. Use high heat and work in batches.
Overcrowding the pan will steam your beef instead of searing it.
You want that caramelized crust, so give each piece room to breathe.
4. Slice against the grain.
Look at your steak and find the direction the muscle fibers are running. Cut perpendicular to those lines.
This breaks up the fibers and makes every bite super tender.
5. Taste your sauce before adding it to the beef.
Every soy sauce brand is different. If yours is super salty, cut back a bit and add more water.
You can always add more soy sauce, but you can’t take it out.
Substitutions and Variations
Protein Swaps
| Instead of Flank Steak | Use This | Notes |
|---|---|---|
| Sirloin | Great choice | A bit more tender, slightly pricier |
| Ribeye | Also works | More marbling = more flavor |
| Skirt steak | Perfect | Similar texture to flank |
| Chicken thighs | Different vibe | Slice thin, cook a bit longer |
Sauce Adjustments
Brown Sugar: Honey or maple syrup can work, but the sauce won’t be quite as thick. You might need to add a cornstarch slurry (1 teaspoon cornstarch mixed with 1 tablespoon water) to thicken it up.
Fresh Ginger: Ground ginger works, but fresh gives you that restaurant-quality flavor. If you’re using ground, use half the amount.
Spice Level:
- 🌶️ Mild: Skip red pepper flakes
- 🌶️🌶️ Medium: Use 1/4 teaspoon (as written)
- 🌶️🌶️🌶️ Spicy: Double to 1/2 teaspoon
- 🌶️🌶️🌶️🌶️ Fire: Add 1 tablespoon sriracha to sauce
Veggie Add-ins
Throw these in when you add the green onions:
- Bell peppers (any color)
- Snap peas
- Broccoli florets (small)
- Sliced mushrooms
- Baby bok choy
Make Ahead Tips
| What | When to Prep | Storage |
|---|---|---|
| Sliced beef | Night before | Airtight container, fridge |
| Mixed sauce | Up to 3 days ahead | Mason jar, fridge |
| Chopped green onions | Morning of | Plastic bag, fridge |
DON’T prep ahead: The cornstarch coating. Do this right before cooking or it’ll get gummy and weird.
Honestly, this dish is so quick that there’s not much reason to make it ahead.
But if you’re meal prepping, you can cook the whole thing and reheat it. Just know that the beef won’t be quite as crispy the second time around.
You’ll love these too : ground beef recipe
How to Make Mongolian Beef

Step 1: Prep Your Beef
Slice your flank steak against the grain into thin strips, about 1/4 inch thick.
If you froze it for 15 minutes like I suggested, this should be super easy.
Put the beef strips in a bowl and toss them with the cornstarch until every piece is coated. Shake off any excess.
Quick Check: Your beef should look like it’s wearing a light, powdery jacket. Not clumpy, not bare.
Step 2: Make the Sauce
While your beef is getting coated, whisk together the soy sauce, water, brown sugar, minced ginger, garlic, and red pepper flakes in a bowl.
Give it a taste. Too salty? Add a splash more water. Want it sweeter? Add another tablespoon of brown sugar.
Step 3: Sear the Beef
Heat 2 tablespoons of oil in a large skillet or wok over medium-high heat.
You want it hot. Like, shimmering hot.
Working in batches (don’t crowd the pan), add the beef in a single layer. Let it sit for about 1-2 minutes without moving it so it gets that nice crust.
Flip and cook for another minute until crispy and browned on both sides.
The beef doesn’t need to be fully cooked through yet since it’ll finish cooking in the sauce.
Transfer to a plate and repeat with the remaining beef.
Pro Move: Resist the urge to poke and flip constantly. Let it sit and develop that gorgeous brown crust.
Step 4: Cook the Sauce
Turn the heat down to medium. Add another tablespoon or two of oil if your pan looks dry.
Toss in your green onions and stir-fry for about 30 seconds until they’re bright green and fragrant.
Pour in your sauce and bring it to a simmer. Let it bubble for 2-3 minutes until it thickens up and gets glossy.
Step 5: Bring It All Together
Add the beef back to the pan and toss everything together until the beef is fully coated in that gorgeous sauce.
Cook for another minute or two, just until the beef is cooked through and the sauce clings to every piece.
Recommended for you : corn beef and cabbage recipe
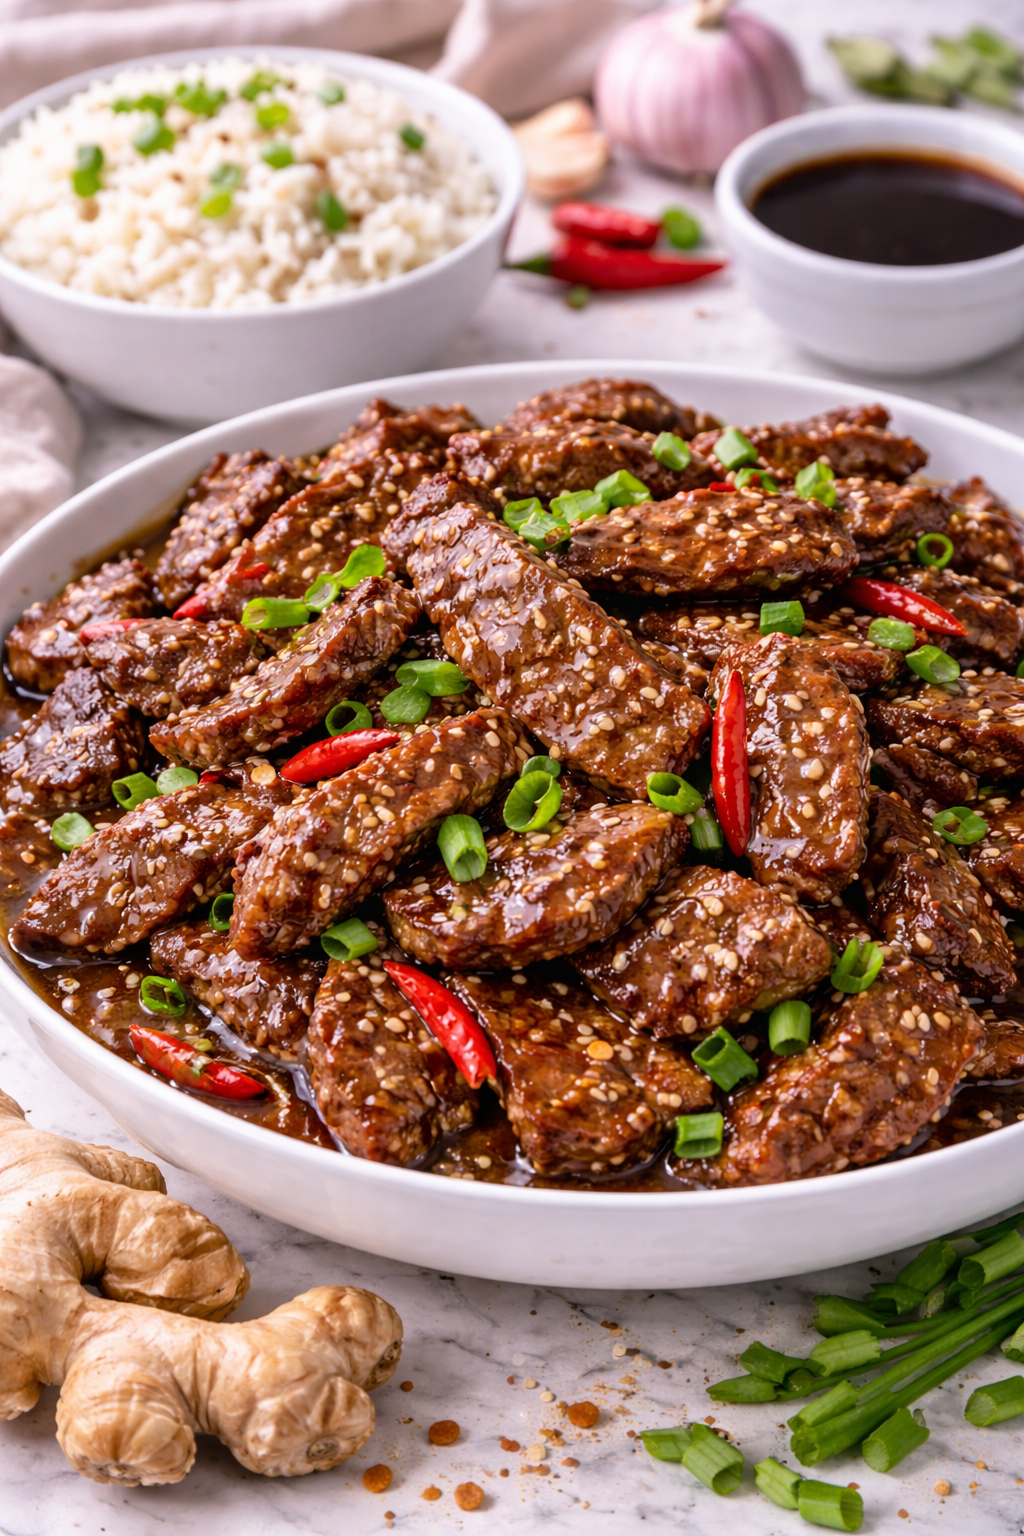
Step 6: Serve
Pile that beef over a big bowl of steamed rice. Sprinkle with sesame seeds if you want to get fancy.
Grab your chopsticks (or a fork, no judgment) and dig in. 🥢
Timing Breakdown
| Task | Time |
|---|---|
| Slice beef | 5 minutes |
| Prep sauce ingredients | 3 minutes |
| Coat beef in cornstarch | 2 minutes |
| Sear beef (in batches) | 8 minutes |
| Cook sauce + green onions | 3 minutes |
| Combine and finish | 3 minutes |
| Total Active Time | 24 minutes |
Add 15 minutes if you’re making rice from scratch.
Or use a rice cooker and let it do its thing while you cook.
Leftovers and Storage
Refrigerator Storage
How long: Up to 3 days in an airtight container
The reality: The beef will lose some of its crispiness, but it’ll still taste great.
Reheating Methods
| Method | Time | Texture Result |
|---|---|---|
| Microwave | 1-2 minutes | Quick but soft |
| Skillet | 3-4 minutes | Brings back some crispiness |
| Air fryer | 5 minutes at 375°F | Crispiest option |
Freezing
How long: Up to 3 months
Fair warning: The texture won’t be quite the same when you thaw it. The sauce might separate a bit too.
Leftover Ideas
- Rice bowls with fresh veggies
- Mongolian beef fried rice (use day-old rice)
- Stuff it in lettuce wraps
- Top ramen noodles with it
- Make a quick stir-fry with more vegetables
Why This Recipe Works
The secret to restaurant-quality Mongolian beef is all about technique.
The Cornstarch Coating: Creates a barrier that keeps the beef juicy while getting crispy on the outside. When the sauce hits it, it clings instead of sliding off.
Cooking in Batches: Every piece of beef gets proper contact with the hot pan. No steaming, just pure searing action.
The Sauce: That combination of salty soy sauce, sweet brown sugar, and aromatic ginger and garlic is what makes this dish so addictive. The water thins it out just enough so it’s not syrupy, but the brown sugar gives it body.
Separate Sauce Cooking: Cooking the sauce separately before adding the beef back in means it has time to thicken and develop flavor. If you just dumped it all in at once, you’d end up with watery beef.
Nobody wants that.
Nutritional Information
Per Serving (Based on 4 servings, without rice)
| Nutrient | Amount | % Daily Value* |
|---|---|---|
| Calories | 380 | 19% |
| Protein | 26g | 52% |
| Carbohydrates | 38g | 13% |
| Fat | 14g | 18% |
| Saturated Fat | 3g | 15% |
| Fiber | 1g | 4% |
| Sugar | 26g | – |
| Sodium | 1240mg | 54% |
*Based on a 2,000 calorie diet
Note: This doesn’t include the rice. Add about 200 calories per cup of white rice.
Making It Lighter
| Swap This | For This | Saves |
|---|---|---|
| Brown sugar (1/2 cup) | 1/3 cup brown sugar | ~50 calories |
| Regular soy sauce | Low-sodium soy sauce | 200mg sodium |
| Frying oil | Cooking spray | ~60 calories |
| White rice | Cauliflower rice | ~150 calories |
What to Serve With Mongolian Beef
The Classics
Steamed White Rice The OG choice. It soaks up all that sauce perfectly.
Fried Rice If you want to level up, make some egg fried rice or vegetable fried rice.
Noodles Lo mein or even plain rice noodles work great if you’re not in a rice mood.
Side Dishes That Actually Work
| Side | Why It Works | Prep Time |
|---|---|---|
| Steamed broccoli | Balances the richness | 5 min |
| Bok choy | Light and crunchy | 4 min |
| Asian cucumber salad | Cool and refreshing | 10 min |
| Edamame | Protein boost | 3 min |
| Spring rolls (store-bought) | Easy appetizer | 0 min |
Quick Asian Cucumber Salad Recipe
Since this pairs so perfectly with Mongolian beef:
- Slice 2 cucumbers thin
- Toss with 2 tbsp rice vinegar, 1 tbsp sesame oil, 1 tsp sugar, pinch of salt
- Let sit for 10 minutes
- Sprinkle with sesame seeds
Done. Crispy, tangy, perfect.
FAQ
Can I use a different cut of beef?
Totally. Sirloin, ribeye, or even skirt steak all work. Just make sure you slice it thin and against the grain.
Tougher cuts like chuck roast can work too, but you’ll need to marinate them longer and cook them slower.
Why is my beef tough?
Two main reasons:
- You didn’t slice against the grain
- You overcooked it
Flank steak should be cooked quickly over high heat. If you cook it too long, it turns into shoe leather.
Can I make this gluten-free?
Yep. Use tamari or coconut aminos instead of soy sauce. Everything else is already gluten-free.
My sauce is too thin. What do I do?
Mix 1 teaspoon of cornstarch with 1 tablespoon of cold water. Stir it into the simmering sauce and cook for another minute or two until it thickens up.
Can I double this recipe?
You can, but you’ll need to work in even smaller batches when searing the beef.
If you try to cook too much at once, you’ll steam it instead of getting that crispy crust.
Is Mongolian beef actually from Mongolia?
Nope. It’s a Chinese-American dish that was created in Taiwan in the 1950s.
The name comes from the Mongolian BBQ cooking style, but it’s not something you’d find in Mongolia. Plot twist, right?
Can I use pre-sliced beef?
If you find pre-sliced stir-fry beef at the store, go for it. Just make sure the slices aren’t too thick.
You want them about 1/4 inch or thinner.
How do I know when the beef is done?
It should be browned on the outside and no longer pink in the center. Since the slices are thin, this only takes a few minutes.
Don’t overthink it.
What if I don’t have a wok?
A large skillet works perfectly fine. I actually prefer a good heavy skillet because it retains heat better than cheap woks.
Can I meal prep this?
You can cook it all and portion it out for the week. Just reheat in a skillet to bring back some texture.
Or prep all the ingredients Sunday night and cook fresh each day. Takes 10 minutes when everything’s prepped.
Common Mistakes (And How to Avoid Them)
| Mistake | What Happens | The Fix |
|---|---|---|
| Slicing with the grain | Chewy, tough beef | Look for the lines, cut across them |
| Overcrowding the pan | Steamed, grey beef | Work in small batches |
| Skipping cornstarch | Soggy coating | Don’t skip it! |
| Adding sauce too early | Watery mess | Cook sauce separately first |
| Using high-sodium soy sauce | Way too salty | Get low-sodium or add extra water |
Wrapping Up
Here’s the truth: once you make Mongolian beef at home, takeout is going to feel like a letdown.
It’s cheaper, tastes better, and you can customize it exactly how you like it.
More sauce? Done. Extra spicy? Easy. Double the green onions? Go for it.
The whole thing takes about 30 minutes from start to finish, and most of that is just chopping and waiting for things to cook.
If you can boil rice, you can make this.
Give it a try this week and let me know how it goes in the comments. Did you add extra garlic? Throw in some veggies? Make it spicy enough to clear your sinuses?
I want to hear about it. 🥢


2 thoughts on “Mongolian Beef That’ll Make You Ditch Takeout Forever”