
You know what’s wild? I’ve been making regular banana pudding for years, and it never once occurred to me to add peanut butter until my sister showed up to Thanksgiving with this version.
I’m not even exaggerating when I say I ate three bowls that day.
The combo of creamy peanut butter and sweet bananas just hits different. It’s like your favorite childhood sandwich turned into a dessert that makes you look like you tried way harder than you actually did.
And here’s the thing: this isn’t some complicated, all-day project. You’re basically making a pudding, layering it with cookies and bananas, and calling it a day. But it tastes like something you’d pay $12 for at a fancy restaurant.
So if you’re tired of making the same old desserts, or you just really love the peanut butter and banana combo (hi, Elvis 👋), then you’re gonna want to keep reading.
Quick Glance: Recipe Stats
| Metric | Details |
|---|---|
| Prep Time | 30 minutes |
| Cook Time | 15 minutes |
| Chill Time | 4 hours (overnight preferred) |
| Total Time | ~5 hours |
| Servings | 12-15 generous portions |
| Difficulty | Easy (seriously!) |
| Best For | Potlucks, BBQs, impressing in-laws |
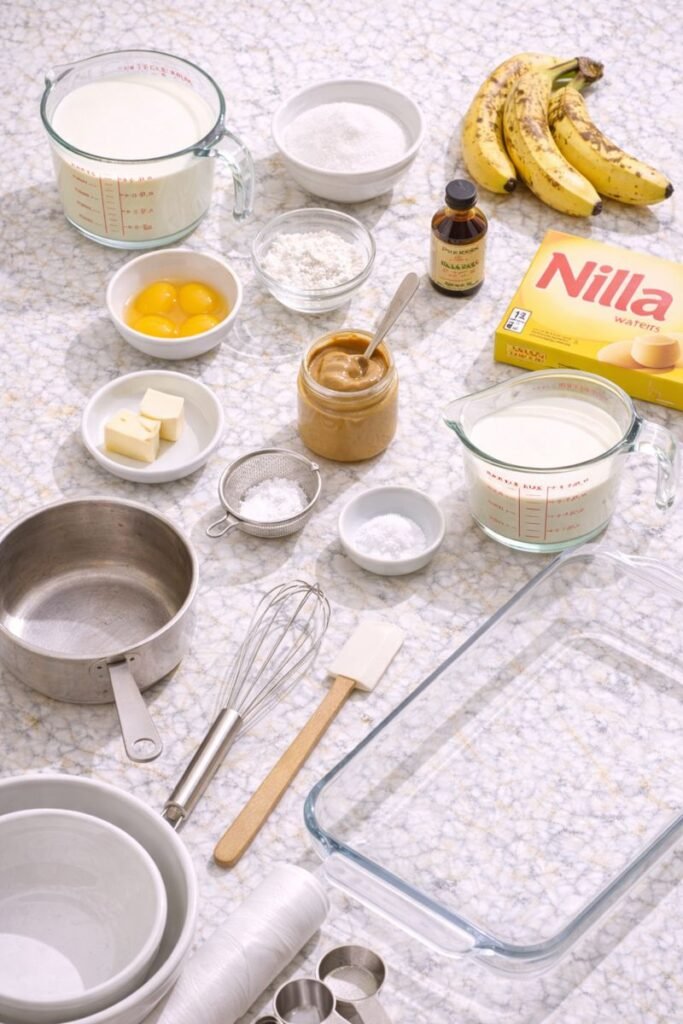
What You’ll Need
For the Peanut Butter Pudding:
- 3/4 cup granulated sugar
- 1/3 cup cornstarch
- 1/4 teaspoon salt
- 3 cups whole milk
- 4 large egg yolks
- 3/4 cup creamy peanut butter (not natural, the regular kind works best)
- 2 tablespoons unsalted butter
- 2 teaspoons vanilla extract
For the Layers:
- 1 (11-ounce) box vanilla wafers
- 4-5 ripe bananas, sliced
- 2 cups heavy whipping cream
- 1/4 cup powdered sugar
- 1/2 teaspoon vanilla extract
For Topping:
- Extra vanilla wafers, crushed
- 2 tablespoons chopped peanuts (optional)
- Chocolate shavings (optional but really good)
Tools You’ll Need
You’ll love these too : banana pancakes recipe
Essential:
- Medium saucepan
- Whisk
- Measuring cups and spoons
- 2 mixing bowls (minimum)
- Electric mixer (hand or stand)
- 9×13 inch baking dish or trifle bowl
- Rubber spatula
- Plastic wrap
Nice to Have:
- Fine-mesh strainer (in case of lumps)
- Piping bag with star tip (for fancy whipped cream)
- Candy thermometer (if you’re a perfectionist)
Pro Tips
Temperature matters more than you think. When you’re tempering those egg yolks, pour the hot milk super slowly while whisking constantly. Rush this and you’ll end up with scrambled eggs in your pudding. Not cute.
Use room temperature peanut butter. Cold peanut butter straight from the fridge won’t mix smoothly into your hot pudding. Let it sit out for 30 minutes before you start, or microwave it for 10-15 seconds to soften it up.
Don’t skip the plastic wrap trick. Press plastic wrap directly onto the surface of your pudding while it cools. This prevents that weird skin from forming on top. Trust me on this one.
Slice bananas right before assembling. Bananas turn brown pretty quickly once they’re cut. If you need to prep ahead, toss them in a little lemon juice, but honestly, it’s better to just slice them when you’re ready to layer.
Let it chill overnight if you can. I know waiting is hard, but this dessert gets SO much better after sitting in the fridge for 8-12 hours. The flavors meld together and the cookies soften just enough to be perfect.
Recommended for you : frozen banana recipes
How to Make Peanut Butter Banana Pudding
Step 1: Make the Pudding Base
In your saucepan, whisk together the sugar, cornstarch, and salt.
Add the milk and whisk until smooth.
Cook over medium heat, whisking constantly, until the mixture starts to thicken and bubble. This takes about 8-10 minutes. Don’t walk away from the stove.
Step 2: Temper the Egg Yolks
In a separate bowl, whisk your egg yolks.
Slowly drizzle about 1 cup of the hot milk mixture into the yolks while whisking constantly. This warms them up without cooking them.
Pour this mixture back into the saucepan.
Step 3: Finish the Pudding
Keep cooking and whisking for another 2-3 minutes until thick and glossy.
Remove from heat.
Stir in the peanut butter, butter, and vanilla until completely smooth. The peanut butter should melt right in.
Thickness Test: Your pudding should coat the back of a spoon. When you run your finger through it, the line should stay clear.
Step 4: Cool It Down
Pour the pudding into a bowl and press plastic wrap directly onto the surface.
Let it cool to room temperature, then refrigerate for at least 2 hours. You want it completely cold before layering.
Step 5: Whip the Cream
In a clean bowl, beat the heavy cream with powdered sugar and vanilla until stiff peaks form.
This takes about 3-4 minutes with an electric mixer. Don’t overbeat or you’ll end up with butter.
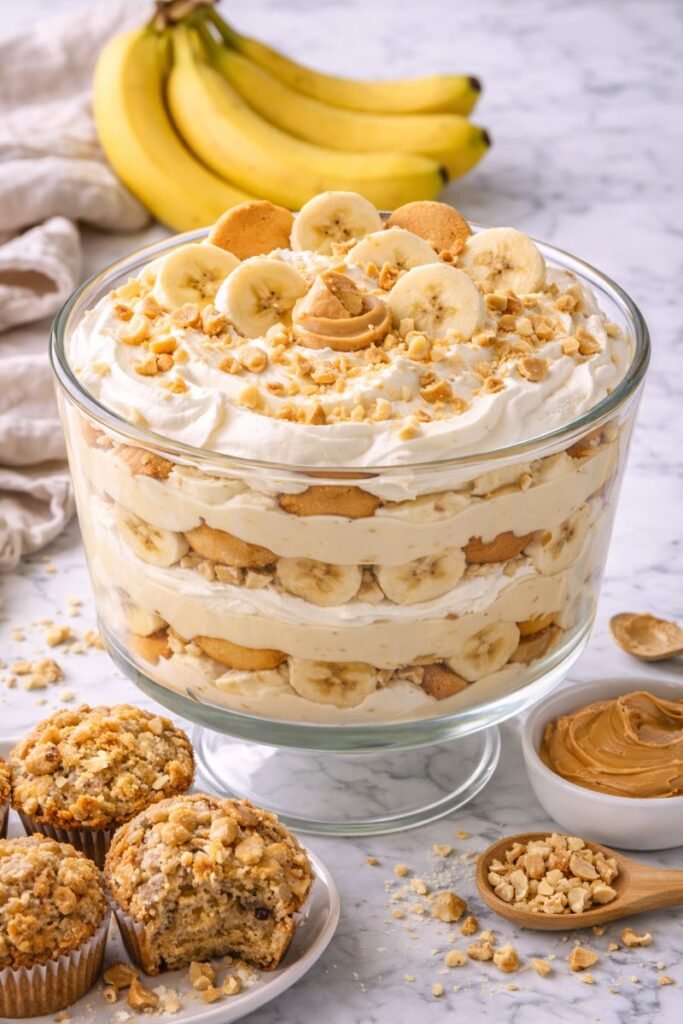
Step 6: Start Layering
In your baking dish, spread about 1/3 of the pudding on the bottom.
Add a layer of vanilla wafers (don’t overlap them too much).
Top with sliced bananas.
Repeat this two more times, ending with pudding on top.
Step 7: Add the Whipped Cream
Spread the whipped cream over the top layer of pudding.
You can pipe it on if you’re feeling fancy, but a spatula works just fine.
You may also like : banana dessert recipes
Step 8: Garnish and Chill
Sprinkle crushed vanilla wafers on top.
Add chopped peanuts and chocolate shavings if you want.
Cover and refrigerate for at least 4 hours, but overnight is better.
Substitutions and Variations
| Instead Of | Try This | The Vibe |
|---|---|---|
| Creamy peanut butter | Almond butter, cashew butter, or sunflower seed butter | Nut-free or different flavor profile |
| Vanilla wafers | Chocolate wafer cookies, Chessmen, graham crackers | Chocolate twist or different texture |
| Regular bananas | Ripe plantains | Less sweet, more interesting |
| Whole milk | Coconut milk | Dairy-free with slight coconut flavor |
| Heavy cream | Coconut cream | Fully dairy-free version |
| Plain pudding | Add 2 tbsp cocoa powder | Chocolate peanut butter version |
| No booze | Add 2 tbsp bourbon or rum | Adult dessert (don’t freeze after) |
Fun Flavor Twists:
Chocolate Lovers: Swap half the vanilla wafers for chocolate ones and add chocolate shavings between layers.
Crunchy Factor: Fold crushed pretzels into the whipped cream for a sweet-salty situation.
Caramel Dream: Drizzle caramel sauce between the layers.
Berry Blast: Add sliced strawberries along with the bananas.
Make Ahead Tips
The Pudding: Make it up to 2 days ahead. Keep covered in the fridge until assembly time.
Fully Assembled: This actually gets better overnight. The cookies soften, flavors blend, everything comes together.
The Whipped Cream: Add this a few hours before serving for the freshest look.
Freeze It: You can freeze just the pudding layer (no bananas, cookies, or cream) for up to 1 month. Thaw overnight in the fridge, then assemble.
Timeline Breakdown:
| When | What To Do |
|---|---|
| 2 days before | Make the pudding, store covered |
| Night before | Assemble everything except whipped cream |
| 3-4 hours before serving | Add whipped cream and toppings |
| Right before serving | Add final garnishes (they look prettier fresh) |
Nutrition Breakdown (Per Serving)
| Nutrient | Amount |
|---|---|
| Calories | 385 |
| Total Fat | 22g |
| Saturated Fat | 11g |
| Carbohydrates | 42g |
| Fiber | 2g |
| Sugar | 28g |
| Protein | 7g |
| Sodium | 180mg |
Want to lighten it up? Use sugar-free pudding mix, reduced-fat peanut butter, and sugar-free whipped topping. You’ll save about 100 calories per serving, but it won’t taste quite as indulgent.
Perfect Pairings
Main Dishes That Match:
- Summer BBQ: Grilled burgers, hot dogs, pulled pork
- Southern Comfort: Fried chicken, mac and cheese, collard greens
- Breakfast Vibes: Bacon, scrambled eggs, biscuits (breakfast dessert is valid)
- Casual Dinner: Meatloaf, mashed potatoes, green beans
Drink Pairings:
- Hot coffee (the combo is chef’s kiss)
- Cold milk (classic for a reason)
- Sweet tea (if you’re going full Southern)
- Bourbon on the rocks (for the adults)
Leftovers and Storage
In the Fridge: Store covered for up to 3 days.
The bananas will start looking a little brown after day 2, but it still tastes totally fine. If aesthetics matter, make only what you’ll eat within 48 hours.
In the Freezer: Individual portions freeze for up to 1 month.
Heads up: The banana texture gets weird when frozen. But the pudding and cookies? Still great.
How to Freeze:
- Portion into airtight containers
- Press plastic wrap onto the surface
- Seal tight
- Label with the date
How to Thaw: In the fridge for several hours. Don’t microwave or everything gets soupy.
Secret Tip: This tastes amazing eaten semi-frozen, like an ice cream cake situation. Try it before you judge me. 😏
Common Mistakes (And How to Avoid Them)
| The Problem | Why It Happened | The Fix |
|---|---|---|
| Lumpy pudding | Heat too high or not whisking enough | Whisk constantly, use medium heat, strain if needed |
| Scrambled egg bits | Tempered eggs too fast | Add hot milk SLOWLY while whisking |
| Watery pudding | Didn’t cook long enough | Cook until it coats a spoon and holds a line |
| Pudding skin | No plastic wrap on surface | Press wrap directly onto pudding while cooling |
| Brown bananas | Cut too early | Slice right before assembly, or toss in lemon juice |
| Soupy whipped cream | Overbeat or too warm | Use cold cream, stop at stiff peaks |
| Runny layers | Didn’t chill long enough | Give it the full 4 hours minimum |
FAQ
Can I use natural peanut butter?
You can, but it won’t be as smooth or creamy. Natural peanut butter has a thinner consistency and the oil separates, which can make your pudding grainy. Stick with regular creamy peanut butter like Jif or Skippy for the best texture.
Why is my pudding lumpy?
Two reasons: either you didn’t whisk constantly while cooking, or your heat was too high. Make sure you’re whisking the entire time and keeping it at medium heat. If it does get lumpy, you can strain it through a fine-mesh sieve and nobody will ever know.
Can I make this without eggs?
Yes! Use 2 tablespoons of cornstarch in place of the egg yolks. Your pudding won’t be quite as rich and creamy, but it’ll still set up fine and taste good. This is a great option if you’re cooking for someone with an egg allergy.
Do the bananas turn brown?
Eventually, yes. That’s just science. That’s why this is best eaten within 2 days of assembly. You can slow the browning by tossing banana slices in a little lemon juice, but it also adds a slight tang to the dessert. Pick your priority.
Can I make this in individual cups?
Absolutely. Mason jars, parfait glasses, or even plastic cups work great. Just layer the same way you would in a big dish. These are perfect for parties or if you want portion control (lol, good luck with that).
What if I don’t have vanilla wafers?
Use graham crackers, shortbread cookies, or even ladyfinger cookies. The texture will be slightly different but still delicious. I’ve even seen people use Oreos for a chocolate version.
Can I add chocolate chips?
Go for it. Sprinkle them between the layers or fold them into the whipped cream. Mini chocolate chips work better than regular-sized ones because they distribute more evenly.
How do I know when the pudding is thick enough?
It should coat the back of a spoon and when you run your finger through it, the line should stay clear. It’ll thicken more as it cools, so don’t overdo it on the stove or you’ll end up with concrete.
Can kids help make this?
For sure! The stove part needs adult supervision, but kids can help whisk, layer the cookies and bananas, and crush the vanilla wafers for topping. Just maybe keep them away from the hot pudding.
Is this actually like the sandwich Elvis ate?
Kind of! Elvis loved peanut butter and banana sandwiches (sometimes with bacon, which you could add to this if you’re brave). This is basically that flavor combo in creamy, layered dessert form.
Why This Recipe Works
Here’s the thing that makes this peanut butter banana pudding different from just throwing PB into regular pudding:
The peanut butter is cooked into the pudding itself. This means it gets silky smooth and fully incorporated instead of being weird and streaky.
The cookies soften overnight. They absorb moisture from the pudding and bananas, creating this cake-like texture that’s insanely good.
The layers create texture contrast. Creamy pudding, soft cookies, fresh bananas, fluffy whipped cream. Every bite hits different.
It’s make-ahead friendly. Unlike some desserts that need last-minute assembly, this one literally gets better as it sits. Perfect for when you’re hosting and don’t want to be in the kitchen all day.
Wrapping Up
Look, I’m not saying this peanut butter banana pudding will change your life.
But I am saying that every single time I bring it somewhere, I get asked for the recipe. And people who claim they “don’t even like pudding” end up going back for seconds.
It’s creamy, it’s nostalgic, it’s got that peanut butter banana thing going on that just works.
Plus, it’s easy enough that you can make it on a random Tuesday when you’re craving something sweet, but impressive enough to bring to a potluck and look like a total rockstar.
The best part? (okay fine, I’ll use it once) You probably have half these ingredients in your kitchen right now. And the ones you don’t have are just a quick grocery run away.
So grab your ingredients, put on your favorite playlist, and make this thing.
Then come back and let me know what you think.
Did you add the chocolate shavings? Did you eat it straight from the fridge at midnight? Did your family beg you to make it again immediately?
Drop a comment below and let me know how it turned out for you. And if you have any tricks or variations you tried, I want to hear about those too. Seriously, I’m always looking for new ways to make good recipes even better.


2 thoughts on “Peanut Butter Banana Pudding (A Twist on the Classic)”