That $4 slice of banana bread at Starbucks?
I cracked the code.
After 15 attempts (and a very happy husband who ate every “failed” loaf), I finally nailed the exact recipe that tastes identical to what you’re paying premium prices for at the coffee shop.
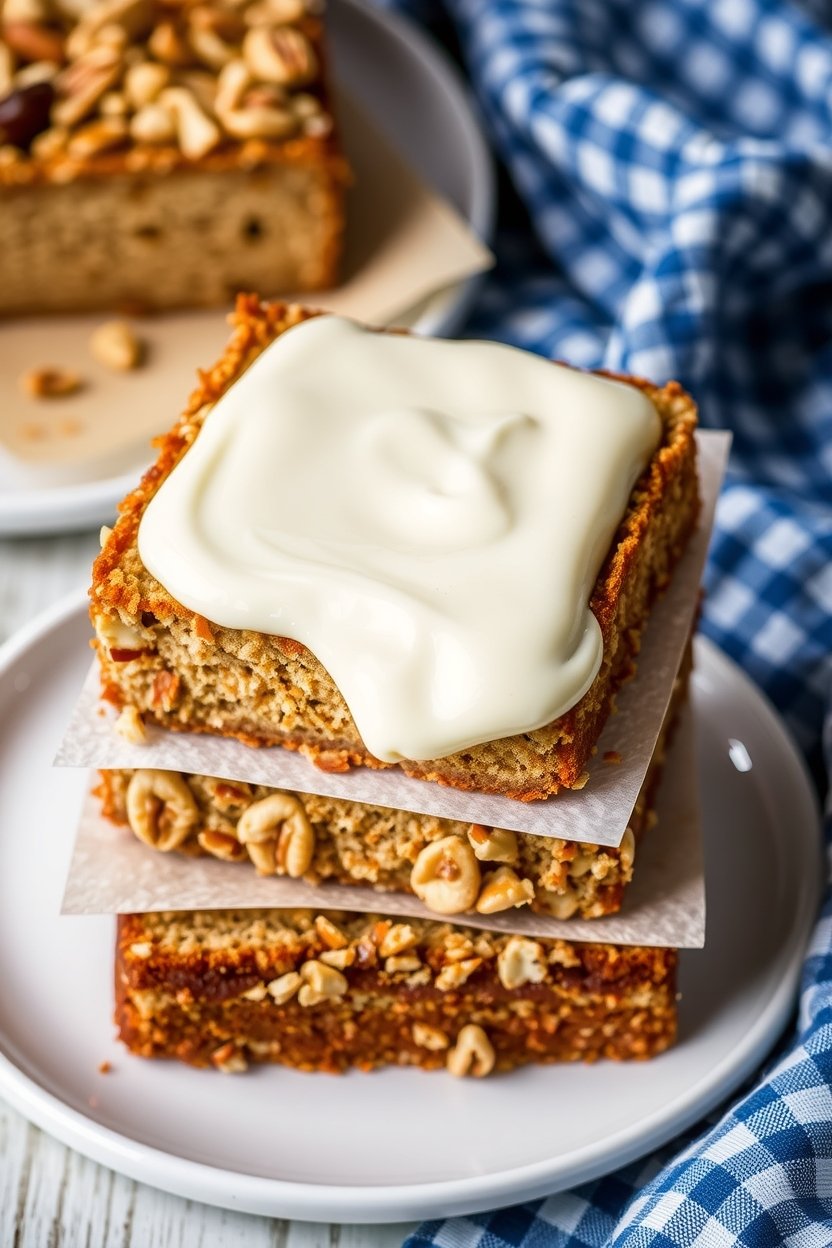
The crispy walnut topping. The impossibly moist center. That perfect sweetness that’s not too much but just right.
I’m giving you the whole formula today – including the one trick that makes the biggest difference.
Quick Recipe Facts
| ⏱️ Prep Time | 15 minutes |
| 🔥 Bake Time | 65-75 minutes |
| ⏰ Total Time | 90 minutes |
| 🍰 Servings | 12 slices |
| 📊 Difficulty | Easy |
| 💰 Cost | Under $5 (vs. $48 at Starbucks!) |
What You’ll Need
The Bread Base
| Ingredient | Amount | Notes |
|---|---|---|
| 🍌 Overripe bananas | 3 large | Seriously, the blacker the better |
| 🫒 Vegetable oil | 1/2 cup | Keeps it super moist |
| 🥚 Eggs | 2 large | Room temp is key |
| 🥛 Buttermilk | 1/2 cup | Secret to that tender crumb |
| 🧴 Vanilla extract | 1 tsp | Pure, not imitation |
| 🌾 All-purpose flour | 2 cups | Measure correctly! |
| 🍚 Granulated sugar | 1 cup | White sugar only |
| 🥄 Baking soda | 1 tsp | Fresh, not expired |
| 🧂 Salt | 1/2 tsp | Balances sweetness |
The Magic Topping
| Ingredient | Amount | Why It Matters |
|---|---|---|
| 🌰 Chopped walnuts | 1/2 cup | Creates that signature crunch |
| 🍚 Granulated sugar | 2 tbsp | Caramelizes on top |
| 🧂 Ground cinnamon | 1/4 tsp | Adds warmth |
Tools You’ll Need
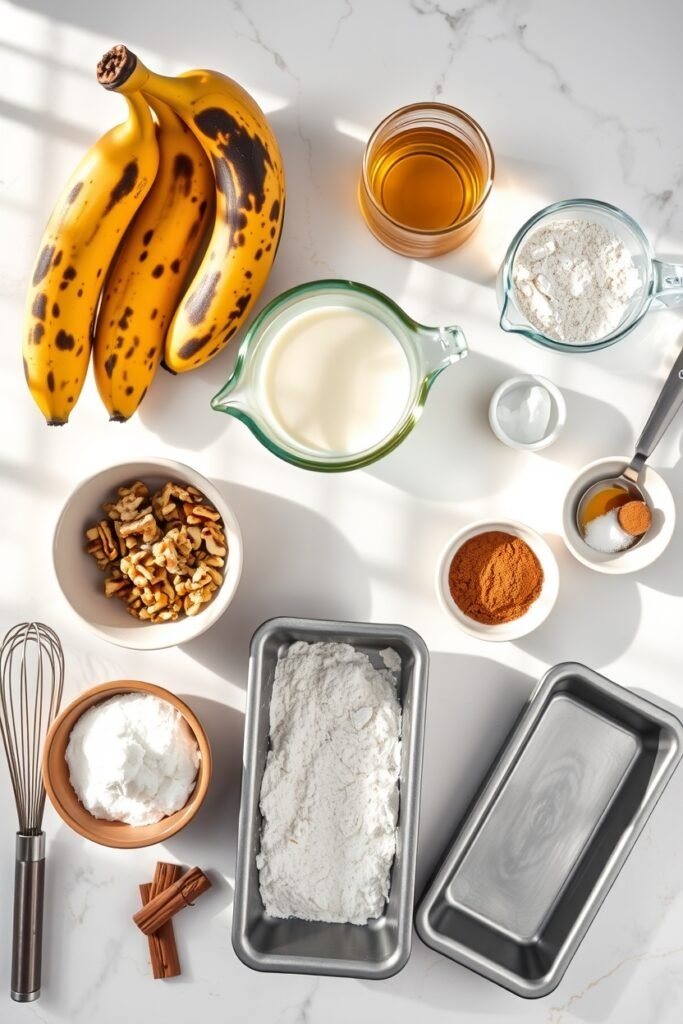
- 9×5 inch loaf pan
- Large mixing bowl
- Medium mixing bowl
- Whisk
- Fork (for mashing)
- Measuring cups & spoons
- Rubber spatula
- Small bowl
- Cooling rack
💡 Pro Hack: Don’t have a cooling rack? Flip your loaf pan upside down and rest the bread on top of it. Works perfectly.
Pro Tips
🍌 Banana Ripeness = Everything
Don’t use bananas that are just starting to get spots.
You want bananas that look like they should’ve been thrown out three days ago. Almost completely black on the outside.
Speed Ripening Trick: Stick unripe bananas in a 300°F oven for 15-20 minutes until the peels turn black. Let them cool before using. Game changer when you’re impatient.
🌡️ Temperature Matters More Than You Think
Cold ingredients = dense, heavy bread.
Take your eggs and buttermilk out of the fridge at least 30 minutes before you start baking.
I learned this after my first three attempts came out way too heavy. Room temperature ingredients mix better and create a lighter texture.
🥄 The Mixing Rule That Changes Everything
Once you add the flour, mix just until you can’t see dry streaks.
Overmixing = tough, chewy bread instead of tender, melt-in-your-mouth texture.
See a few small lumps? Perfect. Leave them alone.
| ✅ Good Mixing | ❌ Bad Mixing |
|---|---|
| Few small lumps visible | Completely smooth |
| Just combined | Mixed for 2+ minutes |
| Tender, fluffy result | Dense, tough result |
🌰 Walnut Timing Is Critical
Add the walnut topping right before the pan goes in the oven.
Too early = they sink and disappear into the batter.
Press them gently into the surface so they stick but don’t submerge.
🦷 The Toothpick Test (Done Right)
Insert a toothpick in the center at 65 minutes.
What you want: A few moist crumbs clinging to it.
What you don’t want: Completely clean (that means overbaked and dry).
The bread continues cooking slightly as it cools, so a few crumbs is perfect.
How to Make Starbucks Banana Bread

Step 1: Prep Your Pan and Oven
Preheat your oven to 325°F.
Not 350°F. This is important.
The lower temperature is the secret to that perfectly moist center without burning the edges.
Grease your 9×5 inch loaf pan really well with butter or cooking spray.
Or line it with parchment paper if you want zero sticking issues.
Step 2: Mash Those Bananas
In your large mixing bowl, mash the bananas with a fork until they’re mostly smooth.
A few small chunks? Totally fine.
You should end up with about 1 1/2 cups of mashed banana.
💭 Quick Tip: The riper the banana, the easier it mashes. Black bananas are soft enough to mash with just a fork in about 30 seconds.
Step 3: Mix the Wet Ingredients
Add to your mashed bananas:
- Vegetable oil
- Eggs
- Buttermilk
- Vanilla extract
Whisk everything together until it looks creamy.
This takes about 30 seconds of actual whisking.
Step 4: Combine the Dry Ingredients
In your medium bowl, whisk together:
- Flour
- Sugar
- Baking soda
- Salt
Make sure there are no clumps of baking soda.
Those little white spots you sometimes see in banana bread? That’s unmixed baking soda. We don’t want that.
Step 5: Bring It All Together
Pour the dry ingredients into the wet ingredients.
Use your spatula to fold everything together gently.
Remember: we’re not overmixing here.
Fold just until you can’t see any dry flour.
The batter will be thick and a little lumpy. That’s exactly what you want.
| What Your Batter Should Look Like |
|---|
| ✓ Thick and scoopable |
| ✓ A few small lumps visible |
| ✓ Slightly glossy from the oil |
| ✓ Smells like banana heaven |
Step 6: Get That Batter in the Pan
Pour the batter into your prepared loaf pan.
Smooth the top with your spatula.
Give the pan a gentle tap on the counter (2-3 times) to release any air bubbles.
Step 7: Make the Magic Walnut Topping
In your small bowl, mix:
- Chopped walnuts
- Sugar
- Cinnamon
Sprinkle this mixture evenly over the batter.
Use your fingers to gently press the walnuts into the surface.
This creates that signature crispy, sweet, nutty top that makes Starbucks banana bread so addictive.
Step 8: Bake to Perfection
Slide that pan into the oven.
Bake for 65-75 minutes.
I know that seems long, but we’re baking at a lower temperature.
Start checking at 65 minutes with a toothpick.
What you’re looking for:
- Deep golden brown top
- Toasted, crispy walnut topping
- Toothpick comes out with moist crumbs
- Your kitchen smells incredible
Step 9: The Hardest Part (Cooling)
Let the bread cool in the pan for 15 minutes.
I know. It’s torture when it smells that good.
But it needs this time to set up properly or it’ll fall apart when you try to remove it.
After 15 minutes, turn it out onto a cooling rack.
Let it cool for at least another 30 minutes before slicing.
🔪 Slicing Secret: Use a serrated knife and a gentle sawing motion. No pressing down. This keeps the top from crumbling off.
Substitutions and Variations
Common Swaps
| If You Don’t Have | Use This Instead | The Result |
|---|---|---|
| Buttermilk | 1/2 cup milk + 1.5 tsp lemon juice (let sit 5 min) | Nearly identical |
| Buttermilk | Plain Greek yogurt thinned with 1-2 tbsp milk | Slightly tangier |
| Walnuts | Pecans | Equally delicious |
| Walnuts | Chocolate chips | Sweeter, no crunch |
| Walnuts | Nothing (omit) | Still amazing |
| Vegetable oil | Unsweetened applesauce (1:1) | Less moist but healthier |
| All-purpose flour | Half AP flour + half whole wheat | Denser, nuttier flavor |
Fun Variations to Try
Chocolate Chip Banana Bread
Fold in 3/4 cup dark chocolate chips after mixing the batter.
Skip the walnut topping or keep it. Both ways are incredible.
Nutella Swirl
Drop spoonfuls of Nutella on top of the batter before adding walnuts.
Use a knife to swirl it gently. Don’t overmix.
Coconut Tropical Version
Add 1/2 cup shredded coconut to the batter.
Replace walnuts with macadamia nuts on top.
Streusel Topping
Mix 1/4 cup flour + 1/4 cup brown sugar + 2 tbsp cold butter + pinch of cinnamon.
Sprinkle on top instead of (or with) the walnut topping.
Make Ahead Tips
Option 1: Make the Batter the Night Before
Mix everything and pour into your loaf pan.
Cover tightly with plastic wrap.
Store in the fridge overnight.
Add the walnut topping right before baking and add 5-10 minutes to bake time (since the batter will be cold).
Option 2: Freeze Unbaked Batter
Pour batter into loaf pan.
Wrap really well: plastic wrap first, then aluminum foil.
Freeze for up to 2 months.
Thaw overnight in the fridge before baking.
⏰ Time Saver: I do this every few weeks and keep frozen batter ready. Fresh banana bread anytime without the prep work.
Leftovers and Storage
Room Temperature Storage
Wrap tightly in plastic wrap or store in an airtight container.
Stays perfectly moist for up to 5 days.
Keep it on the counter, not in the fridge (fridge makes it dry out faster).
Freezing Individual Slices
Wrap each slice in plastic wrap.
Place all wrapped slices in a freezer bag.
Freeze for up to 3 months.
To thaw: Leave on counter for 30 minutes OR microwave for 20-30 seconds.
Freezing the Whole Loaf
Wrap the entire loaf tightly in plastic wrap.
Add a layer of aluminum foil over that.
Freeze for up to 3 months.
Thaw overnight on the counter.
Best Ways to Reheat
| Method | Time | Result |
|---|---|---|
| Toaster/toaster oven | 2 minutes | Crispy edges, warm center ✨ |
| Microwave | 15-20 seconds | Quick, soft, warm |
| Oven (350°F) | 10 minutes | Like fresh-baked |
🧈 Next Level: Toast a slice and add a smear of butter while it’s hot. Or try it with cream cheese. Trust me.
Nutritional Information
Per slice (recipe makes 12 slices):
| Nutrient | Amount |
|---|---|
| Calories | 245 |
| Fat | 11g |
| Carbohydrates | 34g |
| Protein | 4g |
| Fiber | 1g |
| Sugar | 18g |
| Sodium | 180mg |
Meal Pairing Suggestions
Breakfast 🌅
- Hot coffee (duh)
- Fresh berries on the side
- Scrambled eggs
- Greek yogurt with honey
Brunch 🥂
- Crispy bacon strips
- Fresh fruit salad
- Mimosas or fresh OJ
- Soft scrambled eggs with chives
Afternoon Snack ☕
- Hot tea (Earl Grey is my go-to)
- Iced latte
- Fresh apple slices
- String cheese (weird combo but it works)
Dessert Mode 🍨
- Vanilla ice cream
- Caramel sauce drizzle
- Whipped cream
- Warm it up first for max impact
🍳 Leftover Hack: Make French toast with day-old slices. Dip in egg mixture, fry in butter, top with maple syrup. Life changing.
FAQ
Why is my banana bread dry?
Three main culprits:
Overbaking – Check for doneness at 65 minutes. The toothpick should have moist crumbs, not come out clean.
Not enough banana – Make sure you’re using a full 1 1/2 cups of mashed banana.
Incorrect flour measuring – Spoon flour into your measuring cup and level it off. Don’t scoop directly from the bag (you’ll pack in too much flour).
Can I make this in a different size pan?
8×4 inch pan: Add 10-15 minutes to bake time
Muffins: Bake at 325°F for 25-30 minutes
9×13 inch pan: Bake for 35-40 minutes (makes a thinner, cake-like version)
Why did my banana bread sink in the middle?
Usually one of two things:
Too much baking soda – Make sure you’re using a level teaspoon, not a heaping one.
Opening the oven too early – Don’t open the oven door for at least 50 minutes. The sudden temperature change makes it collapse.
How do I know when it’s done?
Look for these signs:
| ✅ It’s Ready | ❌ Keep Baking |
|---|---|
| Toothpick has moist crumbs | Toothpick has wet batter |
| Internal temp around 200°F | Internal temp below 195°F |
| Deep golden brown top | Pale or light brown top |
| Springs back when touched | Feels mushy when touched |
Can I add chocolate chips?
Absolutely.
Fold in 1/2 to 3/4 cup after you mix the batter.
Dark chocolate chips work especially well with banana flavor.
You can keep the walnut topping or replace it with more chocolate chips.
Why does Starbucks banana bread taste so good?
Three reasons:
The moisture level – Buttermilk + oil combo keeps it ridiculously moist
The baking temperature – 325°F prevents it from drying out
That walnut topping – The sugar-cinnamon-walnut combo adds texture and a subtle sweetness that’s seriously addictive
It’s not complicated, just specific techniques that make a huge difference.
Can I make this gluten-free?
Yes.
Use a 1:1 gluten-free flour blend that includes xanthan gum.
Bob’s Red Mill and King Arthur both make good ones.
The texture will be slightly different but still delicious.
How ripe should the bananas be?
Ideal: Heavily spotted or completely black peels
Too early: Just starting to get a few brown spots
Perfect for baking: Looks like they should’ve been thrown out already
The riper the banana, the sweeter and more flavorful your bread will be.
⚡ Quick Ripen: 300°F oven for 15-20 minutes in the peel. Let cool before using.
Wrapping Up
Let me hit you with some quick math:
| Starbucks | Homemade | |
|---|---|---|
| Cost per loaf | $48 (12 slices × $4) | Under $5 |
| Time investment | Driving there, waiting in line | 15 min prep |
| Freshness | Sits under heat lamp all day | Straight from your oven |
| Customization | None | Endless options |
Once you make this at home, you’ll never pay $4 for a slice again.
The recipe is simple. The ingredients are cheap. And it tastes exactly like the real thing.
Maybe even better because it’s warm and fresh from your own oven, and you can eat as much as you want without guilt.
Try it this weekend.
Then come back and tell me how it turned out. Did you add chocolate chips? Did your family destroy the whole loaf in one sitting? Any variations you tried?
Drop a comment below with your experience!


