
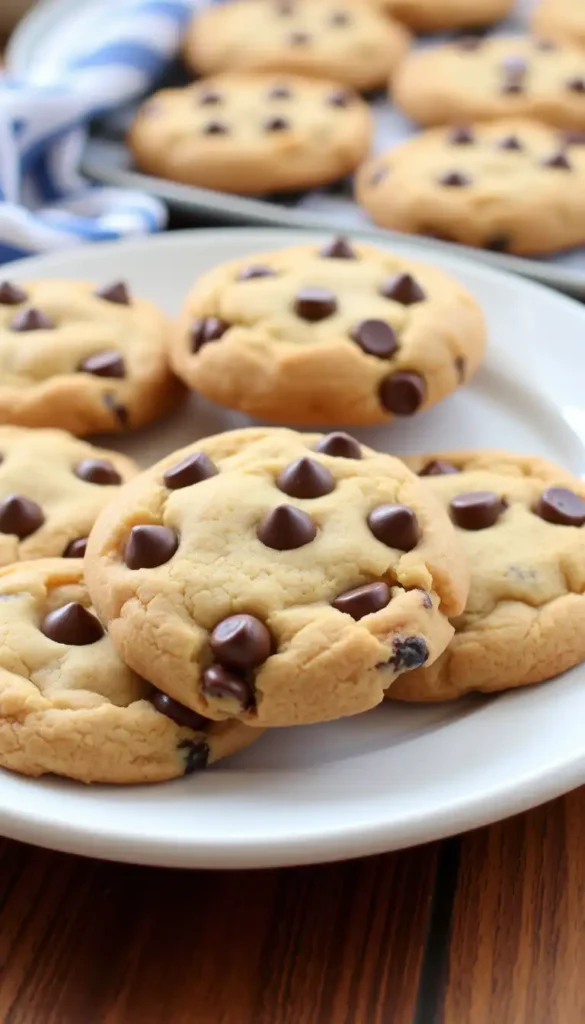
Chocolate Chip Cookie Recipe – Chasing Foxes
Crispy edges. Gooey center. One secret step that changes everything.
Prep: 15 minChill: 30 min+Bake: 9–11 minYield: ~36 cookies
DifficultyEasy
Total Time55 min
Cal / Cookie~180
Freezer FriendlyYes ✓
You’ve had chocolate chip cookies before. A lot of them, probably.
But have you had that one? The kind that’s crispy on the edges, completely soft and gooey in the center, and tastes like someone genuinely put care into every step?
That’s what this recipe is. And there’s one step that most people skip — which is exactly why most homemade cookies end up just okay instead of unforgettable.
(Stick around. I’ll tell you what it is.)
“Once you make these, boxed cookie mix will never feel the same again. I mean it.”
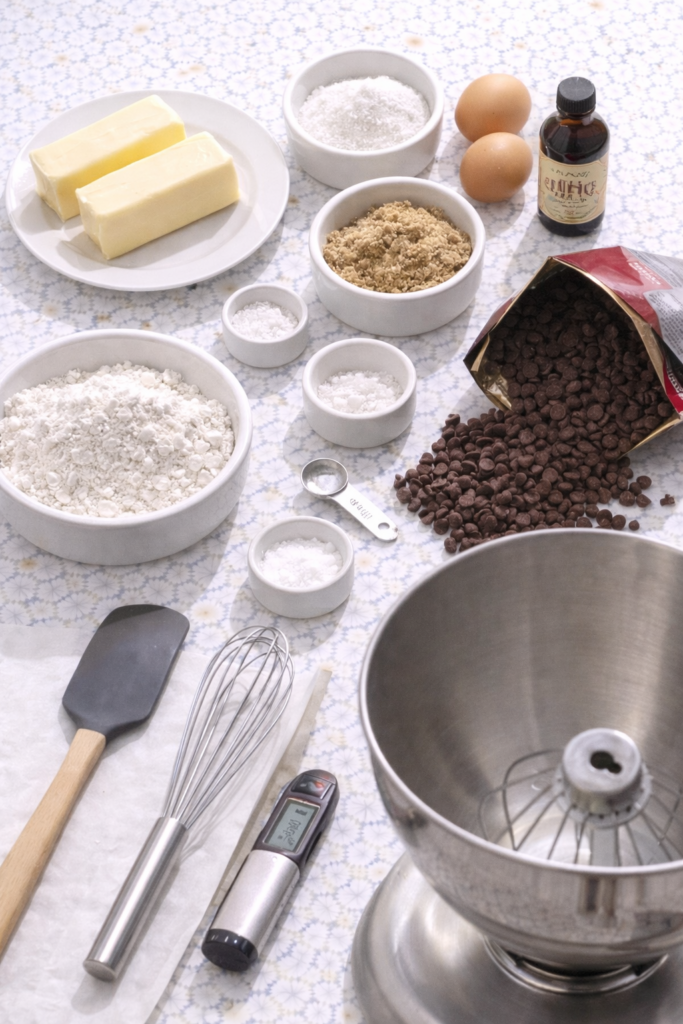
What You’ll Need
Dry Ingredients
2 ¼ cups all-purpose flour
1 tsp baking soda
1 tsp fine sea salt
½ tsp flaky sea salt (topping)
Wet Ingredients
1 cup (2 sticks) unsalted butter, softened
¾ cup granulated white sugar
¾ cup packed light brown sugar
2 large eggs, room temperature
2 tsp pure vanilla extract
2 cups semi-sweet chocolate chips
💡 Quick Tip
Room temperature eggs and butter aren’t just food blogger nonsense. Cold butter won’t cream properly and cold eggs can cause the batter to curdle. Pull them out 30–60 minutes before you start.
Tools You’ll Need
You may also like : fried chicken sandwich
Stand or Hand Mixer
Large Mixing Bowl
Medium Bowl
Rubber Spatula
Whisk
2 Baking Sheets
Parchment Paper
Cookie Scoop
Wire Cooling Rack
Plastic Wrap
Pro Tips
These are the things that actually move the needle. Skip them and you’ll get fine cookies. Follow them and you’ll get people sliding into your DMs asking for the recipe.
- 1 Brown your butterMelt it in a saucepan over medium heat until it turns golden and smells nutty. Let it cool, then use it in place of softened butter. It adds a deep toffee-like flavor that you simply cannot get any other way.
- 2 Chill the dough — overnight if you canThis is the step most people skip. Chilling concentrates the sugars, deepens the flavor, and prevents flat sad cookies. Even 30 minutes makes a difference. Overnight is where the real magic is.
- 3 Pull them out earlyThe cookies should look underdone when they come out of the oven. Slightly wet in the center. They’ll finish setting on the hot pan for 3–5 more minutes. This is what gives you that gooey center.
- 4 Don’t skip the flaky salt on topA pinch of flaky sea salt before baking makes the chocolate taste more chocolatey. It sounds counterintuitive. It absolutely works. Try it once and you’ll never skip it again.
- 5 Use a cookie scoop for even bakingUneven dough balls = some cookies overdone, some underdone. A standard 2-tablespoon scoop keeps everything uniform so your whole tray bakes at the same rate.
Recommended for you : air fried chicken
How to Make Them
- Preheat + Prep Set your oven to 375°F (190°C). Line two baking sheets with parchment paper. Don’t skip the parchment — it prevents sticking and helps the bottoms bake evenly.
- Whisk the Dry Ingredients In a medium bowl, whisk together the flour, baking soda, and fine sea salt. Set it aside. Don’t dump this directly into your butter mixture — adding it separately controls how much you mix later.
- Cream Butter + Sugars Beat softened butter with both sugars on medium-high for 3–4 minutes until light and fluffy. This step matters more than people realize. Proper creaming = better lift, better texture.
- Add Eggs + Vanilla Add eggs one at a time, mixing well after each. Add the vanilla. Beat until smooth and slightly pale.
- Add the Flour Mixture With the mixer on low, slowly add the dry ingredients. Mix until just combined. Stop the moment you can’t see flour streaks. Over-mixing = tough cookies.
- Fold in Chocolate Chips Use a rubber spatula and fold by hand. Get every last chip distributed evenly.
- Chill the Dough Cover the bowl with plastic wrap and refrigerate for at least 30 minutes. Overnight if you have the patience. This is the step that separates average cookies from great ones.
- Scoop + Salt + Bake Scoop dough balls (about 2 tbsp each) onto the parchment-lined baking sheets, 2 inches apart. Sprinkle each with a pinch of flaky salt. Bake 9–11 minutes until edges are golden but centers look underdone.
- Rest Before Moving Let cookies sit on the pan for 5 minutes. They’ll finish setting and firm up to perfection. Then transfer to a wire rack — or just eat one immediately. Also valid.
You’ll love these too : fried chicken wings
Don’t overbake. If the edges look done and the center looks raw, they’re perfect. They continue cooking off the heat. Trust the process.
Substitutions and Variations
| Original | Swap | What Changes |
|---|---|---|
| Unsalted butter | Browned butter (cooled) | Adds deep nutty, toffee flavor |
| Semi-sweet chips | Dark chocolate chunks | More intense, less sweet |
| All-purpose flour | Bread flour | Chewier, thicker cookies |
| 2 whole eggs | 1 egg + 1 extra yolk | Richer, denser texture |
| White sugar | Coconut sugar | Deeper caramel notes |
| Vanilla extract | Vanilla bean paste | More intense vanilla flavor |
Fun Add-Ins
- ½ cup chopped walnuts or pecans for texture and crunch
- 1 tsp espresso powder — you won’t taste coffee, just deeper chocolate
- Mix chocolate chips with chocolate chunks for layered melt texture
- ¼ tsp cinnamon for a subtle warm spice note
- Swap half the chips for butterscotch chips
Make Ahead Tips
Up to 72 hours ahead
Make the full dough batch, cover tightly, refrigerate. Flavor actually improves the longer it sits. Day 3 dough makes the best cookies.
Up to 3 months ahead (frozen dough)
Scoop dough balls onto a sheet pan, freeze until solid (about 1 hour), then transfer to a freezer bag. Bake straight from frozen — just add 2–3 minutes to bake time.
Day of tip
If you’re short on time, even 30 minutes in the fridge makes a noticeable difference over baking immediately. Don’t skip it entirely if you can help it.
🍪 Game Changer
Keeping a bag of pre-scooped frozen cookie dough in the freezer means you’re 12 minutes away from fresh-baked cookies at any point. That’s just smart living.
Nutritional Info
Per cookie, based on a yield of 36 cookies. These are estimates.
~180Calories
24gCarbs
9gFat
2gProtein
15gSugar
95mgSodium
| Dietary Need | What to Swap |
|---|---|
| Dairy-Free | Miyoko’s vegan butter + dairy-free chocolate chips |
| Gluten-Free | 1:1 gluten-free baking flour blend |
| Lower Sugar | Reduce each sugar by 2 tbsp — slightly less sweet, still great |
| Egg-Free | Flax egg (1 tbsp ground flax + 3 tbsp water, rested 5 min) |
Meal Pairing Ideas
These cookies are their own event. But if you want to make it more of a moment:
- Cold whole milk (classic for a reason)
- Two cookies + a scoop of vanilla bean ice cream sandwiched between them
- Warm cookie + salted caramel ice cream on top while still fresh from the oven
- Strong espresso if you’re the “cookies for breakfast” type (no judgment, I see you)
Leftovers and Storage
Room Temp
Airtight container up to 5 days. Add a slice of bread to keep them soft.
Freezer (Baked)
Up to 3 months. Microwave 15–20 seconds to bring back that fresh-baked texture.
Freezer (Dough)
Up to 3 months. Bake from frozen, add 2–3 extra minutes to bake time.
FAQ
Why did my cookies come out flat?
Almost always one of two things: the butter was too warm or melted instead of properly softened, or the dough wasn’t chilled. Both cause spreading. Make sure butter is room temp (soft but not greasy) and chill the dough before baking.
Can I skip chilling the dough?
Yes, but the cookies will spread more and the flavor won’t be as deep. Even 30 minutes makes a noticeable difference. Overnight in the fridge is genuinely a different cookie.
My cookies are always overdone. Help.
Ovens run hotter than they say more often than you’d think. Try dropping the temperature to 350°F and pulling them when the centers still look underdone. They’ll finish on the pan. An oven thermometer is worth every penny.
What’s the difference between bread flour and all-purpose here?
Bread flour has more protein, which creates more gluten = chewier, thicker cookies. All-purpose gives you the classic texture. Both work. Try both and pick your favorite.
Do I really need both brown and white sugar?
Yes, and here’s why: white sugar = crispy edges. Brown sugar = chewy, moist center. Using both gives you that perfect combination. All brown sugar = chewier overall. All white = crispier throughout.
Can I double the recipe?
This recipe doubles perfectly. Just make sure your mixing bowl is large enough — the dough does increase in volume as it’s being mixed.
What if I don’t have a stand mixer?
A hand mixer works just as well. You can also do this fully by hand with a wooden spoon if you’re willing to put in a little more effort — just make sure the butter is very soft before you start.
Wrapping Up
There’s something genuinely satisfying about pulling a perfect batch out of the oven. The smell alone is worth it.
These are the cookies people remember. The ones someone asks you to bring to every gathering. The ones your family requests for birthdays instead of cake.
Give them a try and come back to leave a comment. Did you brown the butter? Did you manage to wait for the overnight chill or did you cave early? Did someone steal the dough before it even made it to the oven?
Tell me everything. I genuinely want to know. 👇


1 thought on “The Chocolate Chip Cookie Recipe You’ll Make on Repeat”