
You know that moment when you walk past a bakery and the smell of fresh cinnamon bread stops you in your tracks?
Yeah, that’s about to be your kitchen.
I stumbled onto this recipe three years ago when I was desperately trying to impress my in-laws during their first visit. I needed something that screamed “I have my life together” but wouldn’t actually require me to have my life together.
This cinnamon bread was my secret weapon.
Here’s what shocked me: it’s easier than making pancakes from scratch. No joke. The dough practically makes itself, and those gorgeous swirls? They happen almost by accident.
My mother-in-law asked for the recipe twice. My neighbor knocked on my door asking what I was baking. And my husband? He ate half the loaf before it even cooled.
That’s the power of homemade cinnamon bread.
Why This Recipe Works (When Others Don’t)
I’ve tried at least a dozen cinnamon bread recipes. Most of them were either too complicated, too time-consuming, or resulted in dense, disappointing loaves.
This one is different.
| Problem with Other Recipes | How This Recipe Fixes It |
|---|---|
| Dense, heavy texture | Uses the perfect ratio of wet to dry ingredients |
| Cinnamon filling leaks everywhere | Strategic sealing technique (I’ll show you) |
| Takes all day | Active time is only 20 minutes |
| Requires fancy equipment | Just basic kitchen tools you already own |
| Difficult to roll without tearing | The dough is soft and forgiving |
The secret? It’s all about the dough hydration and the double rise.
Most recipes skip the second rise because they’re in a hurry. Big mistake. That second rise is what gives you that pillowy, soft texture that makes people think you ordered this from a fancy bakery.
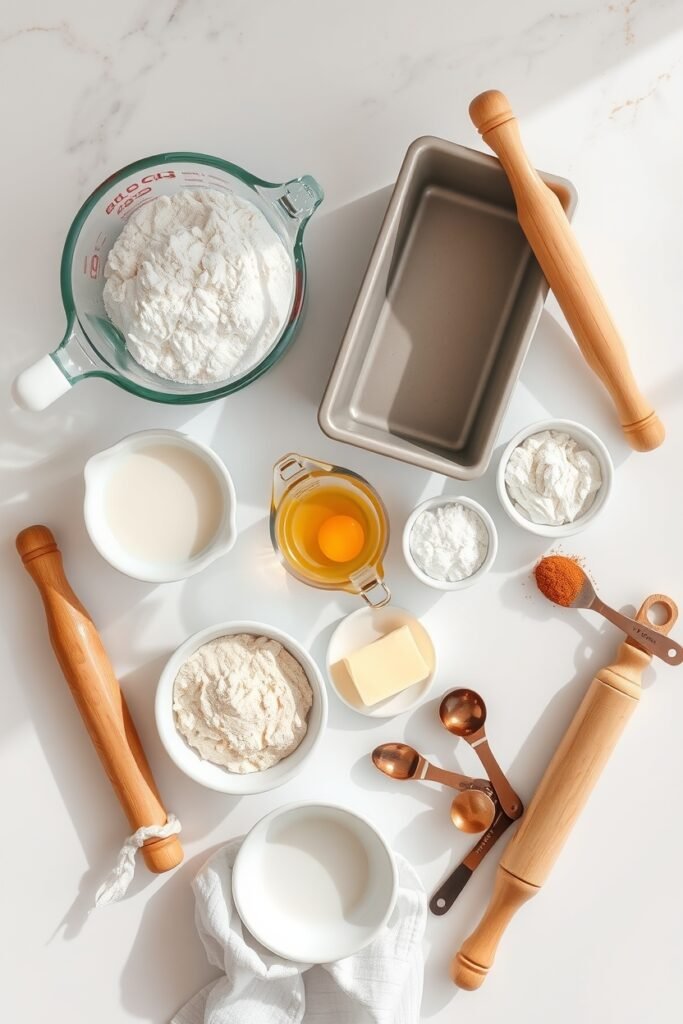
What You’ll Need
For the Dough
| Ingredient | Amount | Why It Matters |
|---|---|---|
| All-purpose flour | 3 cups | The foundation, use regular AP flour |
| Granulated sugar | 1/4 cup | Feeds the yeast and adds subtle sweetness |
| Instant yeast | 2 1/4 tsp (1 packet) | Makes it rise without proofing |
| Salt | 1 tsp | Balances the sweetness |
| Whole milk | 1 cup (warmed to 110°F) | Creates a tender crumb |
| Unsalted butter | 1/4 cup (melted) | Adds richness and flavor |
| Large egg | 1 (room temp) | Binds everything together |
For the Cinnamon Filling
| Ingredient | Amount | Notes |
|---|---|---|
| Granulated sugar | 1/2 cup | White sugar gives the cleanest flavor |
| Ground cinnamon | 2 tbsp | Don’t use old cinnamon, fresh is key |
| Unsalted butter | 3 tbsp (softened) | Helps the filling stick |
For the Topping
- 1 tablespoon melted butter
- 2 tablespoons granulated sugar
- 1/2 teaspoon ground cinnamon
Quick Tip: Set your butter and egg out 30 minutes before you start. Room temperature ingredients mix better and create a smoother dough.
Tools You’ll Need
Basic stuff: ✓ Large mixing bowl
✓ Measuring cups and spoons
✓ Whisk
✓ Rolling pin (or a wine bottle works too 😉)
✓ 9×5 inch loaf pan
✓ Kitchen towel or plastic wrap
✓ Pastry brush (or your fingers)
✓ Small bowl for the filling
Nice to have but not required:
- Stand mixer with dough hook
- Instant-read thermometer
- Bench scraper
I make this by hand every single time. No mixer needed.
Pro Tips From Someone Who’s Made This 50+ Times
1. The warm milk trick that changed everything
Your milk needs to be 110°F. Not hot, not lukewarm, exactly 110°F.
Here’s my lazy method: microwave cold milk for 45 seconds, stir, then check with your finger. It should feel like a comfortable bath. Too hot kills the yeast. Too cold and nothing happens.
Don’t have a thermometer? Touch the milk to your wrist (like testing a baby bottle). If it feels neutral, you’re good.
2. Roll it tight or regret it later
Loose rolls = sad, separated swirls.
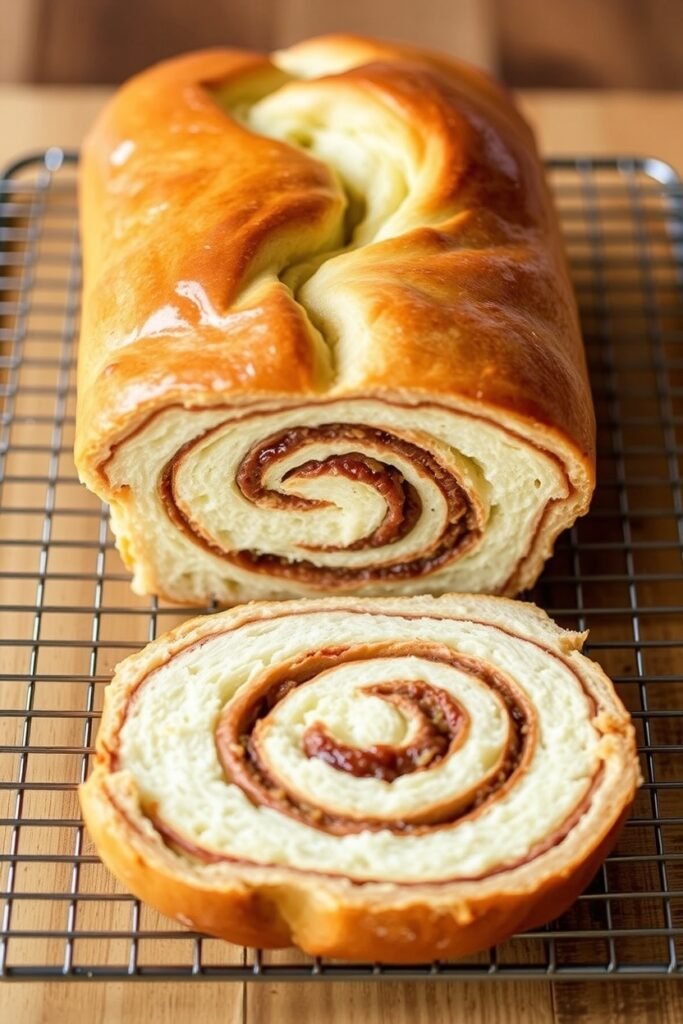
When you’re rolling up that cinnamon-covered dough, pretend you’re rolling a yoga mat. Tight, even pressure from one end to the other. Your future self will thank you when you slice into perfect spirals.
3. The oven trick for perfect rising
Cold kitchen? Your bread won’t rise properly.
Turn your oven to the lowest setting for exactly 2 minutes, then turn it off. That’s your proofing box now. Put your dough in there (covered) and it’ll rise beautifully every time.
4. Score before baking (seriously)
Use a sharp knife to make one shallow cut down the center of your loaf before it goes in the oven.
This isn’t just for looks. It controls where the bread expands so you don’t get weird splits on the sides.
5. The tap test
When you think it’s done, take it out and tap the bottom. It should sound hollow, like knocking on a door. If it sounds dense or dull, give it another 5 minutes.
Or just use a thermometer and look for 190°F internal temperature. Way easier.
How to Make Cinnamon Bread (Step by Step)
Step 1: Mix the Dough
Grab your large bowl. Dump in the flour, sugar, yeast, and salt. Whisk it around.
In a separate bowl, mix your warm milk, melted butter, and egg.
Pour the wet into the dry and stir with a wooden spoon until it forms a shaggy mess. That’s normal.
Dump it onto a floured counter.
Step 2: Knead (It’s Easier Than You Think)
Kneading time: 8-10 minutes
Push the dough away from you with the heel of your hand, fold it back, turn it a quarter turn, and repeat.
You’ll feel it change. It starts sticky and becomes smooth and elastic. If it’s sticking to your hands, sprinkle a little flour. Not too much though.
How to know when you’re done kneading: Poke the dough with your finger. If it slowly springs back, you’re there. If it stays dented, keep kneading.
Step 3: First Rise
Put your dough ball in a greased bowl. Cover it with a damp towel.
Now walk away for 1 to 1.5 hours.
It should double in size. Mine usually takes about 75 minutes in my warmish kitchen.
Step 4: Prep Your Filling
While you’re waiting, mix your cinnamon and sugar in a small bowl.
Set out your softened butter.
That’s it. Easiest part of this whole thing.
Step 5: Roll It Out
Punch down your risen dough (yes, literally punch it).
Flour your counter. Roll the dough into a rectangle about 9 inches by 18 inches.
Don’t stress about perfect measurements. Close enough works.
Step 6: Add the Good Stuff
Spread the softened butter all over your rectangle. Leave about half an inch clear around the edges.
Sprinkle the cinnamon sugar on top. I use all of it. Don’t be shy.
Here’s the part people mess up: make sure you spread that butter evenly. If you have bare spots, your cinnamon won’t stick and it’ll all fall out when you slice it.
Step 7: Roll and Shape
Starting from the short end (the 9-inch side), roll it up as tight as you can.
When you get to the end, pinch the seam closed. Really pinch it. Use a little water on your fingers if it’s not sealing.
Tuck the ends under and place it seam-side down in your greased loaf pan.
Step 8: Second Rise
Cover the pan with a towel.
Wait another 30-45 minutes.
The dough should puff up and almost reach the top of the pan.
This rise makes the difference between good bread and incredible bread. Don’t skip it.
Step 9: Prep and Bake
Preheat your oven to 350°F.
Brush the top with melted butter. Sprinkle the cinnamon-sugar topping over it.
Take a sharp knife and score one line down the center. Not deep, just about 1/4 inch.
Baking time: 35-40 minutes
The top should be deep golden brown. Use a thermometer to check for 190°F inside.
Step 10: Cool (The Hardest Part)
Let it sit in the pan for 10 minutes. This is torture, I know.
Then flip it out onto a wire rack.
Wait at least 20 more minutes before slicing. If you cut it too early, the inside will be gummy and the slices will tear.
I usually go 30 minutes because I have zero patience and I need that buffer.
Timing Breakdown
| Step | Time Required | What You’re Doing |
|---|---|---|
| Mixing & Kneading | 15 minutes | Active work |
| First Rise | 75 minutes | Waiting (go watch Netflix) |
| Rolling & Filling | 10 minutes | Active work |
| Second Rise | 40 minutes | More waiting |
| Baking | 40 minutes | Your kitchen smells amazing |
| Cooling | 30 minutes | Hardest part |
| Total Time | 3 hours 30 min | Only 25 min is actual work |
See? Most of this is just waiting around.
Substitutions and Variations
Different milk options:
| Milk Type | Works? | Notes |
|---|---|---|
| 2% or skim milk | ✓ Yes | Slightly less rich but totally fine |
| Almond milk | ✓ Yes | Use unsweetened, unflavored |
| Oat milk | ✓ Yes | Gives a subtle nutty flavor |
| Coconut milk | ✓ Yes | Use the carton kind, not canned |
Butter swaps:
- Coconut oil works if you’re dairy-free (flavor will be slightly different)
- Vegan butter works great
- Don’t use margarine, it’s gross
Flour variations:
- Replace up to half the flour with whole wheat (add 2 tbsp more milk)
- Use bread flour for an even chewier texture
- Can’t do gluten? Try a 1:1 gluten-free flour blend (I haven’t tested this myself)
Fun add-ins:
Try adding these to your filling:
- 1/2 cup chopped pecans or walnuts 🥜
- 1/2 cup raisins (soak them in warm water first)
- 1/3 cup mini chocolate chips (game changer)
- 1 teaspoon vanilla extract mixed into the butter
- Orange zest for a citrus twist
Sweet tooth upgrades:
- Use brown sugar instead of white in the filling for a caramel vibe
- Add 1/4 cup of softened cream cheese to the filling (spread it with the butter)
- Drizzle with cream cheese icing after it cools
Make Ahead Tips
The night before method:
Make your dough and let it do the first rise. Punch it down, shape it into a ball, wrap it tight in plastic wrap, and stick it in the fridge.
Next morning, let it sit on the counter for 30 minutes to warm up. Then roll it out and continue from step 5.
Freeze for later:
After you’ve shaped the loaf and put it in the pan, wrap the whole thing (pan and all) in plastic wrap, then foil.
Freeze for up to 3 months.
When you’re ready to bake, move it to the fridge the night before. Next day, let it rise at room temp (this takes longer, about 1.5 hours), then bake as normal.
Pre-mixed filling:
Mix your cinnamon and sugar up to 2 weeks ahead. Store in an airtight container. Saves you 30 seconds, but it’s one less thing to do.
Leftovers and Storage
Short-term (3 days or less):
Wrap the cooled bread in plastic wrap or put it in an airtight container. Keep it on your counter, not in the fridge (fridge makes it go stale faster).
It’ll stay soft and delicious for about 3 days.
Long-term storage:
Slice the whole loaf. Put pieces of parchment paper between each slice. Stick them all in a freezer bag.
Freeze for up to 3 months.
Toast individual slices straight from the freezer. Takes about 90 seconds in the toaster and tastes freshly baked.
What to do with day-old bread:
- Make French toast: Slightly stale cinnamon bread makes THE BEST French toast
- Bread pudding: Cut it into cubes, soak in custard, bake at 350°F for 40 minutes
- Cinnamon toast: Butter it, toast it, add more cinnamon sugar if you’re feeling wild
Nutritional Breakdown
Based on 12 slices per loaf
| Nutrient | Per Slice |
|---|---|
| Calories | 245 |
| Total Fat | 8g |
| Saturated Fat | 5g |
| Cholesterol | 35mg |
| Sodium | 210mg |
| Total Carbs | 38g |
| Fiber | 1g |
| Sugars | 15g |
| Protein | 5g |
Real talk: This isn’t health food. It’s a treat. But if you’re tracking macros, one slice fits pretty easily into most daily allowances.
What to Serve With It
Breakfast spreads:
The classics:
- Butter (obviously)
- Cream cheese
- Honey butter (mix equal parts butter and honey)
Next level:
- Mascarpone with a drizzle of honey
- Ricotta with a tiny bit of lemon zest
- Peanut butter and sliced bananas
Drink pairings:
| Drink | Why It Works |
|---|---|
| Black coffee | Cuts through the sweetness perfectly |
| Chai latte | Doubles down on the warm spices |
| Cold milk | Classic combo, especially for kids |
| Hot chocolate | Full dessert mode activated |
| Orange juice | The acid balances the rich bread |
Turn it into dessert:
Toast a thick slice. Top with:
- Vanilla ice cream + caramel drizzle 🍨
- Whipped cream + fresh berries
- Chocolate ganache (just melted chocolate and cream)
I tried the ice cream version once “just to see” and ended up eating three slices. No regrets.
Troubleshooting Guide
My dough didn’t rise. What happened?
Check these things:
- Was your yeast expired? (Check the date)
- Was your milk too hot? (Should be 110°F, not scalding)
- Did you add salt directly to the yeast? (Salt kills yeast)
- Is your kitchen really cold? (Try the oven trick I mentioned)
The cinnamon filling leaked out everywhere.
You didn’t seal the seam well enough. Next time, really pinch it closed and use a tiny bit of water to help it stick. Also make sure you’re placing it seam-side DOWN in the pan.
My bread is dense and heavy.
You either:
- Added too much flour (measure by spooning it into the cup, not scooping)
- Didn’t knead enough (it should be smooth and elastic)
- Skipped the second rise (don’t do that)
The top burned before the inside cooked.
Your oven runs hot. Next time, tent the top with foil after 25 minutes and let it finish baking.
Can I use active dry yeast instead of instant?
Yep. You’ll need to proof it first though. Mix it with the warm milk and a pinch of sugar, wait 5-10 minutes until it’s foamy, then proceed with the recipe.
How do I know when it’s actually done?
Three ways:
- Internal temp hits 190°F
- Top is deep golden brown
- Bottom sounds hollow when you tap it
Use at least two of these methods to be sure.
FAQ
Can I make this without a stand mixer?
Yes. I do it by hand every time. The recipe above is written for hand-mixing. If you have a stand mixer, use the dough hook on medium-low for 5-6 minutes instead of kneading by hand.
How long does this actually take?
Total time is about 3.5 hours, but only 25 minutes of that is you actually doing anything. The rest is waiting for dough to rise and bread to bake.
Can I double the recipe?
Absolutely. Just make sure you have two loaf pans and enough oven space. You might need to bake them one at a time depending on your oven.
Why is there a crack on the side instead of the top?
You didn’t score it before baking. The bread needs somewhere to expand, and if you don’t tell it where (by scoring), it’ll pick its own spot.
Can I add a glaze?
Yes. Mix 1 cup powdered sugar with 2-3 tablespoons of milk and drizzle it over the cooled loaf. Some people add 1/2 teaspoon of vanilla to the glaze too.
Is this recipe good for beginners?
Honestly, yes. I taught my 14-year-old niece how to make this and she nailed it on her first try. If you can follow instructions and not get impatient during the rising times, you’ll be fine.
What’s the deal with instant yeast vs active dry?
Instant yeast can go straight into your dry ingredients. Active dry yeast needs to be proofed (dissolved in warm liquid first). Both work, instant is just faster and easier.
Can I make mini loaves instead?
Sure. Divide the dough in half after the first rise, roll each piece into a smaller rectangle, and bake in 5×3 inch mini loaf pans for about 25-30 minutes.
Wrapping Up
Here’s the thing about homemade bread: it feels intimidating until you actually do it.
Then you realize it’s just flour, yeast, and patience.
This cinnamon bread has become my go-to for lazy Sunday mornings, unexpected guests, and those random Tuesday nights when I want my house to smell like a bakery.
It’s not complicated. It doesn’t require fancy skills. You just need to follow the steps and trust the process.
Make this once and you’ll understand why I keep coming back to it.
Drop a comment below when you try it. I want to know if you went classic or added chocolate chips (the correct answer). And if you have any questions while you’re making it, ask away.


