
Dark, silky chocolate that melts on your tongue and makes you close your eyes for just a second.
That’s what a good chocolate mousse should do.
I’ve tested this recipe probably 20 times over the past few months because I wanted to get it absolutely right. And what I’ve learned is that chocolate mousse isn’t complicated or fancy, it just needs good chocolate and a little patience.
Most recipes overcomplicate things with gelatin or a million steps. This one uses just 5 ingredients and takes about 15 minutes of actual work.
Here’s what makes this recipe different: No gelatin, no complicated techniques, just pure chocolate flavor with a texture so light it practically floats off the spoon.
The key is using quality dark chocolate (I usually go for 70% cacao) and not rushing the folding process. Rush it, and you’ll end up with chocolate-flavored scrambled eggs.
Take your time, and you’ll get clouds of rich, airy mousse.
I made this for a dinner party last month and had three people ask for the recipe before dessert was even over. One guest literally said it was better than the mousse she had in Paris. 🇫🇷
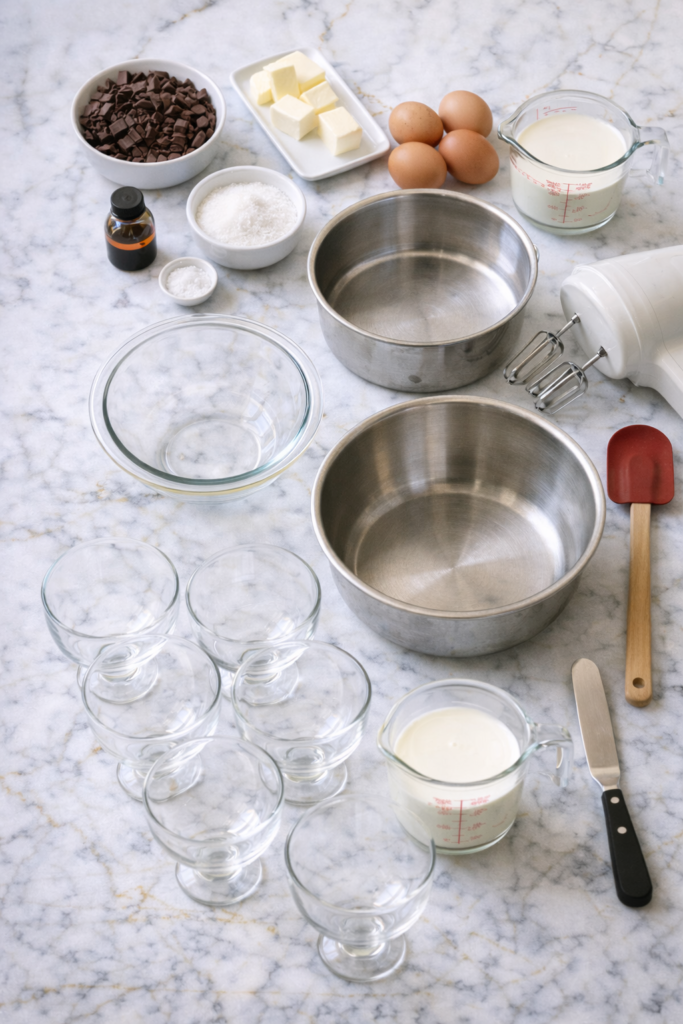
What You’ll Need
The Mousse Base
| Ingredient | Amount | Why It Matters |
|---|---|---|
| Dark chocolate (70% cacao) | 8 oz (225g), chopped | The star of the show – don’t cheap out here |
| Unsalted butter | 3 tablespoons | Adds silky richness |
| Large eggs | 4, separated | Yolks for richness, whites for airiness |
| Granulated sugar | 3 tablespoons | Just enough sweetness |
| Heavy whipping cream | 1 cup | Creates that cloud-like texture |
| Vanilla extract | 1 teaspoon | Enhances chocolate flavor |
| Salt | Pinch | Makes chocolate taste more chocolatey |
Optional Toppings (But Highly Recommended)
✓ Fresh whipped cream
✓ Raspberries or strawberries
✓ Dark chocolate shavings
✓ Flaky sea salt (trust me on this)
✓ Candied orange peel
Tools You’ll Need
You may also like : oatmeal chocolate chip cookie recipe
Essential:
- Medium saucepan
- Heat-safe bowl (for double boiler)
- Electric mixer or whisk
- 2 large mixing bowls
- Rubber spatula
- 6-8 serving glasses
Nice to Have:
- Piping bag for fancy presentation
- Microplane for chocolate shavings
- Kitchen thermometer
Pro Tips From Someone Who’s Made Every Mistake
1. Temperature is Everything 🌡️
Your eggs should be room temperature. Cold eggs don’t whip up as fluffy and they can shock the warm chocolate.
I take mine out of the fridge 30 minutes before starting, or I’ll place them in a bowl of warm water for 5 minutes if I’m impatient.
2. The Water Rule
This is critical: Even a single drop of water can make your chocolate seize up and turn into a grainy mess.
Make sure your double boiler bowl sits above the water, not in it. And keep all your utensils bone dry.
3. The Folding Technique
This is where most people mess up, so here’s exactly how to do it:
Step 1: Cut down through the center with your spatula
Step 2: Sweep along the bottom of the bowl
Step 3: Bring the spatula up the side
Step 4: Rotate the bowl a quarter turn
Step 5: Repeat until no white streaks remain
You’re trying to preserve air bubbles, not beat them out.
4. Patience Pays Off
Chill for at least 4 hours. I know waiting is torture, but this mousse needs time to set properly.
Overnight is honestly better if you can manage it. The flavors develop and the texture becomes even silkier.
5. Chocolate Quality Matters
Here’s my chocolate hierarchy:
🥇 Best: Valrhona, Callebaut, Guittard
🥈 Great: Ghirardelli 70% bars, Lindt Excellence
🥉 Good: Trader Joe’s Pound Plus Dark Chocolate
❌ Skip: Chocolate chips, baking chocolate squares, anything under 60% cacao
You’ll love these too : chocolate frosting recipe
How to Make Chocolate Mousse (Step-by-Step)

Step 1: Melt the Chocolate
Set up your double boiler by bringing about 2 inches of water to a simmer in a medium saucepan.
Place your heat-safe bowl on top. The bowl should rest on the rim of the pot, not touch the water.
Add the chopped chocolate and butter. Stir occasionally until completely melted and smooth, about 3-4 minutes.
Pro move: Turn off the heat once the chocolate is 75% melted. The residual heat will melt the rest, preventing any risk of burning.
Remove from heat and let it cool for 5 minutes. You want it warm enough to pour but not hot enough to cook the eggs.
Step 2: Temper with Egg Yolks
While the chocolate cools, separate your eggs.
Put the yolks in one bowl and the whites in another. Make sure the white bowl is spotlessly clean and completely dry.
Why this matters: Even a tiny bit of yolk in your whites will prevent them from whipping properly.
Whisk the egg yolks into the slightly cooled chocolate until smooth and glossy. Set aside.
Step 3: Whip the Egg Whites to Stiff Peaks
This is where the magic happens. ✨
Using an electric mixer on medium speed, beat the egg whites with a pinch of salt until foamy (about 1 minute).
Gradually add the sugar, one tablespoon at a time, while continuing to beat.
Increase speed to high and beat until stiff peaks form. This takes 3-4 minutes.
The peak test: Lift the beaters straight up. The peaks should stand straight without drooping. If they flop over, keep beating.
Step 4: Whip the Cream
In a separate bowl, beat the heavy cream and vanilla until soft peaks form.
Don’t overbeat! You want soft, billowy peaks, not stiff butter.
| Stage | What It Looks Like | Time |
|---|---|---|
| Frothy | Lots of bubbles, still liquid | 30 seconds |
| Soft peaks | Peaks droop when you lift beaters | 1-2 minutes |
| Medium peaks | Peaks hold but tips curl | 2-3 minutes |
| Stiff peaks | Peaks stand straight up | 3-4 minutes |
| Overwhipped | Grainy, butter forming | Too long! |
Stop at soft peaks for this recipe.
Step 5: The Folding Process (Don’t Rush This!)
First, take about 1/3 of the egg whites and fold them into the chocolate mixture.
This “sacrificial” portion lightens the chocolate and makes it easier to fold in the rest without deflating everything.
Now here’s the critical part:
Add half the remaining egg whites. Fold gently using the technique from the pro tips section.
Add the rest of the whites and fold until no streaks remain.
Finally, fold in the whipped cream using the same gentle motion.
What you’re looking for: The mixture should be light, airy, and uniform in color. No chocolate streaks, no white patches, just smooth mousse.
The whole folding process should take about 2-3 minutes. Any longer and you’re probably stirring instead of folding.
Recommended for you : double chocolate chip cookie recipe
Step 6: Chill and Set
Divide the mousse among your serving glasses.
You can pipe it in with a piping bag for a fancy look, or just spoon it in casually. Both work.
Cover with plastic wrap, pressing it directly onto the surface to prevent a skin from forming.
Refrigerate for at least 4 hours, but preferably overnight.
Substitutions and Variations
Chocolate Options
| Type | Result | My Take |
|---|---|---|
| 60-65% dark | Sweeter, less intense | Good for people who find dark chocolate bitter |
| 70-75% dark | Perfectly balanced | My go-to sweet spot |
| 80-85% dark | Very intense, less sweet | For serious dark chocolate lovers only |
| Semi-sweet | Too sweet | Reduce sugar to 2 tablespoons if using |
| Milk chocolate | ❌ Don’t | Won’t set properly, too sweet |
Flavor Twists That Actually Work
Coffee Lover’s Version:
Add 1 teaspoon instant espresso powder dissolved in 1 tablespoon hot water to the melted chocolate. Coffee makes chocolate taste even more chocolatey.
Orange Dark Chocolate:
Stir in 1 teaspoon finely grated orange zest and 1 tablespoon Grand Marnier. Classic French combination.
Peppermint Mousse:
Add 1/4 teaspoon peppermint extract with the vanilla. Perfect for the holidays. 🎄
Boozy Adult Version:
Add 2 tablespoons of bourbon, rum, or Kahlúa to the chocolate. Reduces sweetness and adds depth.
Salted Caramel Swirl:
Layer mousse with store-bought salted caramel sauce. Swirl gently with a knife before chilling.
Dietary Modifications
Dairy-Free/Coconut Version:
Replace heavy cream with full-fat coconut cream (chill the can overnight first). The mousse will have a subtle coconut flavor.
Use dairy-free dark chocolate (most dark chocolates are naturally dairy-free, but check the label).
Lower Sugar:
Cut the sugar to 2 tablespoons. The mousse will be less sweet but the chocolate flavor will be more pronounced.
You could also use a sugar substitute like erythritol, but I haven’t tested this personally.
Pasteurized Eggs (For Pregnancy-Safe Version):
Use pasteurized eggs available at most grocery stores in the regular egg section.
Or pasteurize them yourself using a sous vide at 135°F for 75 minutes.
Make Ahead Tips
Here’s something that’ll make your life easier: this mousse actually gets better after sitting in the fridge for a day.
The flavors meld together and the texture becomes even silkier.
Timeline:
| When to Make | Results |
|---|---|
| 4 hours ahead | Minimum time needed, texture is good |
| Overnight | Perfect texture, flavors fully developed |
| 1-2 days ahead | Even better, my preferred timing |
| 3 days ahead | Still delicious, starting to lose airiness |
| 4+ days | Not recommended |
Storage tips:
✓ Keep covered tightly in the fridge
✓ Don’t add toppings until just before serving
✓ Whipped cream and berries get soggy if they sit too long
✓ Chocolate shavings can be added up to 2 hours ahead
Nutritional Breakdown
Per serving (based on 8 servings):
| Nutrient | Amount | % Daily Value |
|---|---|---|
| Calories | 285 | – |
| Total Fat | 23g | 35% |
| Saturated Fat | 14g | 70% |
| Cholesterol | 135mg | 45% |
| Sodium | 45mg | 2% |
| Total Carbs | 16g | 5% |
| Fiber | 2g | 8% |
| Sugars | 12g | – |
| Protein | 5g | 10% |
The good news: Dark chocolate contains flavonoids and antioxidants. One serving is genuinely satisfying, so you won’t need a huge portion.
The real news: This is a rich dessert meant to be enjoyed in moderation. But life’s too short to skip dessert entirely. 🍫
Pairing Suggestions
This mousse is rich and intense, so you want to pair it with things that cut through or complement that richness.
Beverages That Work
Coffee: A strong espresso or Americano is perfection
Wine: Port, late harvest Zinfandel, or Banyuls
Whiskey: Bourbon with caramel notes
Tea: English Breakfast or Earl Grey
Liqueur: Baileys, Frangelico, or Amaretto
What to Serve Before
Keep dinner light if you’re serving this for dessert.
Good dinner pairings:
- Grilled fish with lemon
- Roasted chicken with herbs
- Light pasta with olive oil and garlic
- Fresh salads
Skip the heavy stuff:
- Creamy pasta dishes
- Rich beef stews
- Anything with a lot of cheese
Your guests will thank you when they’re not too stuffed to enjoy dessert.
Leftovers and Storage
Store covered in the fridge for up to 4 days.
The mousse will lose some of its airiness after day 3, but it’ll still taste incredible. The texture becomes more dense and fudgy, which honestly isn’t terrible.
Don’t freeze chocolate mousse. I learned this the hard way. The texture changes completely when thawed and you’ll end up with something grainy and separated. Just don’t do it.
Creative Ways to Use Leftovers
Mousse-Stuffed Crepes: Spoon mousse into fresh crepes and top with berries
Ice Cream Swirl: Fold leftover mousse into softened vanilla ice cream and refreeze
Trifle Layers: Layer with pound cake and whipped cream
Chocolate Tart Filling: Press into a graham cracker crust for easy chocolate tart
Troubleshooting Guide
“My chocolate seized up and got grainy!”
Cause: Water got into the chocolate
Fix: Whisk in 1 tablespoon of warm cream or butter until smooth
Prevention: Keep everything bone dry, no steam in the chocolate
“The egg whites won’t whip up!”
Cause: Bowl wasn’t clean, or there’s yolk in the whites
Fix: Start over with a clean bowl and fresh whites
Prevention: Wipe bowl with white vinegar, rinse, and dry completely
“My mousse is grainy and eggy!”
Cause: Chocolate was too hot when you added the yolks
Fix: Can’t fix it, but it’s still edible (just not as smooth)
Prevention: Let chocolate cool for 5-10 minutes before adding yolks
“The mousse deflated!”
Cause: Over-folding or stirring instead of folding
Fix: Can’t fix it once it’s done
Prevention: Use gentle folding motions, stop as soon as it’s combined
“It’s too bitter!”
Cause: Chocolate percentage is too high for your taste
Fix: Add a tablespoon of sugar and some extra whipped cream on top
Prevention: Use 60-65% chocolate instead of 70%+
“It won’t set!”
Cause: Not enough chill time, or you used milk chocolate
Fix: Give it more time in the fridge (up to 8 hours)
Prevention: Use dark chocolate and chill for at least 4 hours
FAQ
Do I have to use raw eggs?
This recipe does use raw eggs, which some people worry about.
If that concerns you, use pasteurized eggs (available at most grocery stores in the regular egg section). They’re heat-treated to kill bacteria but still raw enough to whip properly.
You can also pasteurize eggs yourself using a sous vide at 135°F for 75 minutes.
Can I make this without a mixer?
Yes, but prepare for an arm workout. 💪
You need to whip the egg whites to stiff peaks, which takes a solid 8-10 minutes of vigorous whisking by hand.
A balloon whisk and some determination will get you there. I’ve done it while camping and survived.
Why did my chocolate seize?
99% of the time, it’s because water got into the chocolate.
This can happen from:
- Wet utensils
- Steam from the double boiler
- Even humidity in the air on really humid days
If it happens, try whisking in a tablespoon of warm cream or melted butter to smooth it back out.
Can I use chocolate chips?
You can, but I don’t recommend it.
Chocolate chips contain stabilizers to help them keep their shape during baking. These same stabilizers prevent them from melting as smoothly as bar chocolate.
Bar chocolate is always better for mousse. It’s also usually better quality.
How do I know when the egg whites are done?
Turn off the mixer and lift the beaters straight up.
The peaks should stand straight up like little mountains without drooping over. If they flop to the side, keep beating for another minute.
My mousse is grainy. What happened?
Two possible causes:
1. Chocolate was too hot: If you add eggs to chocolate that’s over 120°F, you’ll essentially cook them into tiny scrambled bits. Let chocolate cool next time.
2. Over-mixing: If you stirred instead of folded, you broke down all the structure. Be gentler with your folding technique.
Can I make this vegan?
Sort of, but it won’t be quite the same.
Replacements:
- Aquafaba (chickpea liquid) instead of egg whites
- Coconut cream instead of dairy cream
- Vegan dark chocolate
The texture won’t be as light and silky, but it can definitely work. I’d add a tablespoon of cornstarch to help it set.
Is this mousse safe for pregnant women?
No, not this version, because of the raw eggs.
Raw or undercooked eggs carry a risk of salmonella, which is especially dangerous during pregnancy.
Pregnant and craving mousse? Use pasteurized eggs. They’re heat-treated to kill bacteria but still work perfectly in this recipe.
How far ahead can I make this?
Up to 3 days ahead is perfect.
Actually, I think it tastes better on day 2 than day 1. The flavors have time to develop and marry together.
Just keep it covered tightly in the fridge and don’t add toppings until you’re ready to serve.
Can I halve this recipe?
Absolutely! Just use 2 eggs instead of 4 and cut everything else in half.
You’ll get 3-4 servings instead of 6-8.
What if I don’t have a double boiler?
No problem! You can make one.
Just find a heat-safe bowl that sits on top of a saucepan without touching the bottom. Fill the saucepan with 2 inches of water and you’re set.
Or microwave the chocolate in 20-second bursts, stirring between each one. Just be more careful not to overheat it.
Wrapping Up
Chocolate mousse feels fancy, but it’s actually pretty forgiving once you understand the basics.
The hardest part is waiting for it to chill, and even if you can’t wait the full 4 hours, it’ll still taste incredible at 2 hours (just slightly less firm).
I love making this for dinner parties because you can prep it the day before and just pull it out when you’re ready for dessert. Zero stress, maximum impact.
Try it this weekend and come back to tell me how it turned out in the comments below. Did you add any fun variations? Did you have any disasters? I want to hear about it all.
And if you have questions about the recipe or technique, drop them below. I’m here to help you make the best chocolate mousse of your life.


1 thought on “The Only Chocolate Mousse Recipe You’ll Ever Need”