
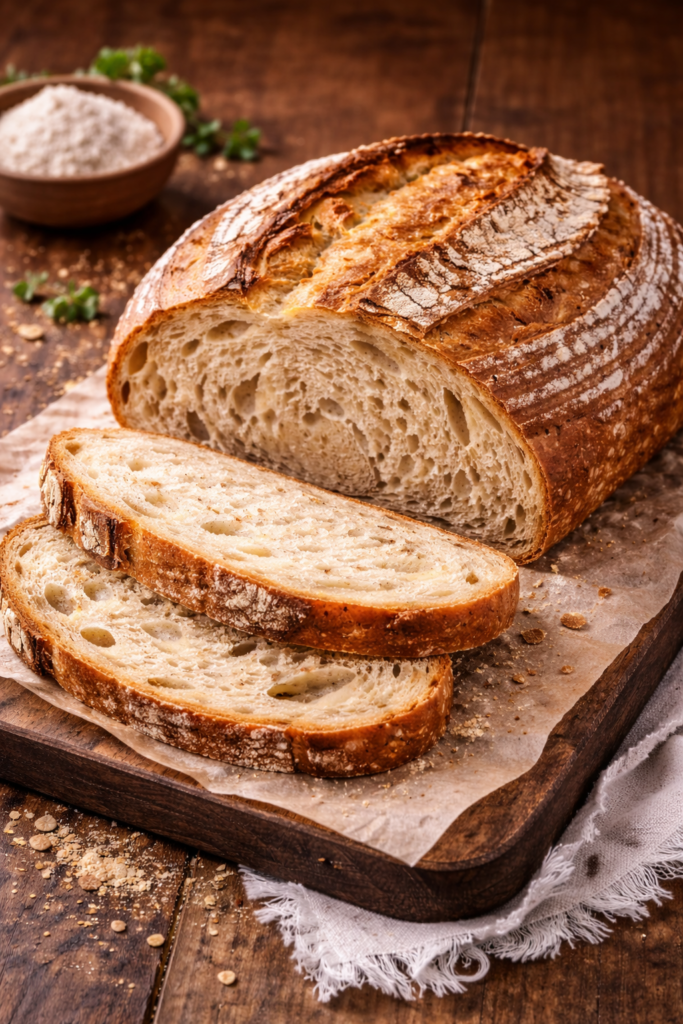
You know that $8 artisan loaf at the bakery?
The one with the crackling crust that sounds like Rice Krispies and those gorgeous irregular holes inside that Instagram bakers show off?
I’m about to save you $416 a year.
Because you can make that exact same bread at home. And no, you don’t need a professional oven, fancy equipment, or a degree in bread science.
I spent three months perfecting this recipe after my first attempt turned into a dense hockey puck. My husband literally refused to eat it (honestly, fair).
But now? I bake two loaves every Sunday and they’re gone by Wednesday.
Here’s what shocked me most: the secret isn’t some complicated technique.
It’s about understanding what your dough is telling you and giving it what it needs. Once you get it, you’ll never buy store-bought bread again.
“Sourdough baking is 10% recipe and 90% observation.” – Every baker who’s ever made this work
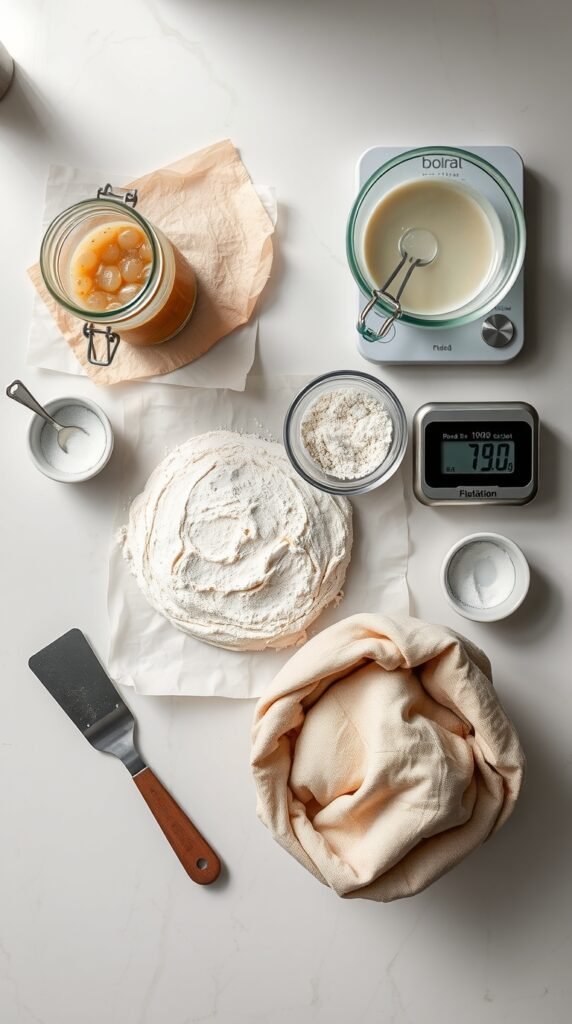
What You’ll Need
Quick Reality Check: This recipe makes 1 gorgeous loaf that serves 10-12 people.
The Starter Mix (Make This 8-12 Hours Before)
| Ingredient | Amount | Why It Matters |
|---|---|---|
| Active sourdough starter | 50g | Must be bubbly and doubled – this is your leavening agent |
| Bread flour | 50g | Higher protein = better structure |
| Water (room temp) | 50g | Activates the wild yeast |
The Main Dough
| Ingredient | Amount | Notes |
|---|---|---|
| Bread flour | 700g | Don’t substitute all-purpose here |
| Water (room temp) | 490g | Temperature affects fermentation speed |
| Salt | 15g | Flavor + gluten strength |
| Your fed starter | All 150g | Use when it’s at peak bubbliness |
💰 Cost Breakdown: This entire loaf costs about $2.50 to make vs. $8-12 at a bakery.
Tools You Actually Need
Must-Haves (Don’t Skip These):
- Kitchen scale – Seriously, cups don’t work for this
- Large mixing bowl
- Dutch oven with lid (4-7 quart size)
- Bench scraper
Nice-to-Haves:
- Banneton basket ($15-20, but a bowl works)
- Bread lame ($8, or use a razor blade)
- Instant-read thermometer
Already in Your Kitchen:
- Parchment paper
- Clean kitchen towel
- Sharp knife
Pro Tip: The Dutch oven is the one non-negotiable. That trapped steam creates the crackling crust. No workarounds here.
Pro Tips
These five things took me 47 failed loaves to figure out. Learn from my mistakes.
🎯 Starter Timing is Everything
Your starter should be at its peak when you add it to the dough.
That means doubled in size, bubbly, and passing the float test (drop a spoonful in water and it should float).
If it sinks? Wait longer. I learned this the hard way with multiple dense bricks.
🌡️ Temperature Matters More Than Time
Here’s what nobody tells you:
| Room Temperature | Bulk Fermentation Time | What to Watch For |
|---|---|---|
| 68-70°F | 6-8 hours | Slow rise, less tangy |
| 75-78°F | 4-5 hours | Sweet spot for timing |
| 80°F+ | 3-4 hours | Can over-proof quickly |
A cold kitchen means slower fermentation. A warm kitchen speeds things up.
I keep mine between 75-78°F for consistent results. Your dough will tell you when it’s ready, not the clock.
🪟 The Windowpane Test Never Lies
After your stretch and folds, test your dough.
Stretch a small piece between your fingers. If it forms a thin, translucent membrane without tearing, you’re golden.
Rips immediately? Keep working it.
🔥 Don’t Skip the Dutch Oven
That initial burst of steam creates the crispy crust.
A regular baking sheet won’t cut it here. The enclosed space traps moisture and mimics a professional steam-injected oven.
This is the ONE tool you can’t substitute.
✂️ Score with Confidence
A quick, decisive cut beats a hesitant one every single time.
Hold your blade at a 45-degree angle and make one swift motion about ½ inch deep.
Think of it like ripping off a bandaid. Commit.
Substitutions and Variations
Flour Swaps That Actually Work
| Swap This | For This | Adjustment Needed |
|---|---|---|
| 100g bread flour | Whole wheat flour | Add 10-20g extra water |
| 100g bread flour | Rye flour | Add 15g extra water, nuttier flavor |
| 50g bread flour | Spelt flour | Same hydration, slightly sweet |
The Rule: Keep whole grain additions under 15% of total flour or your bread gets dense.
No Dutch Oven? Try This
Option 1: Heavy oven-safe pot with lid (cast iron works great)
Option 2: Place a metal baking pan on the bottom oven rack. Pour 1 cup boiling water into it when you add the bread.
Fair warning: The crust won’t be quite as crackling-crispy, but it’ll still be delicious.
Fun Add-Ins to Try
Fold these in during your final stretch and fold:
- 100g chopped olives (Kalamata are my favorite)
- 80g sun-dried tomatoes + 20g fresh rosemary
- 100g roasted garlic cloves (smash them first)
- 75g dried cranberries + 50g chopped walnuts
- 2 tablespoons everything bagel seasoning (brush top with water first)
My Go-To: Olive and rosemary. The smell alone will have your neighbors knocking on your door.
Different Shapes You Can Make
This dough is crazy versatile:
Baguettes: Divide into 3 pieces, shape into long loaves, bake 20-25 minutes
Boule: Classic round loaf (what this recipe makes)
Batard: Oval-shaped, perfect for sandwiches
Make Ahead Tips
The Overnight Method (My Favorite)
Why it’s better: Longer fermentation = deeper flavor + more convenient timing
The Process:
Day 1, Morning: Feed your starter
Day 1, Evening: Mix and bulk ferment your dough
Day 1, Night: Shape and put in fridge (8-12 hours)
Day 2, Morning: Bake straight from the fridge
Add 5 minutes to baking time since it’s cold.
Freeze for Later
Shaped dough: Wrap tightly in plastic, freeze up to 3 months
To bake: Thaw overnight in fridge, bring to room temp (2-3 hours), then bake
Pro move: I make 3 loaves at once, freeze 2, and always have fresh bread ready.
Time-Saving Hack
Pre-measure your ingredients the night before.
Put flour in one bowl, water in a jar, salt in a small dish.
Morning baking becomes stupid-easy when you’re half-asleep and just want coffee.
How to Make Sourdough Bread
Step 1: Feed Your Starter (8-12 Hours Before Mixing)
Mix 50g starter with 50g flour and 50g water in a jar.
Let it sit at room temperature until it doubles in size and gets really bubbly.
Mine usually takes 8 hours in my kitchen, but watch yours.
Ready when: It smells pleasantly tangy (NOT like nail polish remover) and passes the float test.
Step 2: Mix the Dough (5 Minutes Active Time)
Combine 700g bread flour and 490g water in a large bowl.
Mix with your hands until no dry flour remains.
It’ll look shaggy and rough. That’s exactly what you want.
Cover with a damp towel and rest for 30-60 minutes.
What’s happening: This autolyse makes gluten development way easier later. The flour is absorbing water and relaxing.
Step 3: Add Starter and Salt (5 Minutes)
Add your active starter (all 150g) and the 15g salt.
Squish everything together with your hands.
It feels weird and sticky at first, but keep going until the salt and starter are fully mixed in.
Texture check: Sticky but not liquid. If it’s soup, you added too much water.
Step 4: Bulk Fermentation (4-5 Hours Total)
This is where the magic happens.
Cover your bowl and let the dough rest at room temperature.
The Stretch and Fold Schedule:
| Time | What to Do | Why |
|---|---|---|
| 0:00 | Start timer | Beginning of bulk ferment |
| 0:30 | First stretch and fold | Building strength |
| 1:00 | Second stretch and fold | More strength |
| 1:30 | Third stretch and fold | Even more strength |
| 2:00 | Fourth and final stretch and fold | Maximum strength |
| 2:00-4:00 | Leave it alone | Let it do its thing |
How to stretch and fold:
Wet your hands.
Grab one side of the dough, stretch it up, fold it over itself.
Rotate the bowl 90 degrees and repeat 4 times total.
Done when: Dough increases by 50%, has visible bubbles on surface, feels soft and jiggly when you shake the bowl.
Step 5: Pre-Shape (2 Minutes Active Time)
Lightly flour your work surface.
Turn out the dough (it should release easily).
Using your bench scraper, gently shape it into a round.
Cover and rest for 20-30 minutes.
Why this matters: Relaxes the gluten so final shaping is easier and doesn’t tear the dough.
Step 6: Final Shape (3 Minutes)
Flip the dough over so the smooth side is down.
Fold the bottom third up, then the top third down (like folding a letter).
Rotate 90 degrees and repeat.
Flip it seam-side down.
Cup your hands around the dough and drag it toward you in small circles.
Goal: Create a tight, smooth ball with surface tension.
“If your shaping is loose, your bread will spread out instead of rising up.” – Lesson learned from 12 flat loaves.
Step 7: Final Proof (2-4 Hours or Overnight)
Place your shaped loaf seam-side up in a well-floured banneton (or bowl with floured towel).
Cover with a towel.
Room Temperature Route: 2-4 hours until puffy. When you poke it gently, the indent slowly springs back halfway.
Overnight Route: Straight to the fridge for 8-12 hours. My preferred method for better flavor.
Step 8: Preheat (45 Minutes Before Baking)
Put your Dutch oven WITH THE LID ON in the oven.
Preheat to 450°F.
Don’t skip the full preheat time.
Critical: That heat is what creates the oven spring and crust.
Step 9: Score and Bake (Total: 45-55 Minutes)
Carefully remove your screaming-hot Dutch oven.
Flip your dough out onto parchment paper.
Using a sharp knife or lame, make one decisive cut about ½ inch deep at a 45-degree angle.
Baking Timeline:
| Time | Temp | What’s Happening |
|---|---|---|
| 0-30 min | 450°F (lid on) | Steam creates crust, bread rises |
| 30-50 min | 450°F (lid off) | Crust browns and crisps |
Done when deep golden brown and internal temp reads 205-210°F.
Step 10: Cool (The Hardest Part)
Transfer to a cooling rack.
Wait at least 1 hour before cutting.
I know it’s torture.
But the bread is still cooking inside during this time. Cut it too early and the inside will be gummy.
Listen for the crackling sound as it cools. That’s the crust doing its thing. 🎵
Leftovers and Storage
How to Store It
| Storage Method | Duration | Pro Tips |
|---|---|---|
| Counter (cut-side down on board) | 2-3 days | Never use plastic bags (soggy crust) |
| Sliced and frozen | 3 months | Toast straight from freezer |
| Whole loaf, frozen | 2 months | Thaw at room temp 2-3 hours |
Day-Old Bread Revival Trick:
Run the whole loaf under water for 2 seconds.
Bake at 350°F for 10 minutes.
It’ll taste fresh-baked again. This trick is magic.
When It Starts Getting Stale
Don’t throw it away. Sourdough makes THE best:
French Toast – The tangy flavor + custard = perfection
Croutons – Cube it, toss with olive oil and garlic, bake at 375°F for 15 minutes
Bread Pudding – Day-old sourdough soaks up custard better than fresh
Panzanella Salad – Italian tomato and bread salad
Breadcrumbs – Dry it completely, blitz in food processor, store in jar
My husband now gets excited when bread gets stale because it means French toast is happening.
Nutritional Information
Per Slice (Recipe makes 12 slices)
| Nutrient | Amount | % Daily Value* |
|---|---|---|
| Calories | 165 | – |
| Protein | 6g | 12% |
| Carbohydrates | 34g | 11% |
| Fiber | 1.5g | 5% |
| Fat | 0.5g | 1% |
| Sodium | 295mg | 13% |
*Based on 2,000 calorie diet
The Sourdough Advantage:
Natural fermentation breaks down some of the gluten, making it easier to digest than regular bread.
The wild yeast and bacteria create lactic acid, which:
- Gives it that signature tang
- Helps your body absorb minerals better
- Lowers the glycemic index compared to regular bread
Not saying it’s health food, but it’s definitely better for you than Wonder Bread.
Meal Pairing Suggestions
This Bread Makes Everything Better
For Breakfast:
🍳 Toasted with butter and honey (the crunch-to-soft ratio is perfect)
🥑 Thick slices with mashed avocado and a fried egg
🧈 Just butter. Seriously. Warm sourdough with good quality butter is pure joy.
For Lunch:
🧀 Grilled cheese (the crispy crust takes it to another level)
🥪 Paninis with whatever filling you want
🍅 Open-faced sandwiches piled high with roasted vegetables
For Dinner:
🍲 Serve alongside soups – tomato basil, French onion, butternut squash
🍝 Use it to sop up pasta sauce (the big holes catch all the sauce)
🥗 Turn it into garlic bread for literally any meal
For Snacks:
Honestly? Just tear off chunks and eat it.
No topping required when it’s this good.
FAQ
Troubleshooting Your Sourdough
Q: Why didn’t my bread rise?
Three possible culprits:
- Starter wasn’t active enough – It should double in size and pass the float test
- Room too cold – Below 70°F slows fermentation to a crawl
- Over-proofed – Left it too long and the gluten structure collapsed
Fix: Next time, make sure your starter is bubbly and energetic before using it.
Q: Why is my crust too thick/hard?
You over-baked it, or your oven runs hot.
Fix: Use an oven thermometer to check actual temperature. Reduce baking time by 5 minutes next round.
Q: Why is my bread gummy inside?
You didn’t let it cool long enough.
The inside keeps cooking as it cools. I know waiting is torture, but you need the full hour.
Fix: Practice patience. Or make two loaves so you can cut into one early and save the other. 😅
Q: Can I make this without a starter?
No. That’s like asking if you can make a cake without flour.
Sourdough is defined by the wild yeast starter. You’d need commercial yeast, which makes it a completely different type of bread.
Solution: Get a starter. You can make one from scratch (takes 5-7 days) or ask a baker friend for some of theirs.
Q: How do I know when bulk fermentation is done?
Look for these three signs:
| Sign | What It Means |
|---|---|
| 50% increase in volume | Yeast is active and working |
| Visible bubbles throughout | Good fermentation happening |
| Soft, jiggly texture when you shake the bowl | Gluten developed properly |
It should smell tangy and yeasty. Not sour or like acetone.
Q: My bread spread out instead of rising up. What happened?
Option 1: Dough was over-proofed (left too long during final proof)
Option 2: Shaping wasn’t tight enough
Fix: Create better surface tension when you shape. Think of it like wrapping a present – you want it snug.
Q: Do I really need a kitchen scale?
Short answer: Yes.
Long answer: Baking is chemistry. Volume measurements (cups) are wildly inconsistent with flour. One cup can vary by 30g depending on how you scoop it.
A $15 scale will completely change your baking game. It’s the difference between mediocre bread and bakery-quality bread.
Q: Can I use all-purpose flour instead of bread flour?
You can, but your bread won’t have the same structure or chew.
Bread flour has more protein (12-14%) which creates more gluten. That’s what gives sourdough its signature texture.
Best compromise: Use 80% bread flour and 20% all-purpose if that’s what you have.
Q: My starter smells like nail polish remover. Is it dead?
Not dead, just hungry and stressed.
That acetone smell means it needs food. Feed it twice a day for 2-3 days and it should bounce back.
If it develops mold or turns pink/orange? Toss it and start over.
Q: Why does my bread have a huge gap under the crust?
This happens when:
- Dough over-proofed and then got oven spring on the outside only
- Shaping was too loose
- You didn’t score deep enough
Fix: Watch your proof times more carefully and score decisively.
Wrapping Up
Your first loaf might not be perfect.
Mine definitely wasn’t. My husband took one bite, made a face, and said “this tastes like cardboard had a baby with a brick.”
Ouch. But also accurate.
Here’s the thing about sourdough: every single loaf teaches you something.
The dough talks to you if you pay attention.
Too sticky? It needs more flour next time.
Didn’t rise enough? Your starter wasn’t ready.
Dense and heavy? You skipped too many stretch and folds.
But once you nail it?
There’s nothing quite like pulling a crackling loaf of bread out of your own oven. The smell alone is worth every failed attempt.
That first slice while it’s still warm, with butter melting into all those irregular holes, hitting that perfect balance of crispy crust and soft interior…
That’s when you get it.
That’s when you understand why people get obsessed with sourdough.
Start this weekend.
Feed your starter tonight.
By Sunday afternoon, you’ll be slicing into warm, homemade sourdough that cost you $2.50 instead of $8.
Drop a comment below once you’ve made it.
I want to hear how your first loaf turned out. The good, the bad, and yes, even the hockey pucks.
And if you have questions along the way, ask. I’ve made every possible sourdough mistake, so I can probably help you avoid at least a few of them.
Now go make some bread. Your kitchen is about to smell amazing.


