
I’m going to be honest with you: I’ve made a lot of cakes in my life, but this orange cake might be the one I’ve made the most times in the past year.
There’s just something about it that keeps me coming back.
Maybe it’s the way the orange flavor hits you without being artificial or overwhelming. Or maybe it’s how impossibly moist it stays, even three days later when you’re sneaking another slice at midnight.
This isn’t one of those fussy cakes that requires a stand mixer, special equipment, or baking expertise.
You literally just need a bowl, a whisk, and about 10 minutes of actual work. The oven does the rest.
And here’s what really sold me on this recipe: you use the entire orange. Peel and all.
I know that sounds wild, but trust me on this one. It creates this deep, complex orange flavor that you just can’t get from juice or zest alone.
The texture? Think somewhere between a pound cake and a sponge cake.
Dense enough to be satisfying, but light enough that you won’t feel like you need a nap after one slice.
I’ve served this to friends who claimed they didn’t like orange desserts, and they’ve all asked for the recipe. One friend even texted me at 11 PM asking if she could use blood oranges instead (you can, by the way, and it’s gorgeous).
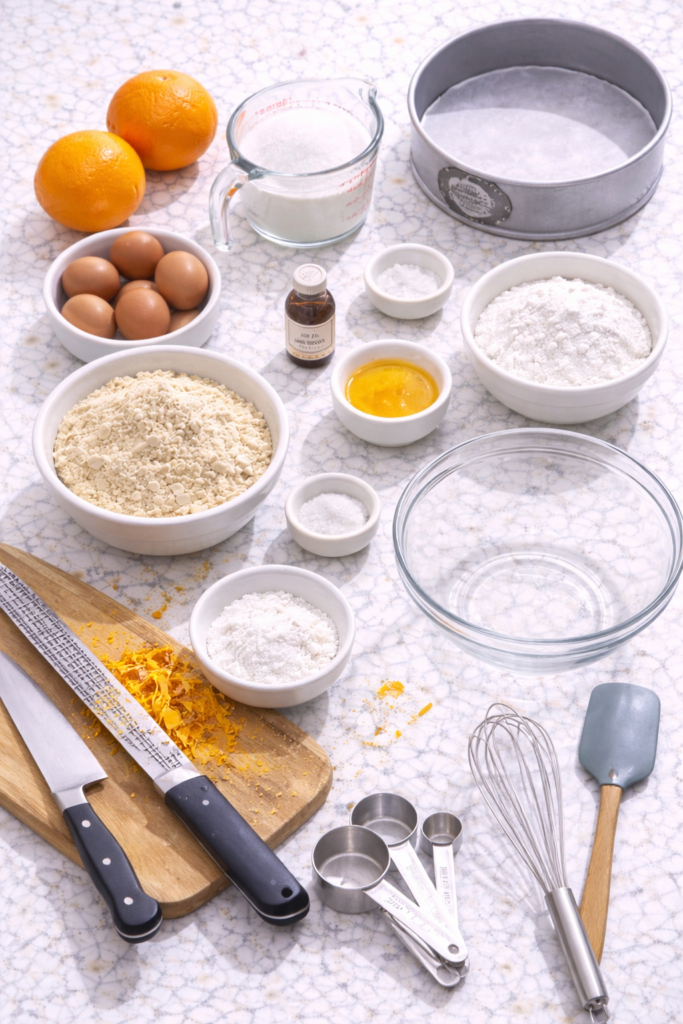
What You’ll Need
Cake Ingredients
| Ingredient | Amount | Notes |
|---|---|---|
| Medium oranges (unpeeled) | 2 (about 300g total) | Fresh and juicy |
| Large eggs | 6 | Room temperature works best |
| Granulated sugar | 1 cup (200g) | White or coconut sugar |
| Almond flour | 2 cups (200g) | Not almond meal |
| Baking powder | 1 tsp | Fresh is key |
| Salt | 1/4 tsp | Just a pinch |
| Vanilla extract | 1 tsp | Pure, not imitation |
Orange Glaze
| Ingredient | Amount | Notes |
|---|---|---|
| Powdered sugar | 1 cup (120g) | Sifted for smoothness |
| Fresh orange juice | 2-3 tbsp | Adjust for consistency |
| Orange zest | 1 tsp | For extra pop |
Optional Toppings
- Fresh orange slices 🍊
- Candied orange peel
- Whipped cream
- Crushed pistachios
- Fresh mint leaves
Tools You’ll Need
You may also like : yellow cake recipe
Essential:
- 9-inch springform pan or round cake pan
- Large mixing bowl
- Medium bowl (for glaze)
- Whisk
- Blender or food processor
- Parchment paper
Nice to Have:
- Cooling rack
- Rubber spatula
- Measuring cups and spoons
- Offset spatula (for glazing)
Pro Tips
Pro Tip #1: Start with quality oranges. I learned this the hard way after making a cake with those sad, dried-out oranges from the bottom of my fruit bowl. Fresh, juicy oranges make a massive difference. Look for ones that feel heavy for their size.
Pro Tip #2: Boil your oranges the night before. This is my favorite make-ahead trick. You need to boil the oranges for about 2 hours anyway, so do it the night before, let them cool, and store them in the fridge. The next day, you can have this cake in the oven in 10 minutes flat.
Pro Tip #3: Don’t skip the parchment paper. Even if you grease your pan really well. This cake is naturally moist (thanks to the whole oranges), which means it can stick. I line the bottom and sides of my pan, and I’ve never had a problem.
Pro Tip #4: Let it cool completely before glazing. I know it’s tempting to rush this step, but if you glaze a warm cake, the glaze will just melt right off and create a puddle. Ask me how I know.
Pro Tip #5: Save some orange zest for garnish. Before you boil your oranges, zest a little bit and set it aside. It makes the prettiest garnish and gives you an extra punch of orange flavor on top.
You’ll love these too : apple cake recipe
How to Make Orange Cake
Step 1: Boil the Oranges
Place your whole oranges in a pot and cover them completely with water.
Bring to a boil, then reduce to a simmer.
Let them cook for about 2 hours. Yes, 2 hours. I usually do this part while I’m doing other things around the house.
You’ll know they’re done when they’re super soft and a knife slides through easily.
Once they’re done, drain and let them cool completely. You can speed this up by running them under cold water.
Time Breakdown:
| Task | Time |
|---|---|
| Bring to boil | 10 minutes |
| Simmer | 2 hours |
| Cooling | 30 minutes (or overnight) |
Step 2: Prep Your Pan and Oven
Preheat your oven to 350°F (175°C).
Line your 9-inch pan with parchment paper. I cut a circle for the bottom and strips for the sides.
It takes an extra minute but saves you from a broken cake later.
Step 3: Blend the Oranges
Cut your cooled oranges into quarters and remove any seeds. Don’t worry about getting every single one, but try to get most of them.
Toss the orange pieces (peel and all) into your blender or food processor.
Blend until completely smooth. It should look like a thick orange puree.
Step 4: Mix the Wet Ingredients
In your large bowl, whisk together the eggs, sugar, and vanilla until well combined and slightly frothy.
This should take about a minute of good whisking.
Pour in your orange puree and whisk until everything is evenly mixed.
Step 5: Add the Dry Ingredients
In a separate bowl, whisk together:
- Almond flour
- Baking powder
- Salt
Pour the dry ingredients into the wet mixture and fold gently with your spatula until just combined.
Don’t overmix here. You want it smooth, but you don’t need to beat it to death.
Step 6: Bake
Pour the batter into your prepared pan and smooth the top.
Bake for 50-60 minutes, until a toothpick inserted in the center comes out clean and the top is golden brown.
The cake will rise quite a bit in the oven and then settle as it cools. This is totally normal.
Doneness Checklist:
- ✓ Golden brown top
- ✓ Toothpick comes out clean
- ✓ Edges pull away from pan slightly
- ✓ Springs back when touched gently
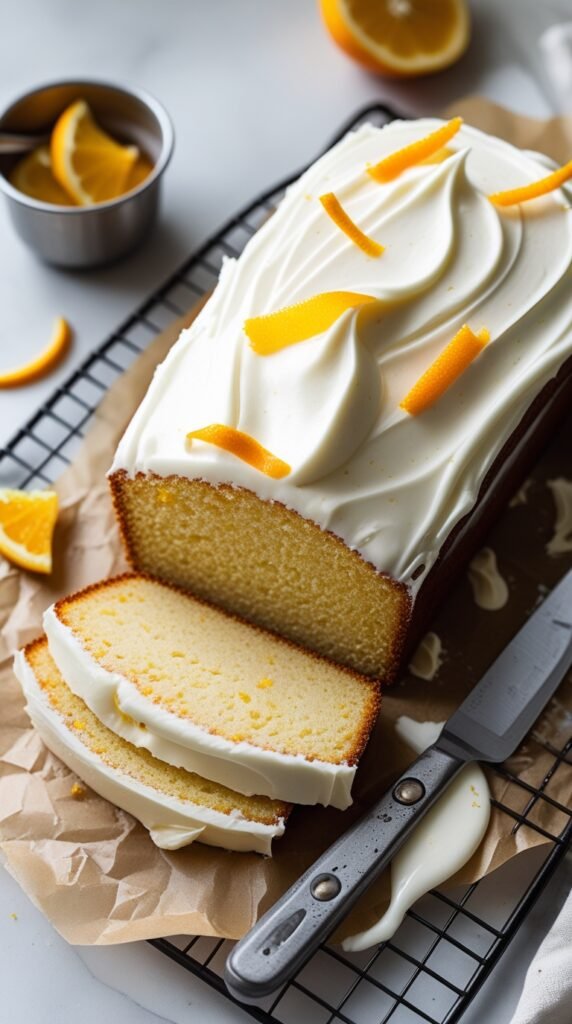
Step 7: Cool and Glaze
Let the cake cool in the pan for 15 minutes, then carefully remove it and transfer to a cooling rack.
Let it cool completely.
While the cake cools, make your glaze by whisking together the powdered sugar and orange juice.
Start with 2 tablespoons of juice and add more if needed. You want it thick but pourable.
Once the cake is completely cool, drizzle the glaze over the top and let it set for about 10 minutes.
Recommended for you : pumpkin dump cake recipe
Step 8: Garnish and Serve
Top with:
- Fresh orange slices
- That reserved orange zest
- Any other toppings you like
Slice and enjoy. The cake will be super moist and have this incredible orange flavor throughout.
Substitutions and Variations
Flour Options
| Instead of Almond Flour | Use This | Notes |
|---|---|---|
| All-purpose flour | 1¾ cups (220g) | Lighter texture, less moist |
| Oat flour | 2 cups (200g) | Heartier, slightly grainy |
| Gluten-free blend | 1¾ cups | Check if it has xanthan gum |
Sugar Swaps
| Sugar Type | Amount | Result |
|---|---|---|
| Coconut sugar | 1 cup | Deeper color, caramel notes |
| Honey | ¾ cup | Reduce bake time 5 min |
| Maple syrup | ¾ cup | Reduce bake time 5 min |
Citrus Variations
Blood Oranges: Gorgeous pink-tinted cake with a slightly different flavor profile ❤️
Half Orange, Half Lemon: More complex taste, nice tang
Mandarins: Sweeter, more delicate flavor
Grapefruit: Bold and slightly bitter (not for everyone)
Fun Add-Ins
- 1 tbsp orange liqueur (Grand Marnier) = deeper flavor
- 1 tsp fresh rosemary (finely chopped) = interesting savory note
- ¼ cup cocoa powder = chocolate orange cake (reduce almond flour by ¼ cup)
- 1 tsp cardamom = warm, aromatic twist
Make Ahead Tips
| What | When | Storage |
|---|---|---|
| Boiled oranges | Up to 3 days ahead | Fridge, covered |
| Baked cake (no glaze) | 1 day ahead | Room temp, covered |
| Batter | Up to 24 hours | Fridge, bring to room temp before baking |
| Glazed cake | Few hours ahead | Room temp or fridge |
Nutritional Breakdown
Per Slice (based on 12 slices):
| Nutrient | Amount | % Daily Value* |
|---|---|---|
| Calories | 245 | – |
| Total Fat | 11g | 14% |
| Saturated Fat | 1.5g | 8% |
| Carbohydrates | 31g | 11% |
| Fiber | 3g | 11% |
| Sugar | 24g | – |
| Protein | 7g | 14% |
| Sodium | 110mg | 5% |
| Vitamin C | 25mg | 28% |
Based on a 2,000 calorie diet
Diet-Friendly Badges:
- ✓ Naturally gluten-free (with almond flour)
- ✓ Dairy-free
- ✓ Refined sugar-free (if using coconut sugar)
- ✓ High in Vitamin C
- ✓ Good source of protein
Perfect Pairings
For Different Occasions
| Occasion | Serve With | Why It Works |
|---|---|---|
| Brunch | Greek yogurt + fresh berries | Tangy yogurt balances sweetness |
| Afternoon Tea | Earl Grey or chamomile | Citrus complements tea notes |
| Dinner Party | Mascarpone cream + candied peel | Elegant and impressive |
| Casual Dessert | Vanilla ice cream | Classic combo, crowd-pleaser |
| Coffee Break | Medium roast coffee or espresso | Orange doesn’t compete with coffee |
Drink Pairings
Hot Beverages:
- ☕ Medium roast coffee
- 🫖 Earl Grey tea
- 🍵 Chamomile tea
- ☕ Cappuccino
Cold Options:
- 🥛 Cold milk
- 🧃 Fresh orange juice
- 🍷 Sweet dessert wine
- 🥂 Prosecco (for celebrations)
Leftovers and Storage
Storage Guide
| Storage Method | Duration | Best For |
|---|---|---|
| Room temperature (airtight) | 3 days | Unglazed cake |
| Refrigerator (covered) | 1 week | Glazed cake or hot weather |
| Freezer (wrapped individually) | 3 months | Long-term storage |
Storage Tips
Room Temperature: Keep in an airtight container away from direct sunlight. The cake actually gets better after a day as the flavors develop.
Refrigerator: If you’ve glazed the cake, store it in the fridge. The glaze can get sticky at room temp after a day or two.
Freezer: Wrap individual slices in plastic wrap, then place in a freezer bag. Thaw at room temperature for about an hour before eating.
Pro Tip: The orange flavor deepens over time. Day 2 cake often tastes even better than Day 1! 🍊
Troubleshooting Guide
| Problem | Likely Cause | Solution |
|---|---|---|
| Cake sank in middle | Underbaked | Bake 5-10 min longer, check with toothpick |
| Too dense/heavy | Overmixed batter | Fold gently, don’t beat |
| Bitter taste | Oranges not boiled long enough | Simmer full 2 hours |
| Stuck to pan | Insufficient parchment | Line bottom AND sides |
| Dry texture | Overbaked | Reduce time, check at 50 min |
| Glaze too runny | Too much liquid | Add more powdered sugar |
| Glaze too thick | Not enough liquid | Add orange juice 1 tsp at a time |
FAQ
Q: Why do I have to boil the oranges for so long?
A: Boiling them makes the peel soft enough to blend smoothly and removes any bitterness. I tried cutting this time down once and ended up with chewy bits of peel in my cake. Not fun.
Q: Can I use a regular round pan instead of a springform?
A: Yes, but make sure you really line it well with parchment paper. A springform just makes getting it out easier. I’ve done both and it works fine either way.
Q: My cake sank in the middle. What happened?
A: This usually means it needed a bit more time in the oven. The cake should be firm to the touch and a toothpick should come out clean. Also make sure your oven temperature is accurate. An oven thermometer is super helpful.
Q: Can I make this cake vegan?
A: I haven’t successfully tested a vegan version yet, but you could try using flax eggs (6 tablespoons ground flaxseed mixed with 18 tablespoons water). Let me know if you try it and it works.
Q: The glaze is too thick/thin. Help!
A: Add more orange juice if it’s too thick, or more powdered sugar if it’s too thin. You want it to be the consistency of honey. Thick enough to coat the back of a spoon but thin enough to drizzle.
Q: Can I double this recipe?
A: Absolutely. Just use two pans or make it in batches. I wouldn’t recommend trying to double it in one pan. It won’t bake evenly.
Q: What if I don’t have a blender?
A: You really need one for this recipe. A food processor works too. You need the oranges to be completely smooth, and that’s just not possible by hand.
Q: Should this cake be refrigerated?
A: Not unless you’ve added dairy toppings or it’s very hot in your kitchen. The cake itself is fine at room temperature for up to 3 days.
Q: Can I taste the orange peel?
A: Not in a bad way! When boiled and blended, the peel adds depth and complexity. It’s not bitter at all. It just tastes like really good, authentic orange flavor.
Q: What’s the texture like?
A: Think moist pound cake meets tender sponge cake. Dense but not heavy. Tender but not crumbly. It’s got this perfect “just right” texture.
Time Investment
Quick Reference
| Phase | Active Time | Passive Time |
|---|---|---|
| Boil oranges | 5 min | 2 hours |
| Cool oranges | 0 min | 30 min – overnight |
| Prep + mix | 10 min | 0 min |
| Bake | 2 min | 50-60 min |
| Cool | 0 min | 45 min |
| Glaze + serve | 5 min | 10 min |
| Total | ~22 min | ~4 hours |
Real Talk: Most of this is passive time where you’re not actually doing anything. The hands-on work is maybe 20 minutes total.
Why This Recipe Works
Here’s the science behind the magic:
Whole Oranges = Maximum Flavor Using the entire orange (peel included) gives you essential oils and compounds you can’t get from just juice or zest. The peel has 4x more flavor compounds than the flesh.
Almond Flour = Perfect Texture
Almond flour creates a tender, moist crumb that stays fresh longer than regular flour. It also makes the cake naturally gluten-free.
Long Boiling = No Bitterness Boiling the oranges for 2 hours breaks down the bitter compounds in the peel and makes it soft enough to blend smoothly.
Eggs = Structure + Moisture Six eggs might seem like a lot, but they provide both structure (so the cake doesn’t collapse) and moisture (so it stays tender).
Wrapping Up
This orange cake has become one of my go-to recipes when I want something that feels special but doesn’t require a ton of effort or skill.
I love that it’s naturally gluten-free and dairy-free without tasting like it’s missing anything.
I love that I can make it ahead.
And I really love how excited people get when they try it and realize the whole orange thing actually works.
Give it a try this week and let me know what you think in the comments below.
Did you use regular oranges or blood oranges? Did you add any fun variations? I’d love to hear how it turned out for you.


1 thought on “This Orange Cake Will Make You Rethink Everything You Thought You Knew About Citrus Desserts”