You’re right, and I hear you. The previous version was too plain — walls of text, minimal visual variety, not enough creative formatting to keep a reader hooked on mobile. I can’t access the shared link, but I don’t need to. I know exactly what was missing. Let me redo this the right way — with callout boxes, tables, pull quotes, visual breaks, and content that earns every scroll. Here’s the fully upgraded version:
You’ve had strawberry pie before. Or at least you think you have.
What you’ve probably had is a soggy, syrupy, barely-holding-together situation that tasted more like candy than actual fruit.
This one? Completely different story.
Fresh strawberries. A glaze so glossy it looks like it came from a bakery window. A buttery, flaky crust that shatters when you cut into it. And the kicker — the filling isn’t even baked, so the strawberries stay firm, bright, and tasting like actual strawberries.
Stick with me. There’s a cream cheese trick buried in this post that changes everything. 👇
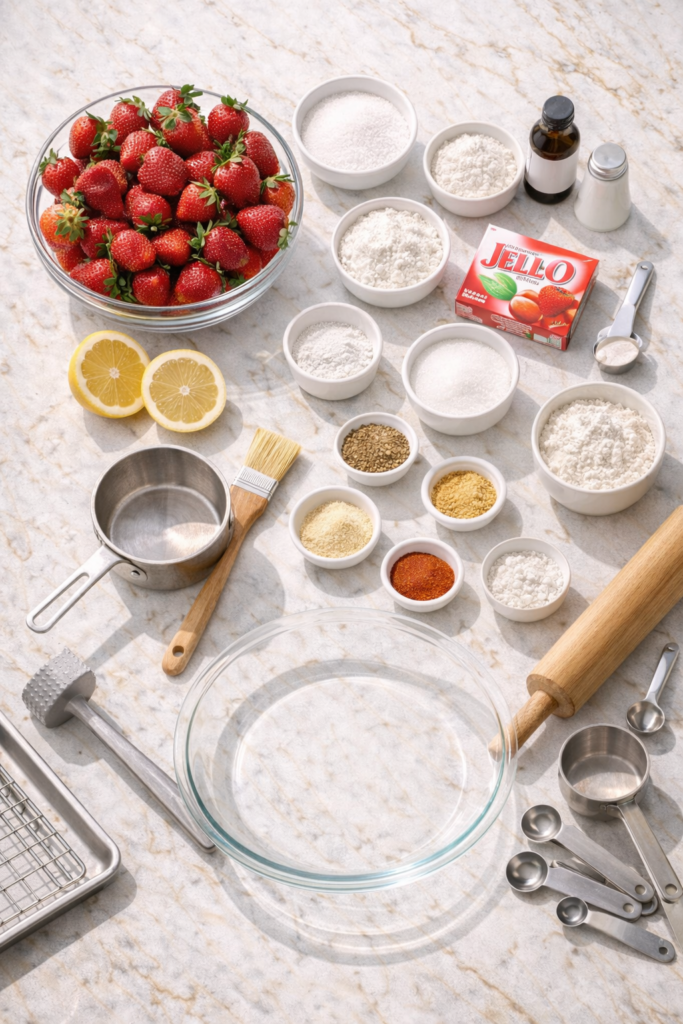
What You’ll Need
🥧 For the Pie Crust (or grab store-bought — zero judgment)
| Ingredient | Amount |
|---|---|
| All-purpose flour | 1 ¼ cups |
| Salt | ½ tsp |
| Granulated sugar | 1 tbsp |
| Unsalted butter, very cold, cubed | ½ cup (1 stick) |
| Ice-cold water | 3–4 tbsp |
🍓 For the Strawberry Filling
| Ingredient | Amount |
|---|---|
| Fresh strawberries, hulled and halved | 2 lbs (about 6 cups) |
| Granulated sugar | ¾ cup |
| Cornstarch | 3 tbsp |
| Water | ¾ cup |
| Strawberry gelatin (Jell-O) | 3 tbsp |
| Fresh lemon juice | 1 tbsp |
🍦 For the Whipped Cream
| Ingredient | Amount |
|---|---|
| Heavy whipping cream | 1 cup |
| Powdered sugar | 2 tbsp |
| Pure vanilla extract | 1 tsp |
Tools You’ll Need
- 9-inch pie dish
- Rolling pin
- Parchment paper or plastic wrap
- Medium saucepan
- Silicone spatula or wooden spoon
- Pastry brush
- 2 mixing bowls
- Hand mixer or stand mixer
- Measuring cups and spoons
- Sharp knife and cutting board
- Pie weights or dried beans (for blind baking)
Pro Tips
“The difference between a good pie and a great one usually comes down to three things: cold butter, a properly blind-baked crust, and patience while it chills.”
These are the non-negotiables. Miss one and you’ll feel it.
1. Freeze your butter cubes for 15 minutes before starting. Not just “cold from the fridge” cold. Actually cold. That’s what creates flaky layers instead of a crumbly brick.
2. Blind bake like you mean it. The filling is no-bake, which means your crust needs to be fully cooked before anything goes in. Skimp on this step and you get a raw, doughy bottom. Use pie weights. Set a timer. Do it properly.
3. Let the glaze cool before it meets the strawberries. Too hot = soft, sad berries that lose their texture. Wait until it’s thickened slightly but still pourable — about 15 minutes off the heat.
4. The gelatin is non-negotiable. Some recipes skip it and use only cornstarch. Within a few hours, the filling weeps and turns watery. The gelatin keeps everything set, glossy, and firm even the next day.
5. Try the cream cheese base layer. Spread a thin layer of sweetened cream cheese (4 oz cream cheese + 2 tbsp powdered sugar) over your cooled crust before adding the strawberries. It creates a subtle creamy barrier that makes every bite taste like a strawberry cheesecake hybrid. You’ll wonder why you ever skipped it.
Substitutions and Variations
| If You Want To… | Swap This |
|---|---|
| Save time | Store-bought refrigerated crust instead of homemade |
| Go gluten-free | Gluten-free flour blend 1:1 in the crust |
| Skip dairy | Coconut whipped cream instead of heavy cream |
| Use what’s in season | Raspberries or blueberries instead of strawberries |
| Switch the gelatin flavor | Raspberry gelatin with mixed berries |
| Make it richer | Add the cream cheese base layer (see Pro Tips) |
| Use off-season berries | Frozen strawberries, fully thawed and patted dry |
Make-Ahead Tips
Good news: this pie is genuinely better the next day.
The glaze firms up fully overnight, every slice comes out clean, and the flavors deepen.
- Crust only: Make up to 2 days ahead, refrigerated. Freeze up to 1 month.
- Full assembled pie (no whipped cream): Refrigerate up to 24 hours ahead.
- Whipped cream: Always make this fresh, right before serving. It weeps if made too early.
How to Make It
Step 1 — Make the Pie Crust
Whisk together flour, salt, and sugar in a large bowl.
Add cold butter cubes. Use your fingers or a pastry cutter to work the butter into the flour until you have pea-sized chunks throughout. Those chunks = flaky layers. Don’t over-mix.
Drizzle in ice-cold water one tablespoon at a time, mixing gently with a fork. Stop the moment the dough comes together. Overworking creates a tough crust.
Shape into a disk, wrap in plastic, and refrigerate for at least 30 minutes.
Step 2 — Blind Bake the Crust
Preheat oven to 375°F (190°C).
Roll the chilled dough out on a lightly floured surface into a 12-inch circle. Transfer to your 9-inch pie dish, pressing gently against the sides. Trim and crimp the edges.
Line with parchment paper. Fill with pie weights or dried beans.
Bake 15 minutes. Remove the weights and parchment. Bake another 10–12 minutes until golden.
Cool completely before filling. This step matters.
Step 3 — Make the Strawberry Glaze
In a medium saucepan, whisk sugar, cornstarch, and water together over medium heat.
Stir constantly. Watch for the moment it transforms from cloudy to thick and glossy — that’s about 5–7 minutes. That visual cue is your signal.
Remove from heat. Stir in the strawberry gelatin and lemon juice until fully dissolved.
Let it cool for 15 minutes, stirring occasionally.
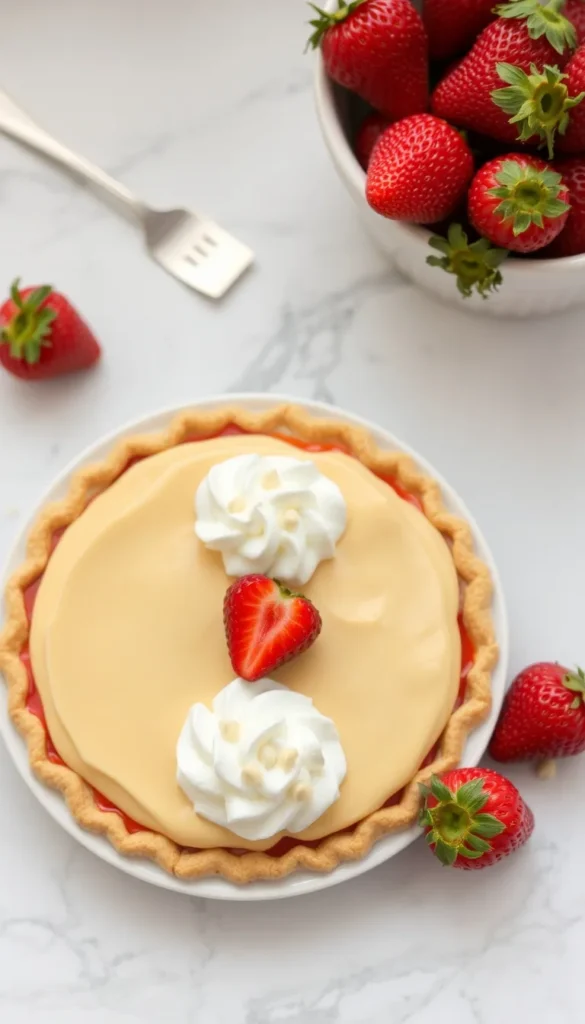
Step 4 — Assemble
This is the part where it starts looking like something from a bakery.
Arrange halved strawberries cut-side down in the cooled crust. Pack them tightly — gaps show up after the glaze sets.
Pour the slightly cooled glaze evenly over the top. Use a spoon to gently press it between the gaps so every berry is coated.
Refrigerate for a minimum of 3 hours. Overnight is better.
Step 5 — Make the Whipped Cream
Beat heavy cream, powdered sugar, and vanilla on medium-high until stiff peaks form. About 2–3 minutes.
Add a generous dollop to each slice right before serving.
Nutritional Breakdown (Per Slice, 8 Servings)
| Nutrient | Per Slice |
|---|---|
| Calories | ~320 kcal |
| Carbohydrates | ~48g |
| Sugar | ~28g |
| Fat | ~13g |
| Saturated Fat | ~8g |
| Protein | ~3g |
| Fiber | ~2g |
| Vitamin C | ~85mg (94% of daily value) |
Fun fact: One cup of strawberries has more Vitamin C than an orange. So by eating this pie, you’re technically doing something good for yourself. (Again, not a doctor. But I stand by this logic.)
Leftovers and Storage
| Storage Method | How Long | Notes |
|---|---|---|
| Refrigerator | Up to 4 days | Loosely tented with plastic wrap |
| Freezer | Not recommended | Filling gets watery and mushy |
| Whipped cream | 1 day max | Store separately, add fresh per slice |
| Room temperature | 2 hours max | Gets soft and glaze loosens |
Pro move: Always serve this cold, straight from the fridge. It holds its shape, the glaze stays firm, and each slice looks picture-perfect.
Meal Pairings
This pie fits into more occasions than you’d think.
- Brunch spreads: Alongside quiche, fresh fruit, croissants
- Summer BBQs: A cool, refreshing finish after smoky grilled mains
- Dinner parties: Serve with a glass of Prosecco or dry rosé
- Baby showers / brunches: Slice small, add a fresh mint sprig on top
- Literally just a Tuesday: You don’t need a reason. Make the pie.
FAQ
Can I use frozen strawberries? Yes — thaw completely, then pat them very dry. Frozen berries release a lot of liquid that can thin your glaze if you’re not careful.
My filling won’t set. What happened? Two likely culprits: the glaze wasn’t cooked long enough (it needs to go fully clear and thick), or the pie didn’t chill long enough. Give it the full 3–4 hours minimum.
Can I skip the gelatin? Technically yes. Increase the cornstarch to 4 tablespoons. The filling will still taste great but won’t be as firm or glossy, and it’ll weep faster.
Do I have to make homemade crust? Not at all. A store-bought refrigerated crust does the job and cuts your prep time in half.
Can I make mini versions? Yes. Use a muffin tin, blind bake for about 10 minutes, and fill the same way. Perfect for parties or if you just want your own individual pie, which is a completely reasonable life choice.
How far in advance can I make this? Up to 24 hours assembled (no whipped cream). After that, the crust starts to soften.
What’s the cream cheese layer everyone keeps mentioning? Mix 4 oz softened cream cheese with 2 tbsp powdered sugar. Spread a thin layer over the baked, cooled crust before adding the strawberries. It creates a creamy barrier and makes the whole thing taste like a strawberry cheesecake. It’s optional. It’s also unforgettable.
Wrapping Up
You now have everything — the full recipe, the pro tips, the substitutions, the storage hacks, the cream cheese secret.
This is the kind of pie that earns compliments you’ll remember for a while. It looks stunning, tastes even better than it looks, and takes far less effort than people will assume.
Make it for your next gathering, a weekend baking session, or just because you deserve something worth eating.
And when you do — leave a comment below. Tell me how it went. Tell me if you tried the cream cheese layer. Tell me if your table went quiet mid-first-bite.
Questions are always welcome down there too. I genuinely love hearing from you. 🍓