
I’ve been baking bread for years, but ciabatta? That one intimidated me for the longest time.
All those recipes talking about high hydration doughs and specialized techniques made it seem like something only professional bakers could pull off.
But here’s the thing: it’s actually way more forgiving than you’d think.
Once I finally tried making it at home, I realized ciabatta is all about embracing the mess.
The dough is wet, sticky, and looks nothing like what you’d expect. But that’s exactly what gives you those massive air pockets and that shatteringly crispy crust.
Now I make it at least twice a month, and honestly, nothing beats slicing into a warm loaf you just pulled from your own oven.
Quick Recipe Snapshot:
| Timeline | Hands-On Time | Total Time |
|---|---|---|
| Day 1 | 15 minutes | 2.5 hours + overnight |
| Day 2 | 10 minutes | 1 hour |
Skill Level: Intermediate (but totally doable for beginners!)
Yield: 2 large loaves
Best For: Sandwiches, dipping, trying to impress literally everyone
What You’ll Need
The Ingredients
| Ingredient | Amount | Notes |
|---|---|---|
| Bread flour | 3 ¾ cups (500g) | Higher protein = better chew |
| Lukewarm water | 2 cups (480ml) | 90°F/32°C – feels barely warm |
| Instant yeast | 2 tsp (7g) | Active dry works too |
| Fine sea salt | 2 tsp (10g) | Don’t skip this flavor |
| Extra virgin olive oil | 2 tbsp (30ml) | The good stuff makes a difference |
| Dusting flour | As needed | All-purpose is fine here |
💡 Why bread flour matters: The extra protein creates more gluten, which gives ciabatta its signature chewy texture and helps trap all those beautiful air bubbles.
Your Essential Toolkit
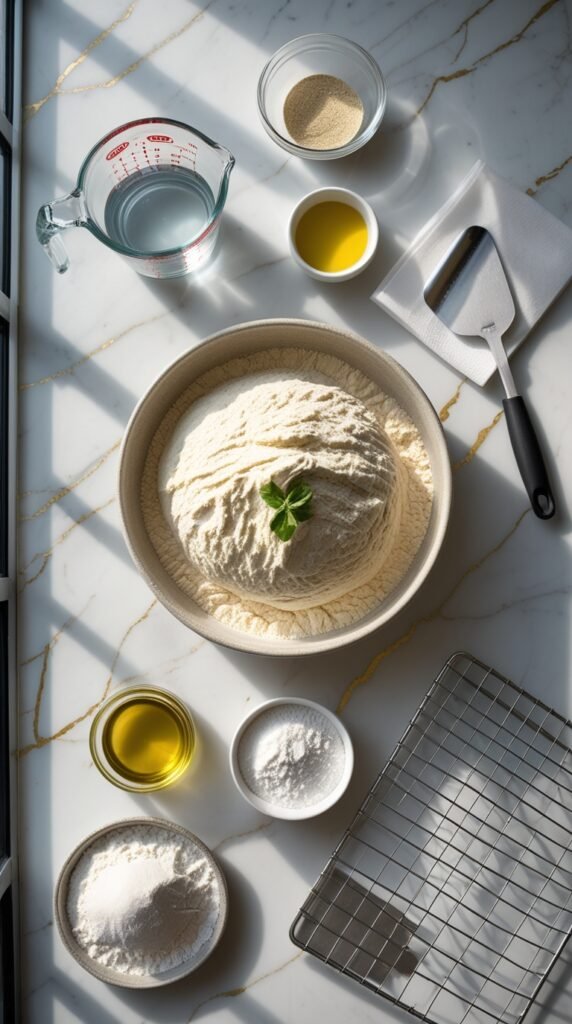
Must-Haves:
- Large mixing bowl (dough doubles in size)
- Kitchen scale (game-changer for consistent results)
- Bench scraper or sturdy spatula
- Clean kitchen towel or plastic wrap
For Baking Day:
- Baking sheet or pizza stone
- Parchment paper
- Spray bottle with water
- Wire cooling rack
Pro baker secret: A pizza stone preheated for 30+ minutes creates a crust so crispy it literally crackles when you break it apart.
Pro Tips
🌊 The wetter, the better
I know the dough looks ridiculously sticky at first. Don’t panic and add more flour.
That wetness is what creates those gorgeous air pockets. Resist the urge to fix it.
Trust me on this one.
🔪 Use a bench scraper, not your hands
When you’re shaping the dough, a bench scraper is your best friend.
The dough is too sticky to handle with your bare hands without adding tons of extra flour (which you don’t want).
Just gently fold and shape with the scraper. It’s like magic.
🔥 Preheat that oven properly
I’m talking 475°F for at least 30 minutes before the bread goes in.
A really hot oven creates that crispy crust. If you have a pizza stone, even better.
Let it preheat with the oven and you’ll get bakery-level results.
💨 Create steam in your oven
Right when you put the bread in, spray the oven walls with water from a spray bottle.
Do it quickly and close the door fast.
That steam helps develop the crust. Some people toss ice cubes in a pan at the bottom of the oven, but I find the spray bottle easier.
⏰ Don’t skip the overnight rise
I’ve tried rushing this, and the flavor just isn’t the same.
That long, slow fermentation in the fridge gives ciabatta its slightly tangy taste and better texture.
Plan ahead and you won’t regret it. This is where ciabatta goes from good to incredible.
Step-by-Step Instructions
Day 1: Mix and First Rise
⏱️ Active Time: 15 minutes | Rise Time: 1.5 hours + overnight
Step 1: Activate the yeast (5 minutes)
Mix the water and yeast in your large bowl.
Let it sit for about 5 minutes until it gets a little foamy. This tells you the yeast is alive and ready to work.
Step 2: Mix the dough (5 minutes)
Add the flour, salt, and olive oil.
Use a sturdy spoon or your hands to mix everything until there’s no dry flour left.
The dough will be shaggy and sticky. That’s perfect. Don’t try to make it smooth.
Step 3: First rise (1 to 1.5 hours)
Cover the bowl with a damp kitchen towel or plastic wrap.
Let it rise at room temperature for 1 to 1.5 hours.
It should roughly double in size and look bubbly. You’ll see all these little air pockets forming.
Step 4: Stretch and fold technique (10 minutes total)
After the first rise, do a series of stretch and folds.
Wet your hands, grab one side of the dough, stretch it up, and fold it over itself.
Rotate the bowl 90 degrees and repeat. Do this 4 times total.
You’re building structure without kneading. It’s way gentler and actually works better.
Wait 30 minutes and repeat the stretch and fold process one more time.
Step 5: Cold fermentation (8 to 24 hours)
Cover the bowl tightly with plastic wrap and stick it in the fridge overnight.
The cold fermentation is where the magic happens. This is when the flavor develops.
Leave it for at least 8 hours, but up to 24 hours works great too.
Day 2: Shape and Bake
⏱️ Active Time: 10 minutes | Baking Time: 25 minutes
Step 6: Prepare the dough (2 minutes)
Take the dough out of the fridge. It’ll be puffy and full of air bubbles.
Beautiful sight, right?
Dust your work surface generously with flour.
Turn the dough out onto it. Don’t punch it down or you’ll lose all those air pockets you worked so hard to create.
Step 7: Divide and shape (5 minutes)
Use your bench scraper to gently divide the dough into 2 or 3 pieces, depending on how large you want your loaves.
I usually do 2 bigger loaves because they’re more impressive.
Dust the tops with more flour.
Using your bench scraper, gently stretch each piece into a rough rectangle. Don’t roll it or press hard.
Just coax it into shape. It should be about ¾ inch thick.
Step 8: Final rise (30 to 45 minutes)
Transfer each piece onto parchment paper.
Let them rest for 30 to 45 minutes while you preheat your oven to 475°F (245°C).
If using a pizza stone, put it in the oven now.
Step 9: Dimple and prep for baking (2 minutes)
Right before baking, use your fingers to dimple the dough gently.
This creates those classic ciabatta indentations and helps the bread bake evenly.
Step 10: Bake with steam (20 to 25 minutes)
Slide the parchment paper with the dough onto your baking sheet or pizza stone.
Spray the oven walls with water, close the door quickly, and bake for 20 to 25 minutes.
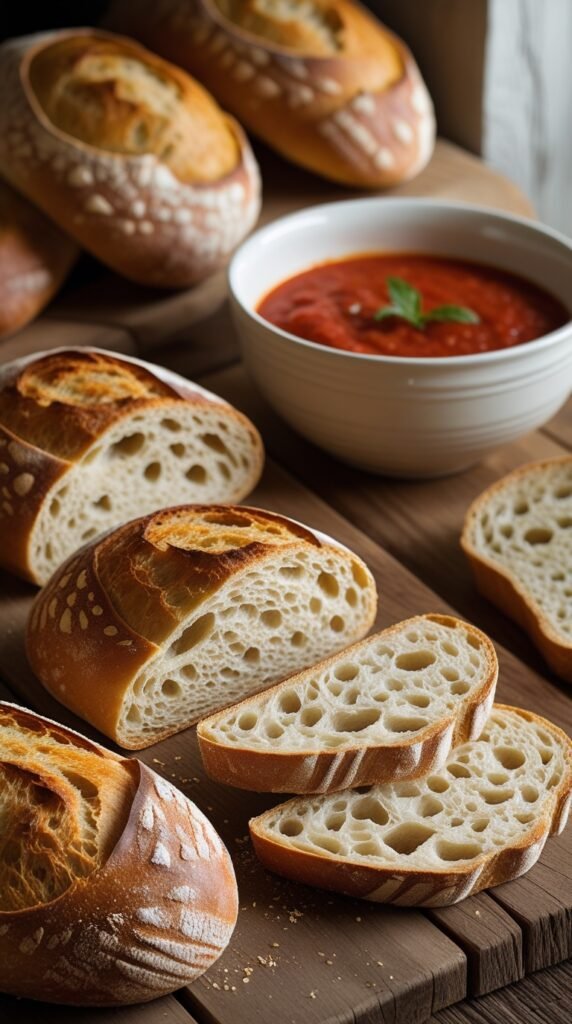
The bread is done when it’s deep golden brown and sounds hollow when you tap the bottom.
Internal temperature should hit around 205°F (96°C) if you want to be precise.
Step 11: Cool (15 minutes minimum)
Transfer to a wire rack immediately.
Let it cool for at least 15 minutes before slicing.
I know it’s hard to wait, but cutting into hot bread makes the inside gummy. You’ve come this far, don’t ruin it now.
The moment of truth: That first crack when you break open a warm loaf and see those giant, irregular holes? Pure satisfaction. This is why we bake.
Substitutions and Variations
Ingredient Swaps That Actually Work
| Original | Substitute | What Changes |
|---|---|---|
| Bread flour | All-purpose flour | Less chewy, slightly denser crumb |
| Bread flour | 50% whole wheat | Nuttier flavor, less open crumb |
| Bread flour | 00 flour (pizza flour) | Incredibly light, less chewy |
| Instant yeast | Active dry yeast | Dissolve in water first, wait 10 min |
| Olive oil | Neutral oil | Same texture, less flavor |
Flavor Variations to Try
Rosemary Ciabatta 🌿
Add 2 tablespoons of chopped fresh rosemary during the initial mix.
The aroma while it’s baking will make your whole house smell like an Italian bakery.
Roasted Garlic Version 🧄
Press 6 to 8 roasted garlic cloves into the dough before shaping.
Sweet, mellow garlic flavor in every bite.
Olive & Sun-Dried Tomato
Fold in ½ cup of chopped olives or sun-dried tomatoes after the first rise.
Pat them dry first so they don’t add too much extra moisture. This combo is insanely good with pasta.
Everything Bagel Ciabatta
Brush the top with olive oil before baking and sprinkle with everything bagel seasoning.
Trust me on this one. It’s ridiculous how good it is.
Mix-in rule: Never add more than ½ cup of extras or you’ll weigh down the dough and lose that airy texture.
Make Ahead Tips
The beauty of ciabatta is that it practically demands to be made ahead.
Your Flexible Timeline
Option 1: Extended Cold Rise
After the overnight rise in the fridge, the dough can actually stay there for up to 24 hours.
So if you mix it Monday night, you could bake it Wednesday morning.
The flavor gets even better with the extra time. I’ve done this countless times when life gets busy.
Option 2: Freeze Unbaked Loaves
Shape the dough on Day 2, then wrap tightly in plastic wrap and freeze for up to 2 months.
When you’re ready to bake:
- Thaw in fridge overnight
- Bring to room temperature (30 minutes)
- Bake as usual
Fresh bread anytime you want it. Game changer.
Option 3: Freeze Baked Bread
Let the baked ciabatta cool completely.
Wrap it tightly and freeze for up to 3 months.
Thaw at room temperature, then refresh in a 350°F oven for 5 to 10 minutes to crisp up the crust.
Honestly tastes like you just baked it.
| Method | Storage Time | Best For |
|---|---|---|
| Extended fridge rise | Up to 24 hours | More flavor development |
| Freeze unbaked | 2 months | Fresh-baked anytime |
| Freeze baked | 3 months | Quick weeknight sides |
Nutritional Information
Per Slice (based on 16 slices per batch)
| Nutrient | Amount | % Daily Value* |
|---|---|---|
| Calories | 95 | – |
| Carbohydrates | 17g | 6% |
| Protein | 3g | 6% |
| Fat | 1.5g | 2% |
| Fiber | 1g | 4% |
| Sodium | 240mg | 10% |
| Sugar | 0g | 0% |
*Based on a 2,000 calorie diet
💡 Note: This is an estimate and will vary based on exact measurements and slice size. Thicker slices = more calories, but also more happiness.
Leftovers and Storage
Fresh ciabatta is best eaten the day you bake it.
That crust just doesn’t stay crispy once it sits overnight. But life happens, so here’s how to handle leftovers.
Storage Guide
| Storage Method | How Long | Best Use |
|---|---|---|
| Paper bag, room temp | 2 days | Sandwiches, toast |
| Frozen (baked) | 3 months | Refresh in oven |
| Frozen (unbaked) | 2 months | Fresh-baked anytime |
🚫 Never use plastic bags – they make the crust soft and chewy in the wrong way. Paper bags or nothing.
♻️ Refresh day-old bread
Run it under water quickly (yes, really), shake off the excess, and pop it in a 350°F oven for 5 to 7 minutes.
The crust crisps right back up. It’s like a mini resurrection.
🥖 Turn stale bread into croutons
Cube them up and make croutons.
Toss with olive oil, salt, and garlic powder, then bake at 375°F until golden and crunchy.
They last for weeks in an airtight container and are perfect for salads or soups.
Honestly better than store-bought.
What to Serve With Ciabatta
This bread is incredible with so many things. Here are my favorites.
Breakfast Ideas 🍳
The Ultimate Avocado Toast
Slice it thick, toast it, and top with mashed avocado, a poached egg, and everything bagel seasoning.
The sturdy texture holds up to all those toppings without getting soggy.
I make this at least twice a week.
Ricotta & Honey
Toast a slice, spread with fresh ricotta, drizzle with honey, and add a pinch of flaky sea salt.
Sweet, creamy, and way fancier than it has any right to be for a 2-minute breakfast.
Lunch & Dinner Pairings 🥪
Italian Sub Supreme
This makes the best sandwich bread.
I’m talking Italian subs loaded with salami, mortadella, provolone, and giardiniera.
The bread is sturdy enough to hold everything without falling apart.
Simple Caprese
Fresh mozzarella, tomatoes, basil, and a drizzle of balsamic.
Sometimes simple is best.
Soup’s Best Friend
Serve it alongside any pasta dish. It’s perfect for soaking up leftover sauce.
I also love it with hearty soups: minestrone, ribollita, or even just a good tomato soup.
Just Bread, Elevated 🧈
And honestly? Sometimes I just eat it warm with really good butter and flaky sea salt.
That’s it.
Pure heaven.
The bread is good enough to stand on its own.
Pairing Suggestions
Wine & Drink Pairings
| Type | Recommendation | Why It Works |
|---|---|---|
| Red Wine | Chianti or Barbera | Light Italian reds complement without overpowering |
| White Wine | Pinot Grigio or Vermentino | Crisp acidity cuts through olive oil |
| Beer | Italian pilsner or wheat beer | Light, refreshing, classic combo |
| Non-alcoholic | Sparkling water with lemon | Cleanses palate between bites |
Perfect Dipping Combinations
Classic Italian Style
Mix good olive oil with balsamic vinegar, crushed red pepper, and dried oregano.
The vinegar adds tanginess, the red pepper gives it a kick.
Simple & Elegant
Just high-quality olive oil and coarse sea salt.
Sometimes the simplest things are the best. Let the bread shine.
Garlic Lover’s Dream
Roasted garlic cloves mashed into olive oil with fresh parsley.
Spreadable, garlicky heaven.
Cheese Board Essentials
Pair slices with:
- Aged Parmigiano-Reggiano (nutty, salty, pairs with everything)
- Creamy burrata (rich, luxurious, melts in your mouth)
- Spreadable goat cheese (tangy, smooth, easy to spread)
Add some honey, fig jam, and marcona almonds for the full experience.
Soup Pairings That Hit Different
This bread is made for dipping. The open crumb soaks up broth like a dream.
| Soup | Why It’s Perfect |
|---|---|
| Italian wedding soup | Meatballs + greens + ciabatta = comfort |
| Pasta e fagioli | Bean soup needs crusty bread |
| Minestrone | Vegetable goodness with every dip |
| Tomato basil | Classic combo, never gets old |
Troubleshooting Common Issues
When Things Go Wrong (And How to Fix Them)
❌ Problem: Dough too sticky to handle
✅ Solution: Remember, ciabatta dough is supposed to be very wet. Use a well-floured surface and bench scraper. If it’s literally soup, you might need to add 2 to 3 tablespoons more flour, but be conservative. When in doubt, it’s better too wet than too dry.
❌ Problem: Bread came out flat
✅ Solution: This usually means the dough over-proofed. If it sat too long during the final rise, the gluten structure weakened. Next time, bake it when it’s just puffy, not doubled in size. Set a timer so you don’t forget about it.
❌ Problem: Dense crumb with no holes
✅ Solution: You might have added too much flour or handled the dough too roughly when shaping. Those air pockets are fragile. Treat the dough gently, especially after the overnight rise. Think of it like handling a water balloon.
❌ Problem: Crust not crispy
✅ Solution: Your oven probably wasn’t hot enough, or you skipped the steam. Make sure you preheat for at least 30 minutes and spray that water right when the bread goes in. A pizza stone also helps create a crispier bottom crust.
❌ Problem: Tastes bland
✅ Solution: The overnight fermentation is crucial for flavor development. If you rushed it or shortened the fridge time, the bread won’t have that characteristic tangy taste. Also, make sure you’re using enough salt. 2 teaspoons might seem like a lot, but it’s necessary.
Remember: Baking is part science, part art. Your first loaf might not be perfect, and that’s totally fine. Each time you make it, you’ll get better at reading the dough and knowing when it’s ready.
FAQ
Your Ciabatta Questions, Answered
🤔 Can I make ciabatta without a stand mixer?
Yes, absolutely.
This recipe is mixed by hand. Ciabatta doesn’t need kneading like other breads.
The stretch and fold technique builds all the structure you need. I’ve never used a stand mixer for this, and I’ve made it dozens of times.
💧 Why is my ciabatta dough so wet compared to other bread recipes?
That’s the whole point of ciabatta.
The high hydration (around 75 to 80% water to flour ratio) creates those big, irregular holes in the crumb.
It feels wrong at first, but trust the process. Wet dough = airy bread.
🌡️ How do I know when the bread is fully baked?
Look for three signs:
- Deep golden brown all over
- Sounds hollow when you tap the bottom
- Internal temp around 205°F on an instant-read thermometer
Underbaked ciabatta will be gummy inside. Nobody wants that.
🌾 Can I use all-purpose flour instead of bread flour?
You can, but the texture won’t be quite as chewy.
Bread flour has more protein, which creates better gluten structure.
If you only have all-purpose, it’ll still work. Just expect a slightly less airy crumb.
❄️ Do I really need to refrigerate the dough overnight?
Technically no, but you really should.
The cold fermentation develops so much more flavor and makes the dough easier to handle.
I’ve made same-day ciabatta in a pinch, and it’s fine, but not nearly as good. The overnight rise is where ciabatta becomes ciabatta.
🔥 My oven doesn’t go up to 475°F. What should I do?
Bake at whatever your max temperature is, and add 5 to 10 minutes to the baking time.
The crust won’t be quite as dramatic, but it’ll still be tasty.
You might also want to use a pizza stone to help create more bottom heat.
🫒 Can I add mix-ins like cheese or olives?
Definitely.
Just fold them in gently after the first rise, before the overnight refrigeration.
Pat wet ingredients dry first to avoid adding too much extra moisture. And don’t go overboard – ½ cup max or you’ll weigh down the dough.
🍞 What’s the difference between ciabatta and focaccia?
Both are Italian breads with olive oil in the dough, but there are key differences:
| Feature | Ciabatta | Focaccia |
|---|---|---|
| Shape | Free-form loaves | Baked in a pan |
| Oil content | Less oil | Lots of oil |
| Texture | Irregular, open crumb | Denser, more uniform |
| Toppings | Usually plain | Often topped with herbs, tomatoes, etc. |
Think of focaccia as ciabatta’s more structured, oil-loving cousin.
Wrapping Up
Making your own ciabatta bread at home is one of those things that feels impossible until you actually do it.
The first time I pulled a golden, crackling loaf out of my oven, I couldn’t believe I’d made it myself. Now it’s become one of my go-to weekend baking projects.
Give this recipe a try and don’t stress about making it perfect. The beauty of ciabatta is in its rustic, imperfect look. Those irregular holes and craggy surface are what make it special.
Once you’ve made yours, come back and let me know how it went. Did you add any fun mix-ins? What did you eat it with? I love hearing about your baking experiments.


